SCHOOLEASY / CONNECTED SCHOOL OPERATIONS

A clearer view.
A better school day.

Bring student records, people, attendance, teaching and assessment into connected workspaces built around the way your school operates.

Desktop + AndroidLocalhost · LAN · WANMulti-campus options
SchoolEasy / Administration hub
SchoolEasy system administration hub Take a closer look
Your departments, connected through a central workspace.
FROM FIRST ADMISSION TO FINAL REPORT

Follow the work.
Understand every window.

Start with permanent student and staff records. Organize the academic term, plan teaching, capture attendance and marks, then prepare reports and identity cards. The guide below explains each supplied application view and the task it supports.

44 application views8 workflow areas Full-size previews
THE PRODUCT, IN DETAIL

Explore the SchoolEasy workspace

Choose a workflow, or browse the complete window guide. Select any screenshot to enlarge it.

WORKFLOW / ACCESS

Workspace & access

Sign in to your workspace

Choose your server, department and role before signing in.

SchoolEasy: Sign in to your workspace Click to enlarge
Sign in to your workspace · Desktop application

What this window does

The login window brings connection settings and staff access into one place. Users select a local or remote server, choose their department and role, then enter their credentials. Separate registration and account recovery tabs support the account lifecycle.

Your workflow

  1. Select the server that matches your installation.
  2. Choose your department and assigned role; subject teachers can specify their subject code.
  3. Enter your credentials to open your workspace.
Back to workflow navigation ↑

System administration hub

A central starting point for school operations.

SchoolEasy: System administration hub Click to enlarge
System administration hub · Desktop application

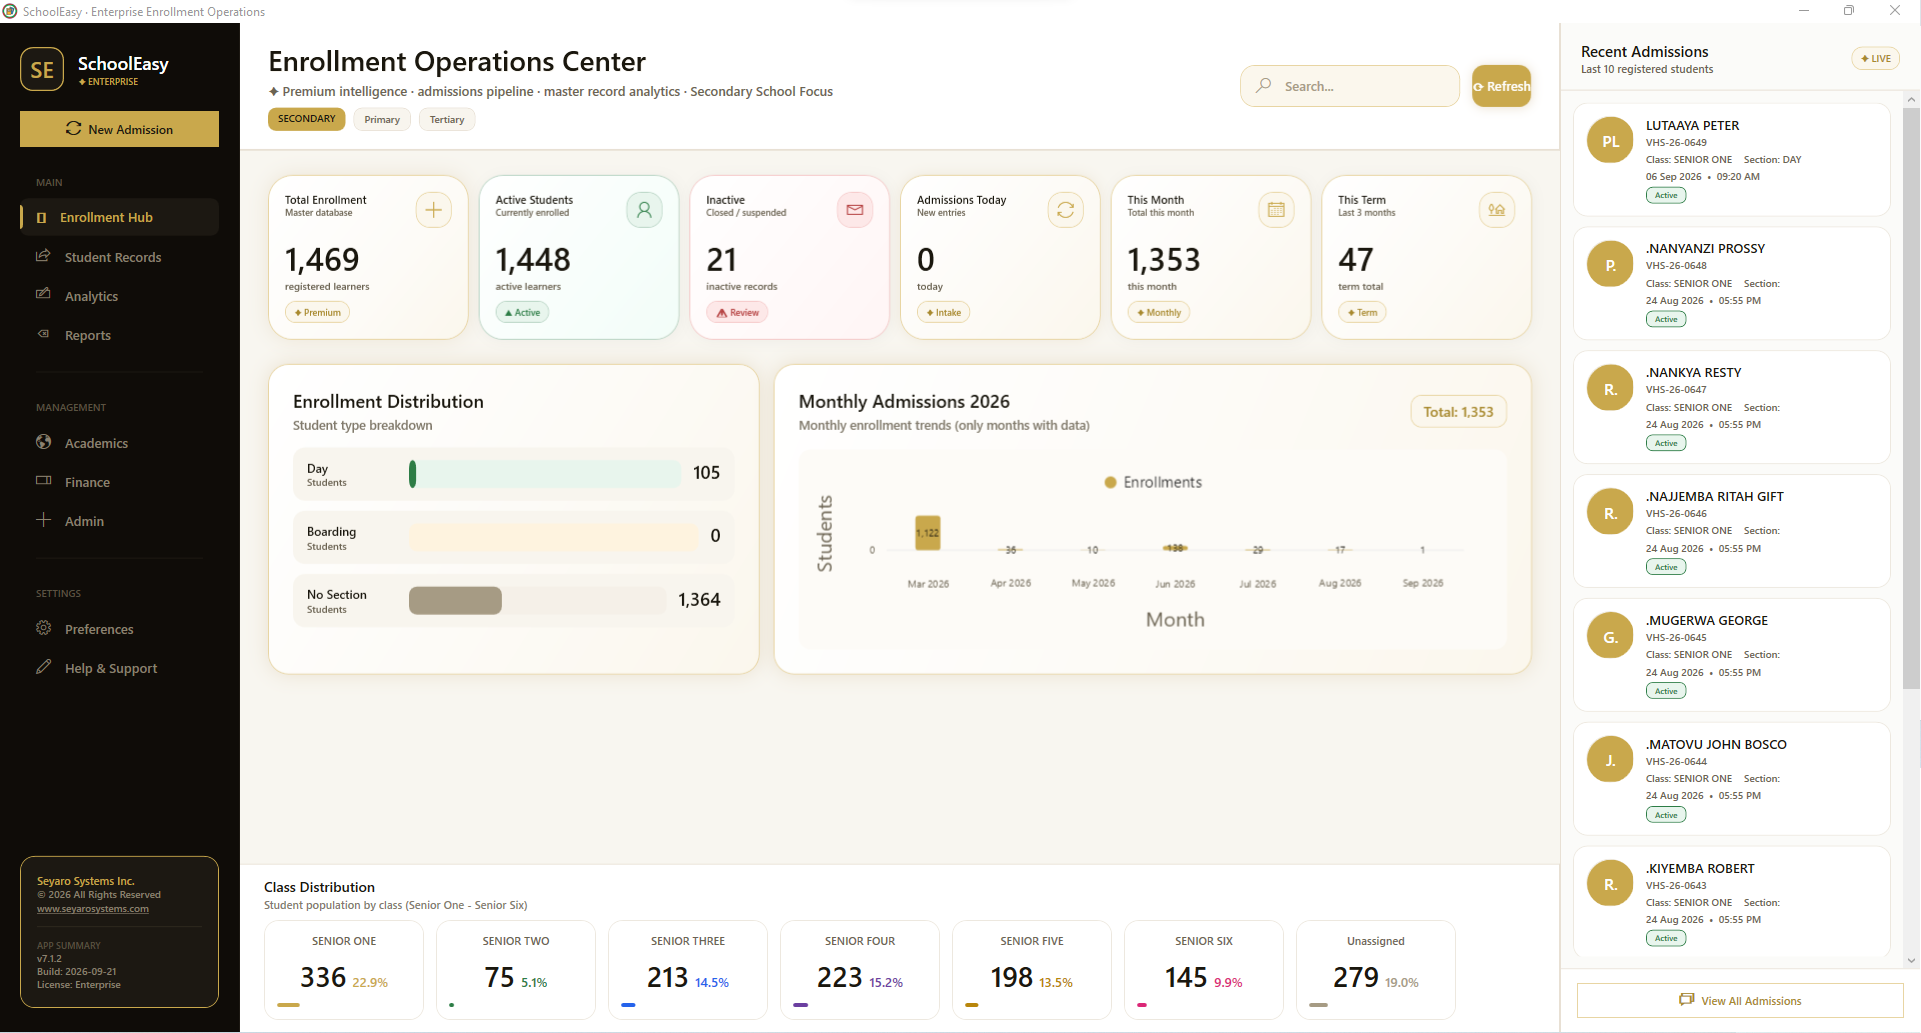
What this window does

The hub connects enrollment, assessment, attendance, finance, staff, timetables and identification. Summary cards, enrollment and fee charts, a calendar and recent activity help administrators decide where to work next without opening every department.

Your workflow

  1. Review the school overview and recent activity.
  2. Open the department you need from the navigation.
  3. Use the calendar and operational summaries to plan follow-up work.
Back to workflow navigation ↑
WORKFLOW / ENROLLMENT

Enrollment & families

Enrollment operations center

Monitor admissions and open student records.

SchoolEasy: Enrollment operations center Click to enlarge
Enrollment operations center · Desktop application

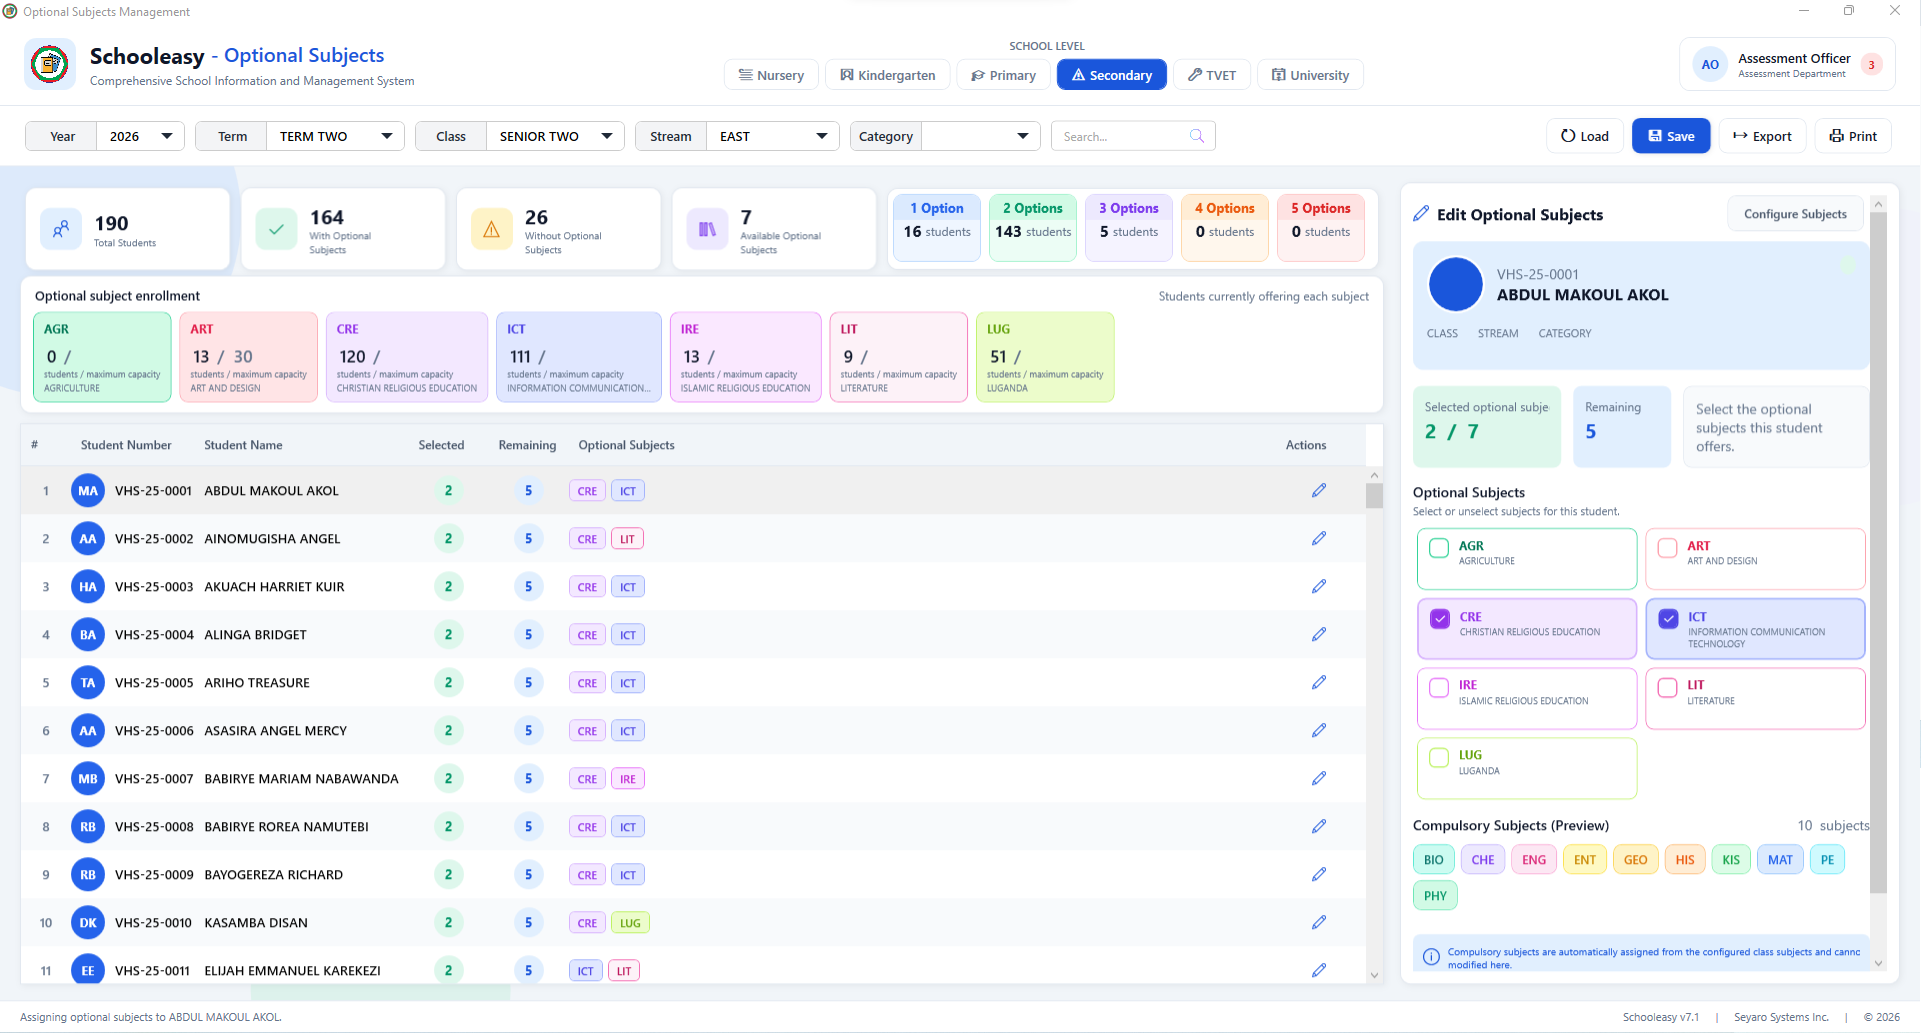
What this window does

Enrollment staff can review active and inactive students, admissions over different periods and day or boarding distribution. Class summaries and recent admissions provide context before opening a new admission or the student master register.

Your workflow

  1. Check admissions for the relevant period.
  2. Review class and residential distributions.
  3. Open a new admission or search the master register.
Back to workflow navigation ↑

Student master register

Maintain the permanent student profile in one workspace.
SchoolEasy: Student master register Click to enlarge
Student master register · Desktop application

What this window does

The register combines a searchable student table with a selected-student editor. Personal details, photographs, class information, house, category, identifiers and status are visible together. The toolbar provides record saving, import, export, print and photo actions.

Your workflow

  1. Find a student in the master table.
  2. Review personal details and enrollment information in the side editor.
  3. Save the record or use the available import, export and print tools.
Back to workflow navigation ↑

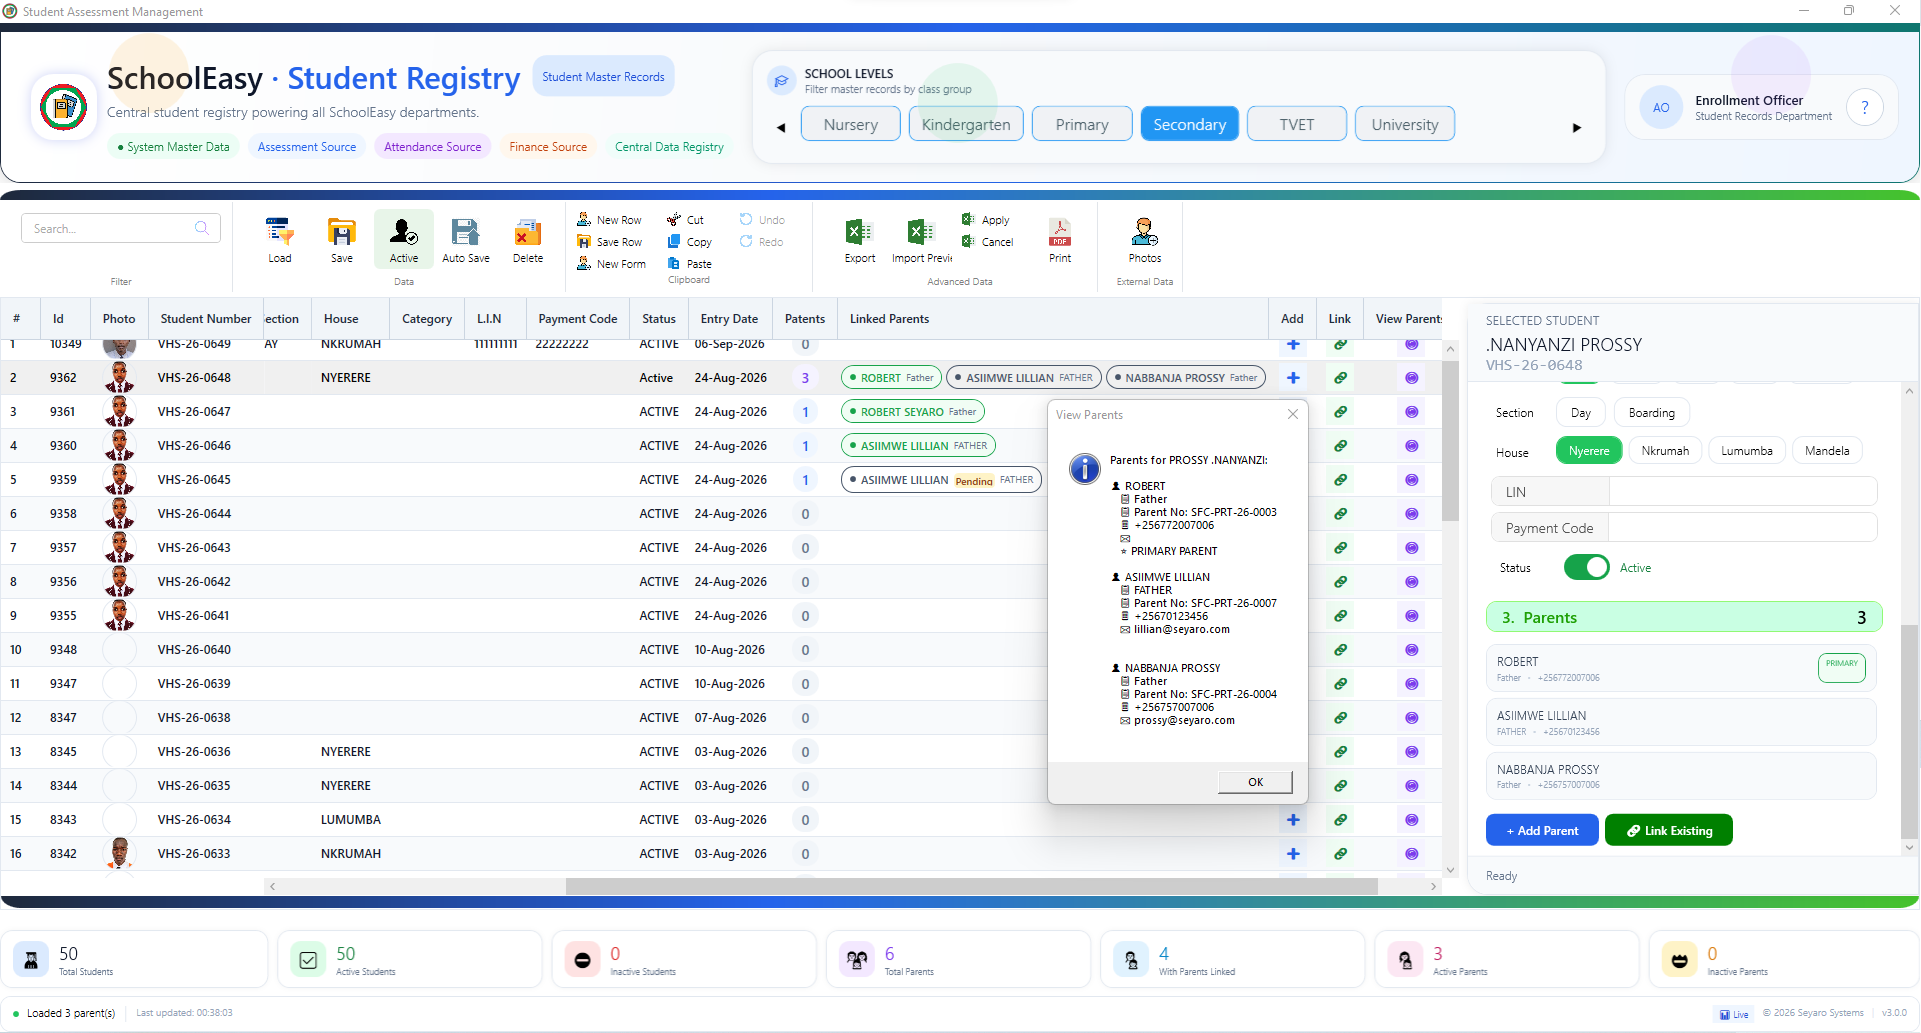
Parents and student relationships

Connect students with their parents and guardians.

SchoolEasy: Parents and student relationships Click to enlarge
Parents and student relationships · Desktop application

What this window does

Parent chips and the linked-parent panel make the relationship between a student and their contacts visible. Staff can inspect existing links, add or link a parent and identify the primary parent. This view complements the student's permanent record.

Your workflow

  1. Select the student whose contacts need updating.
  2. Inspect the linked-parent list and primary contact.
  3. Add or link the appropriate parent record and review the relationship.
Back to workflow navigation ↑

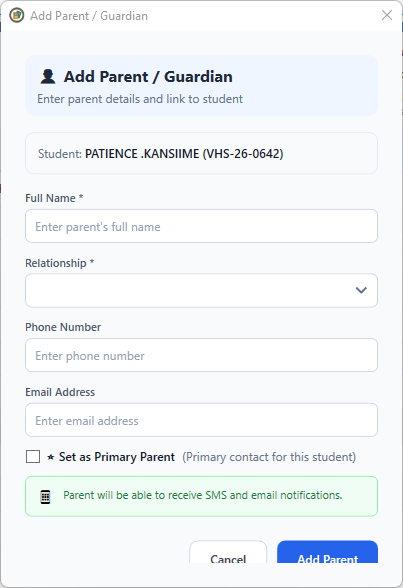
Add a parent or guardian

Create a contact and link it to the selected student.

SchoolEasy: Add a parent or guardian Click to enlarge
Add a parent or guardian · Desktop application

What this window does

The parent form captures a name, relationship, phone number and email address for the selected student. A primary-parent option identifies the main contact. Keeping the relationship and contact details together helps staff establish who should be contacted about the student.

Your workflow

  1. Confirm the student shown at the top of the form.
  2. Enter the guardian's details and relationship.
  3. Choose whether this is the primary parent, then add the record.
Back to workflow navigation ↑

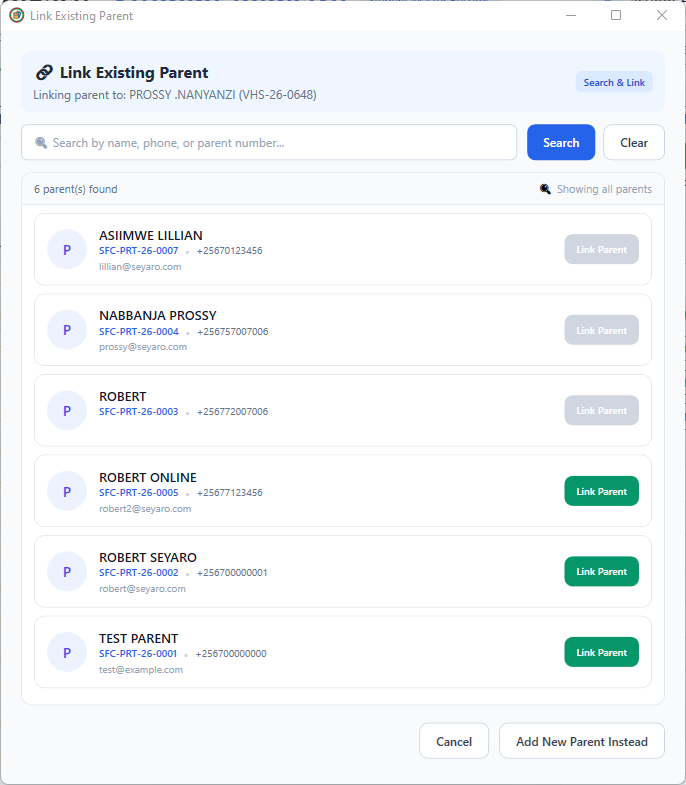
Link an existing parent

Reuse an existing parent record for another student.

SchoolEasy: Link an existing parent Click to enlarge
Link an existing parent · Desktop application

What this window does

The search window finds parent records by name, phone number or parent number. Each result shows identifying contact details and a link action. This workflow helps staff connect an existing family contact to the selected student without creating a duplicate; a separate action is available when a new parent really is needed.

Your workflow

  1. Search for the student's parent or guardian.
  2. Check the matching record's identity and contact details.
  3. Link the appropriate existing parent, or choose Add New Parent Instead.
Back to workflow navigation ↑

Prepare the term register

Choose the academic context before loading records.

SchoolEasy: Prepare the term register Click to enlarge
Prepare the term register · Desktop application

What this window does

The starting view of Student Term Records guides staff through selecting a year, term and class context. Its preparation workflow highlights newly enrolled students and gaps from previous terms so staff can review exceptions before synchronizing eligible students.

Your workflow

  1. Select the academic year, term and student filters.
  2. Review new admissions and previous-term gaps.
  3. Approve the relevant synchronization before continuing to the register.
Back to workflow navigation ↑

Student term records

Manage enrollment details for a specific term.

SchoolEasy: Student term records Click to enlarge
Student term records · Desktop application

What this window does

The loaded term register presents students in a grid with a selected-student editor. Year, term, class, stream, house, category and status describe the student's placement for that academic period, keeping term operations distinct from permanent student details.

Your workflow

  1. Load the required year and term.
  2. Filter the class or stream and inspect a student.
  3. Update term placement and save the changes.
Back to workflow navigation ↑

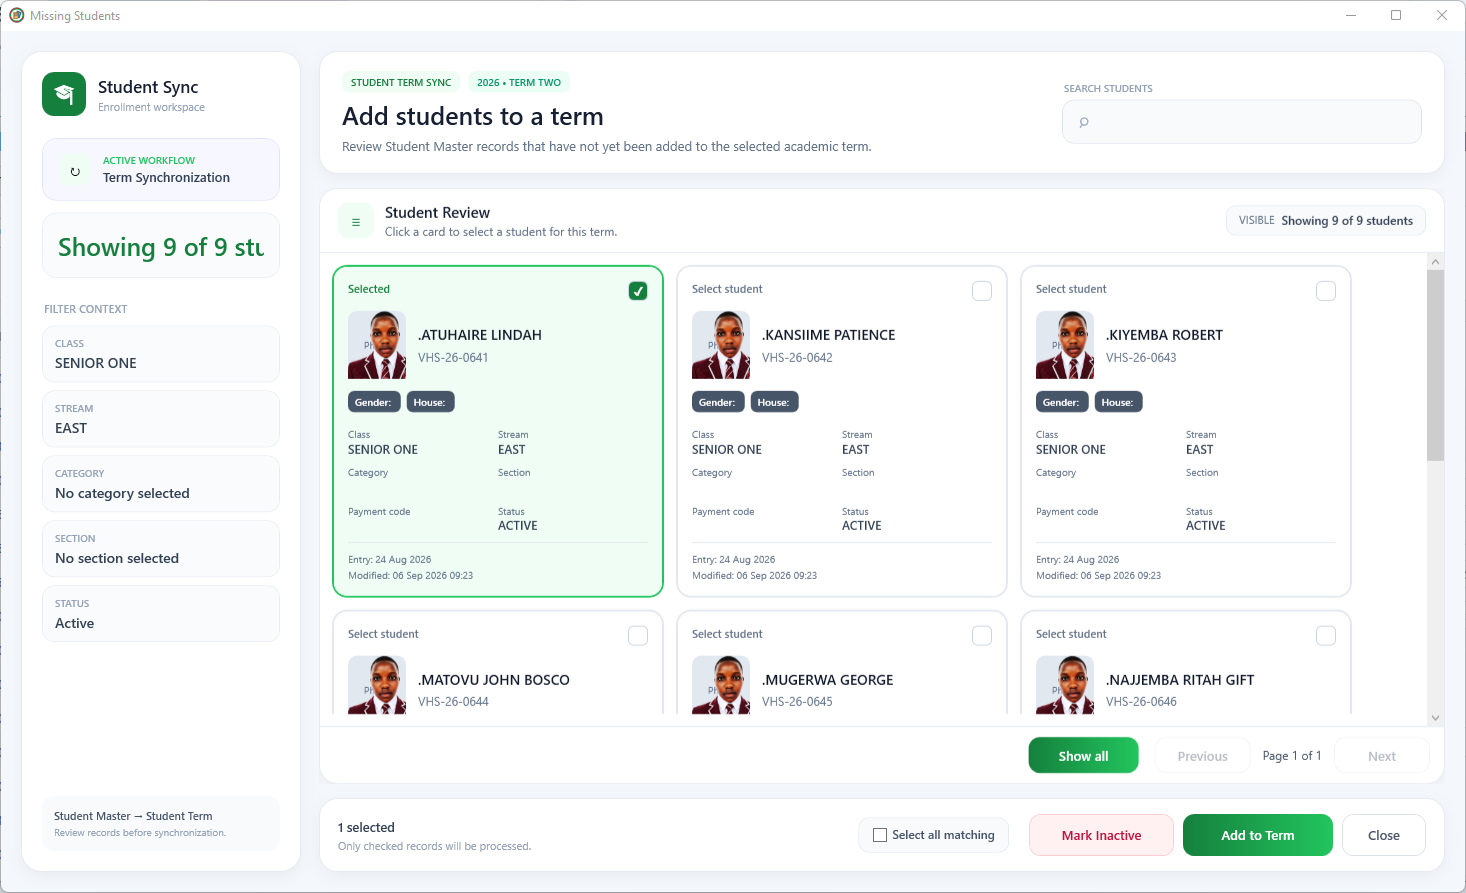
Add students to a term

Review eligible students before including them.

SchoolEasy: Add students to a term Click to enlarge
Add students to a term · Desktop application

What this window does

Student Sync lists master records missing from the selected term. Search, filters and selection controls help staff choose who to include. This is a deliberate review step for building the term register, with actions for adding selected students and managing status.

Your workflow

  1. Set the destination term and placement filters.
  2. Search and select the eligible students.
  3. Review the selection before adding it to the term.
Back to workflow navigation ↑

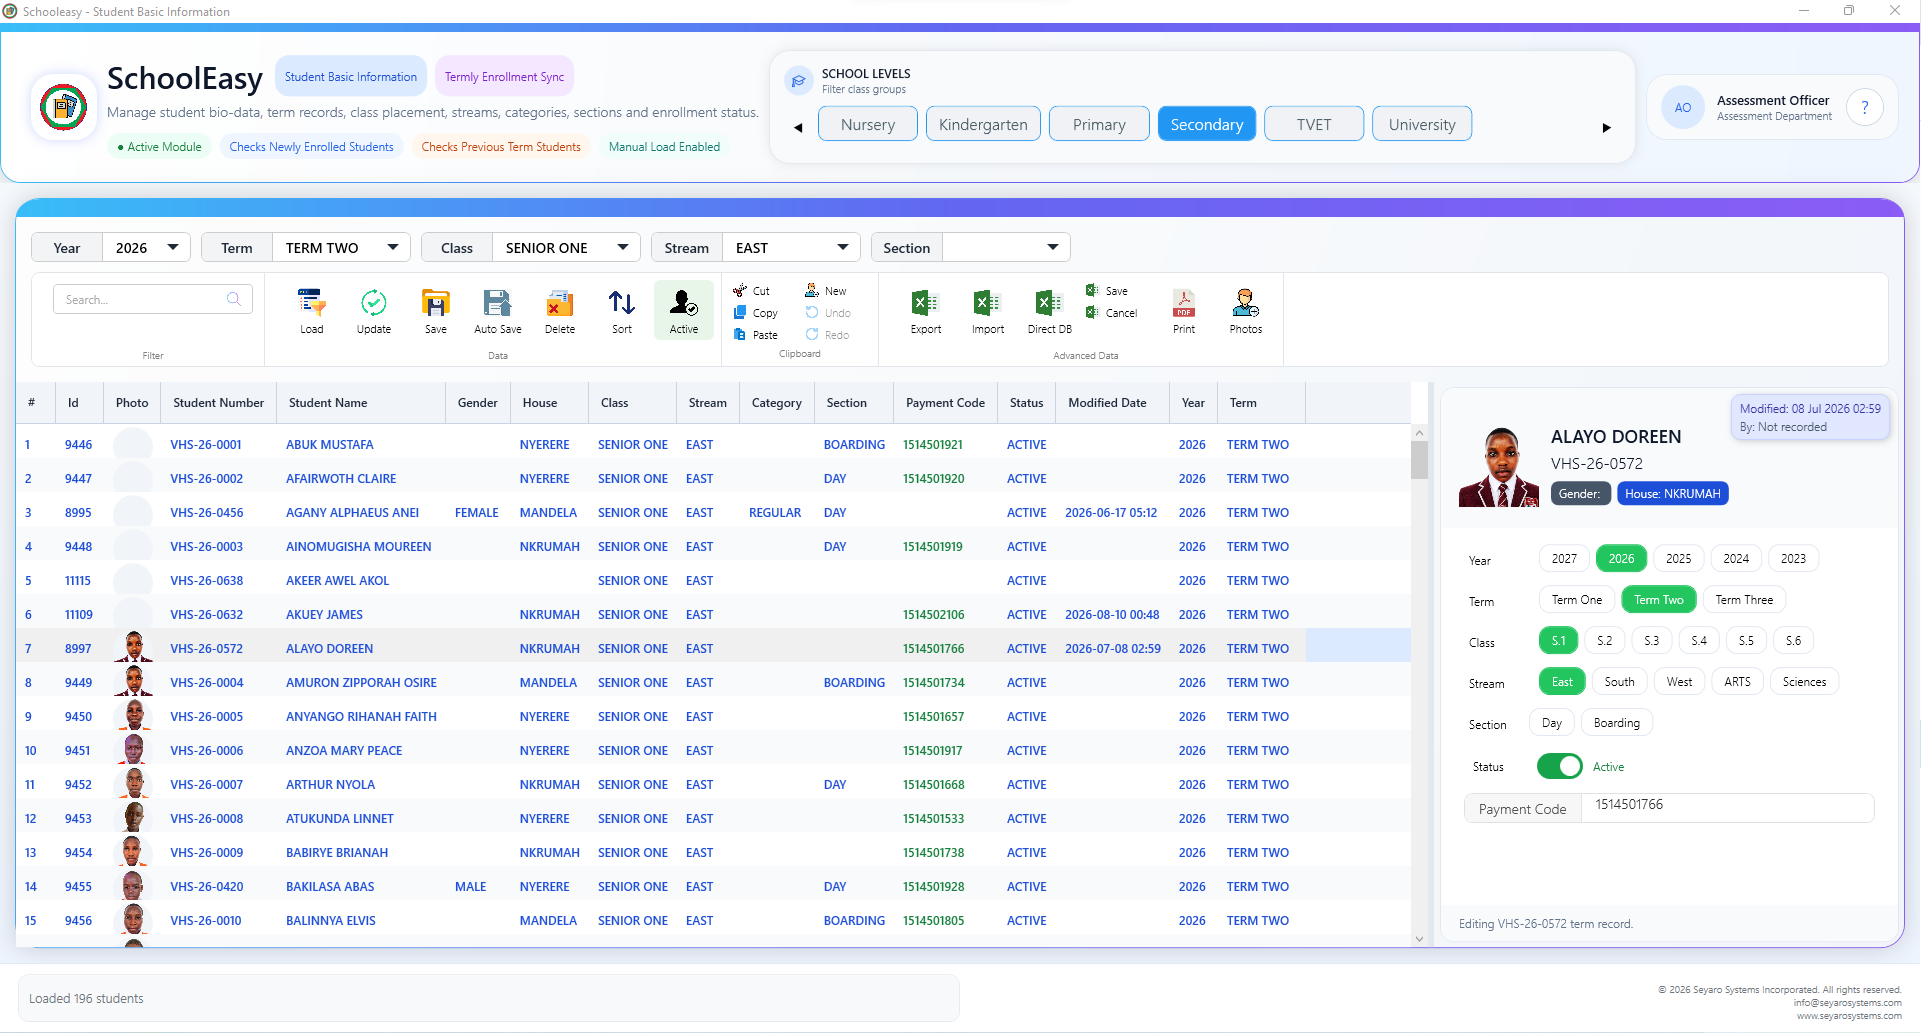
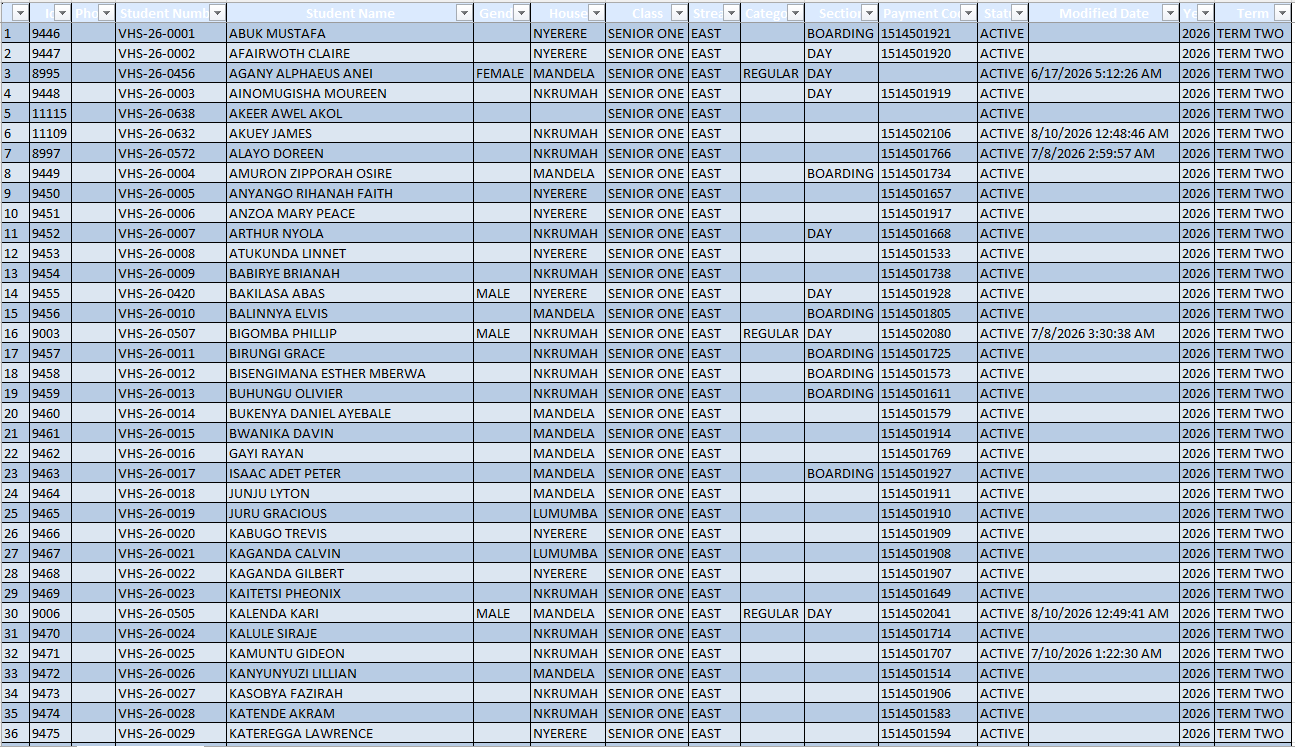
Student records in table view

Inspect student and term fields side by side.

SchoolEasy: Student records in table view Click to enlarge
Student records in table view · Desktop application

What this window does

This close-up shows a dense student records table, including student numbers, names, gender, house, class, stream, section, payment codes, status and modification dates. It illustrates how administrative fields can be reviewed together across a group of students.

Your workflow

  1. Use the column headings to understand each field.
  2. Compare placement, status and identifiers across the rows.
  3. Return to the relevant student editor when a record needs correction.
Back to workflow navigation ↑
WORKFLOW / STAFF

Staff & responsibilities

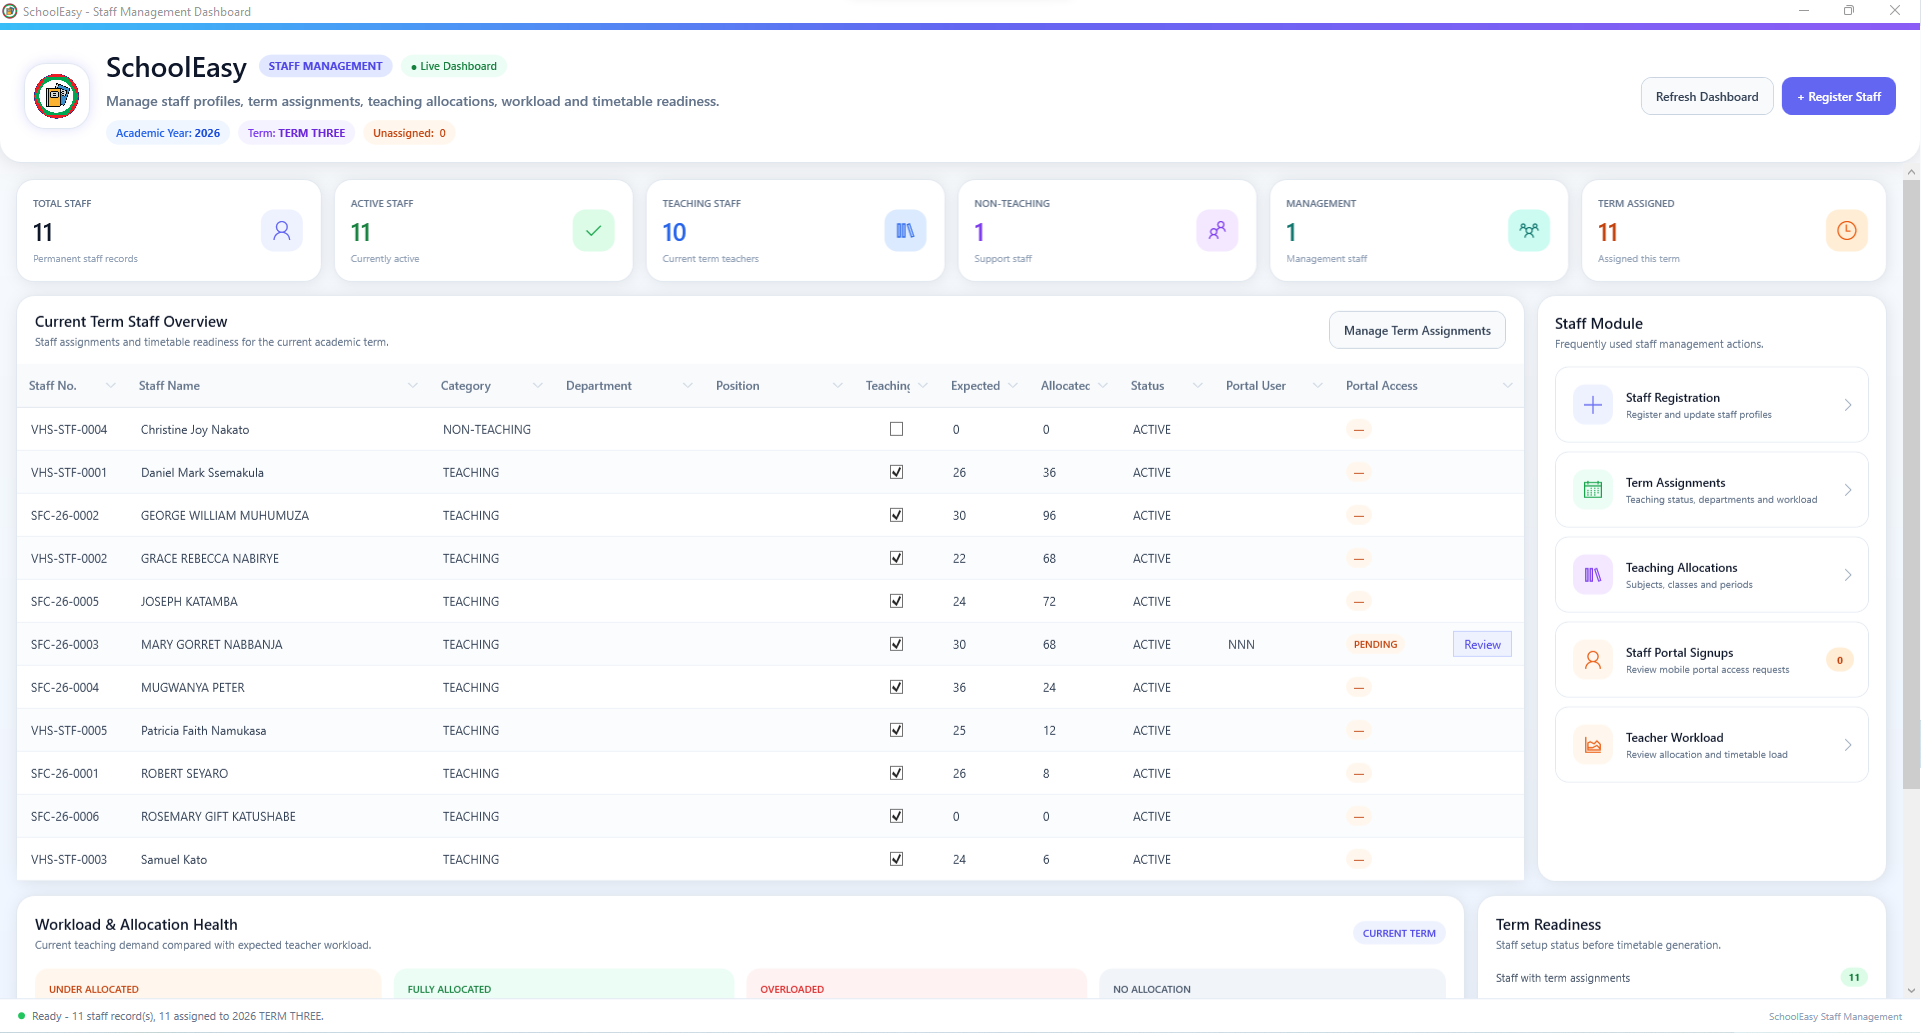
Staff operations dashboard

Review staffing, assignments and workload coverage.

SchoolEasy: Staff operations dashboard Click to enlarge
Staff operations dashboard · Desktop application

What this window does

The dashboard combines staff totals with categories, departments, positions, expected workload, allocated workload and portal access. Shortcuts connect registration, term assignments, teaching allocations and signup review so administrators can move from an overview to the underlying task.

Your workflow

  1. Select the working year and term.
  2. Review teaching, non-teaching and management coverage.
  3. Open the appropriate registration, allocation or access workflow.
Back to workflow navigation ↑

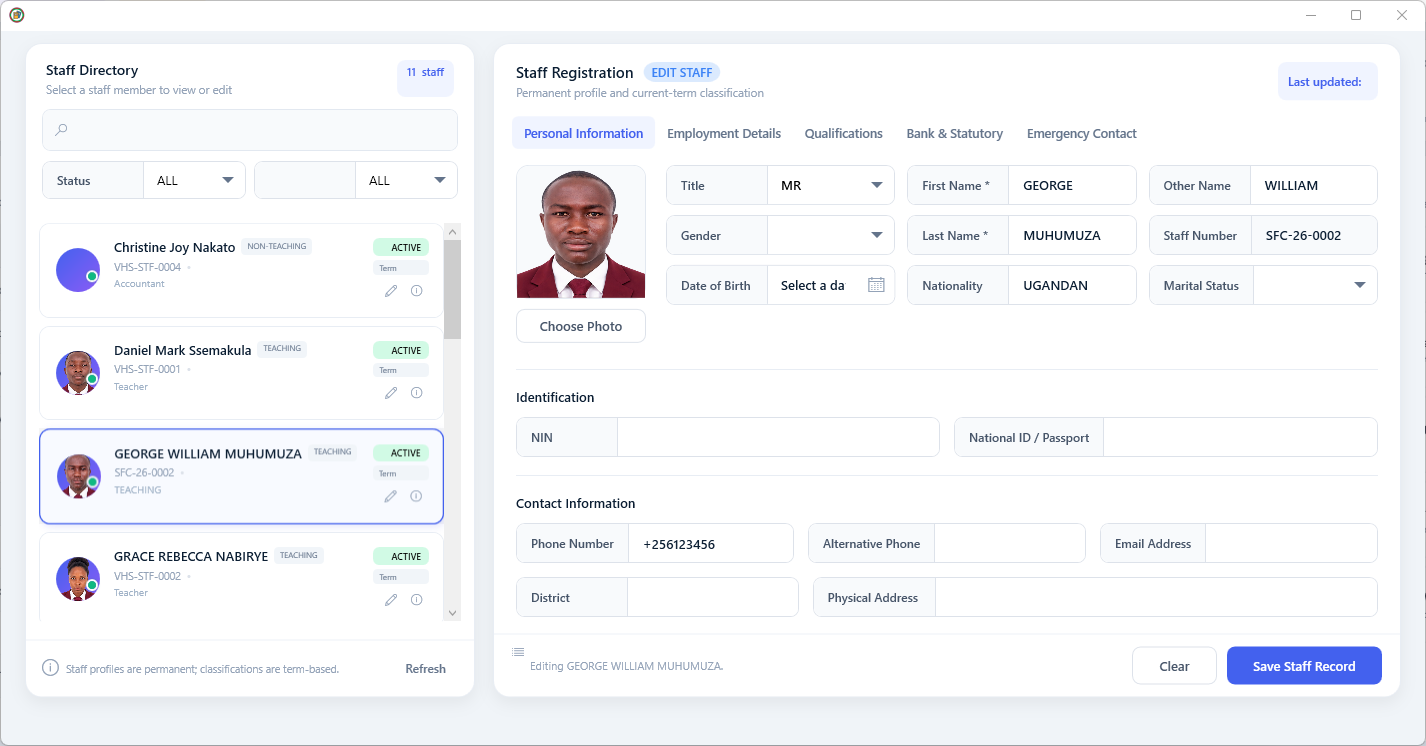
Staff directory and registration

Create and maintain a complete staff profile.

SchoolEasy: Staff directory and registration Click to enlarge
Staff directory and registration · Desktop application

What this window does

Staff registration keeps a searchable directory beside the personal-information editor. Additional tabs organize employment, qualifications, bank and statutory information, and emergency contacts. This permanent profile provides the foundation for later term assignments.

Your workflow

  1. Find an existing staff member or begin a new profile.
  2. Complete the relevant personal and employment tabs.
  3. Review the details and save the staff record.
Back to workflow navigation ↑

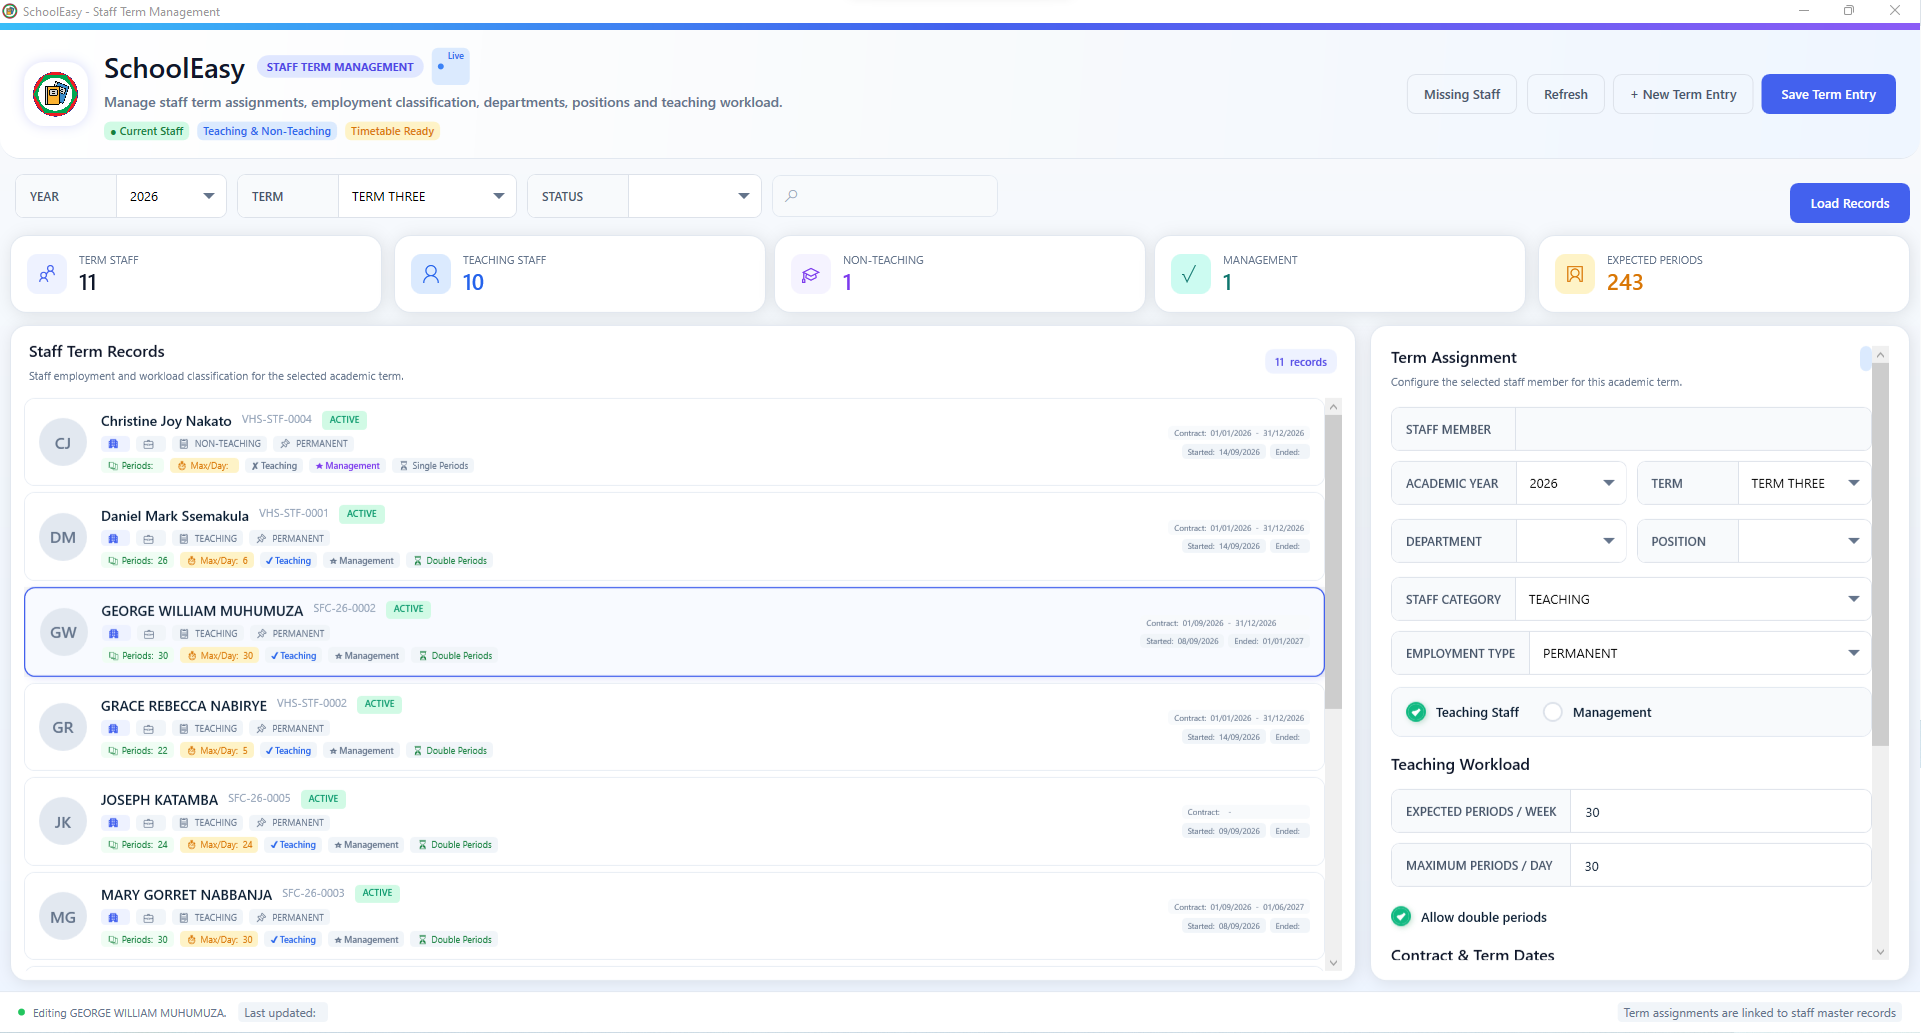
Staff term assignments

Set responsibilities and teaching workload by term.

SchoolEasy: Staff term assignments Click to enlarge
Staff term assignments · Desktop application

What this window does

This workspace assigns a staff member to an academic period, department, position, category and employment type. Teaching workload settings include expected weekly periods, daily limits and double-period preferences, helping prepare the inputs used in timetable planning.

Your workflow

  1. Load staff for the selected academic period.
  2. Set the selected staff member's term responsibilities and workload.
  3. Save the term entry before proceeding to teaching allocations.
Back to workflow navigation ↑

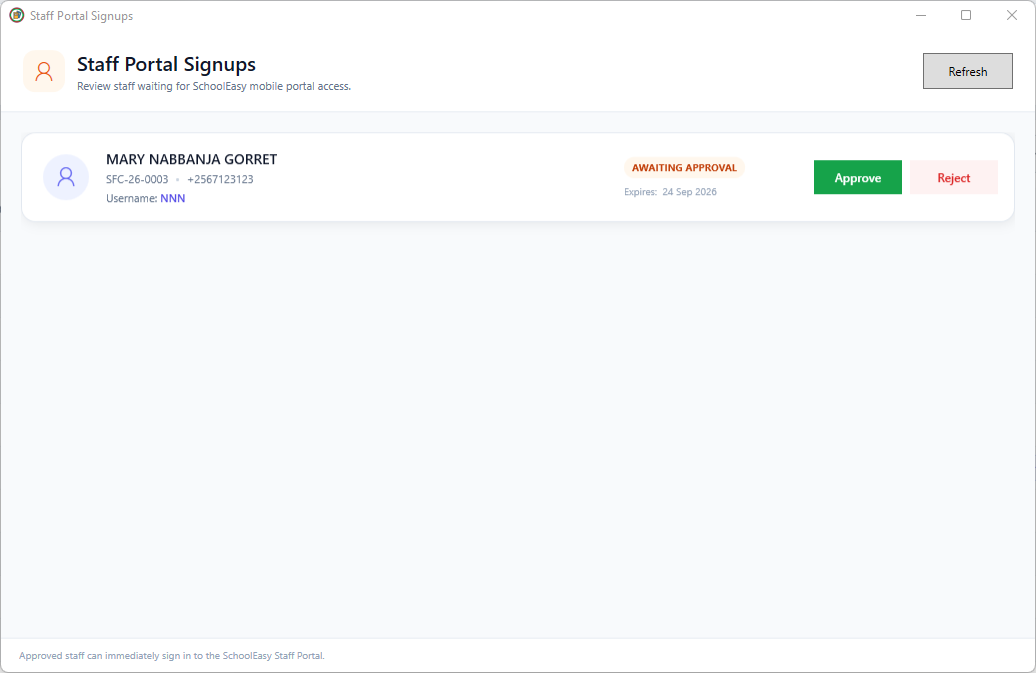
Staff portal signup review

Approve or reject staff access requests.

SchoolEasy: Staff portal signup review Click to enlarge
Staff portal signup review · Desktop application

What this window does

The signup window lists staff waiting for portal access, alongside their identity, username, request status and expiry information. Administrators can review each request and explicitly approve or reject it rather than treating a signup as immediate access.

Your workflow

  1. Refresh the pending signup list.
  2. Check the staff identity and requested username.
  3. Approve or reject the request after review.
Back to workflow navigation ↑
WORKFLOW / ATTENDANCE

Attendance

Daily attendance register

Record attendance for a selected day and session.

SchoolEasy: Daily attendance register Click to enlarge
Daily attendance register · Desktop application

What this window does

The daily register brings student attendance and class totals into the same view. Staff can select the academic context and date, mark present or absent, and see unmarked entries. Bulk actions support a whole class or selected students; saving commits the changes.

Your workflow

  1. Choose the date, class, stream and session.
  2. Mark attendance individually or use the bulk actions.
  3. Check unmarked entries, then save or export the register.
Back to workflow navigation ↑

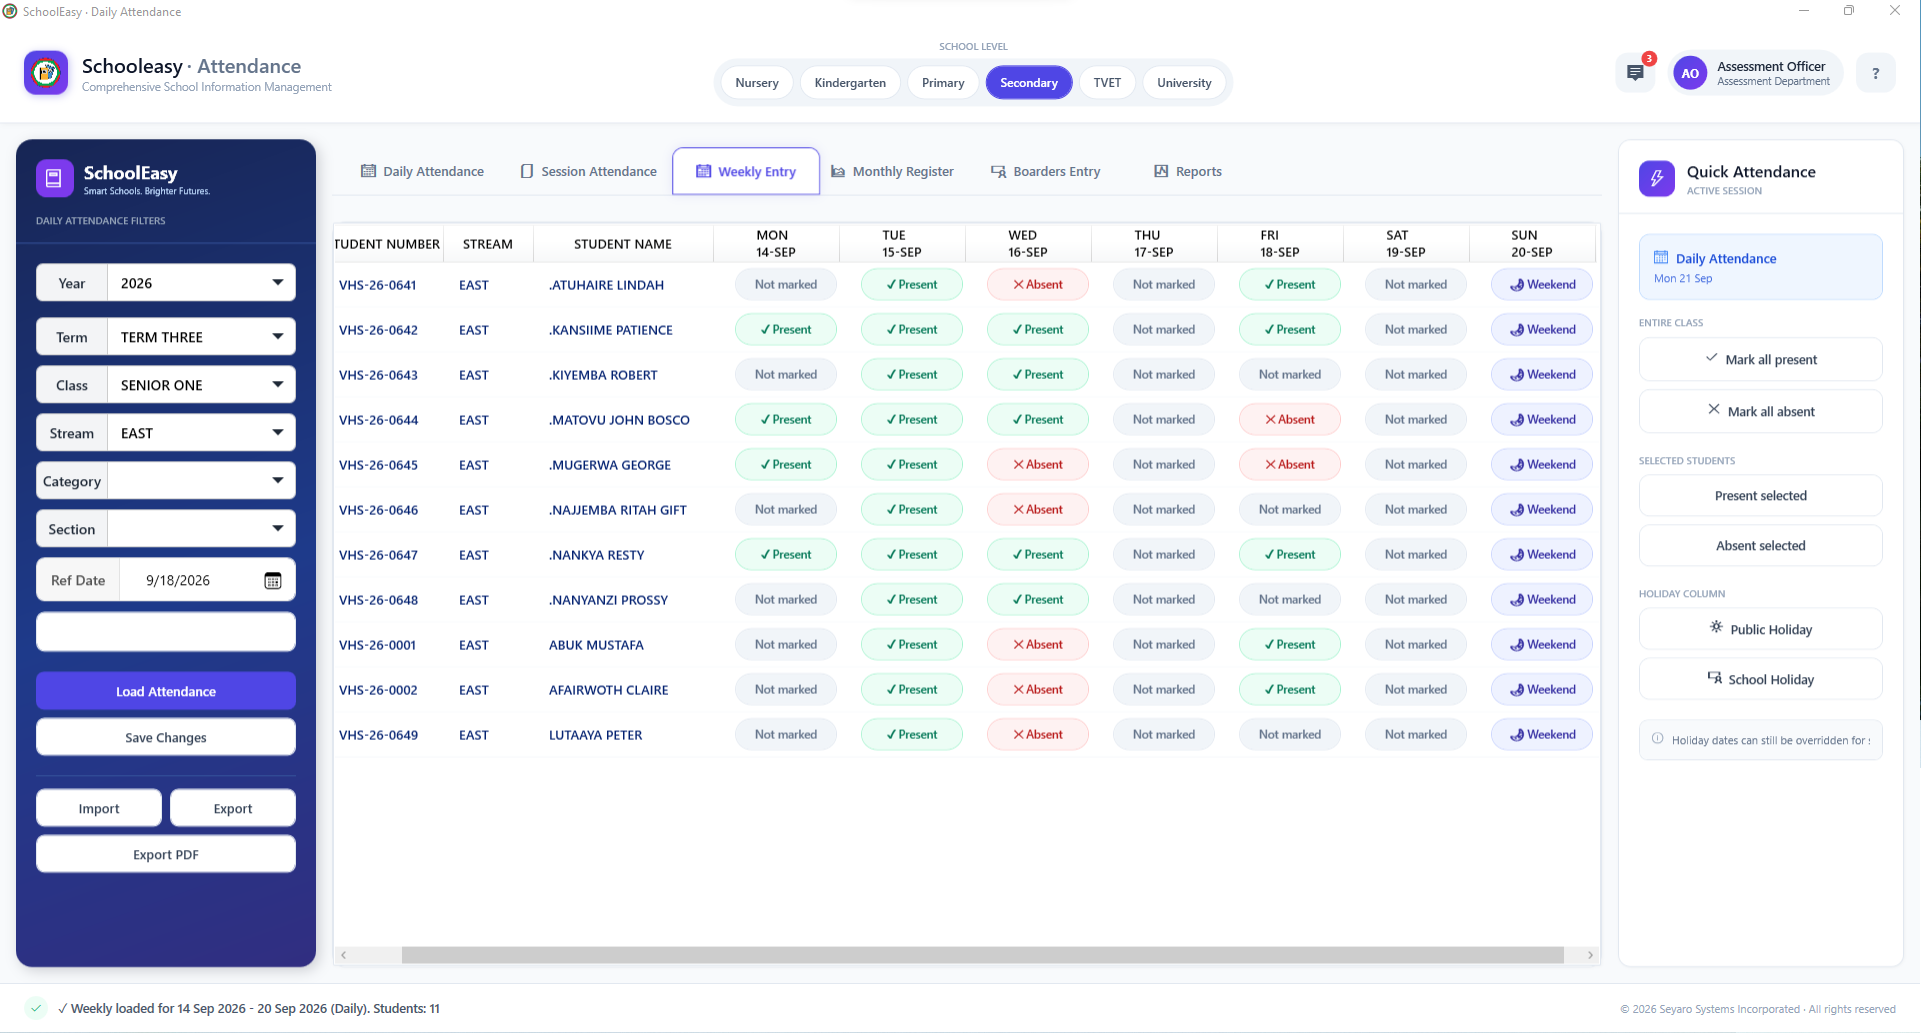
Weekly attendance entry

Work through the week's register in one grid.

SchoolEasy: Weekly attendance entry Click to enlarge
Weekly attendance entry · Desktop application

What this window does

A student-by-day matrix shows attendance across the week, including weekends. Selected-student, whole-class and selected-day actions reduce repetitive entry, while the filters keep work scoped to the correct school group and week.

Your workflow

  1. Select the week and class context.
  2. Review the daily cells and apply the appropriate attendance status.
  3. Check the week and save the changes.
Back to workflow navigation ↑

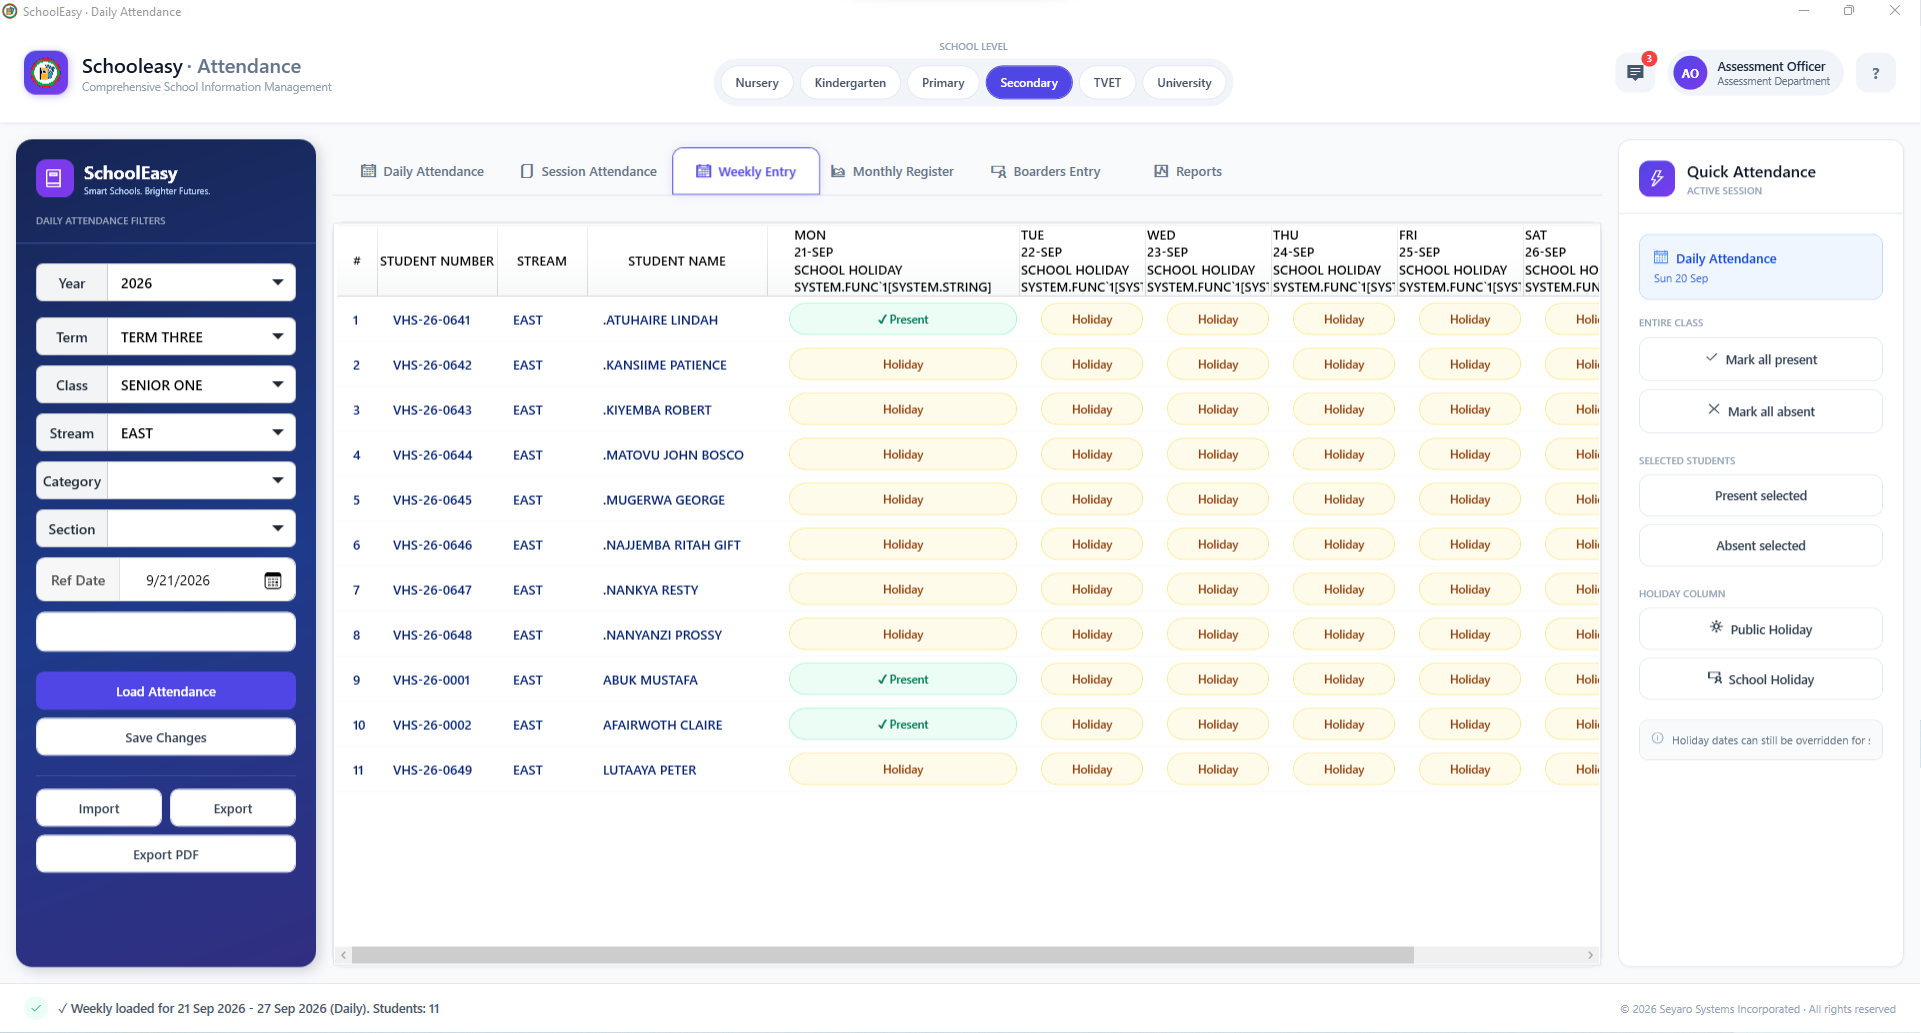
Holiday-aware attendance

Represent closures clearly in the weekly register.

SchoolEasy: Holiday-aware attendance Click to enlarge
Holiday-aware attendance · Desktop application

What this window does

This view demonstrates holiday markers within the weekly attendance grid. Public or school holiday actions can apply to a selected day column, making scheduled closures distinguishable from absence and helping staff interpret the register correctly.

Your workflow

  1. Select the relevant week and day column.
  2. Apply the appropriate public or school holiday status.
  3. Review the affected cells and save the register.
Back to workflow navigation ↑

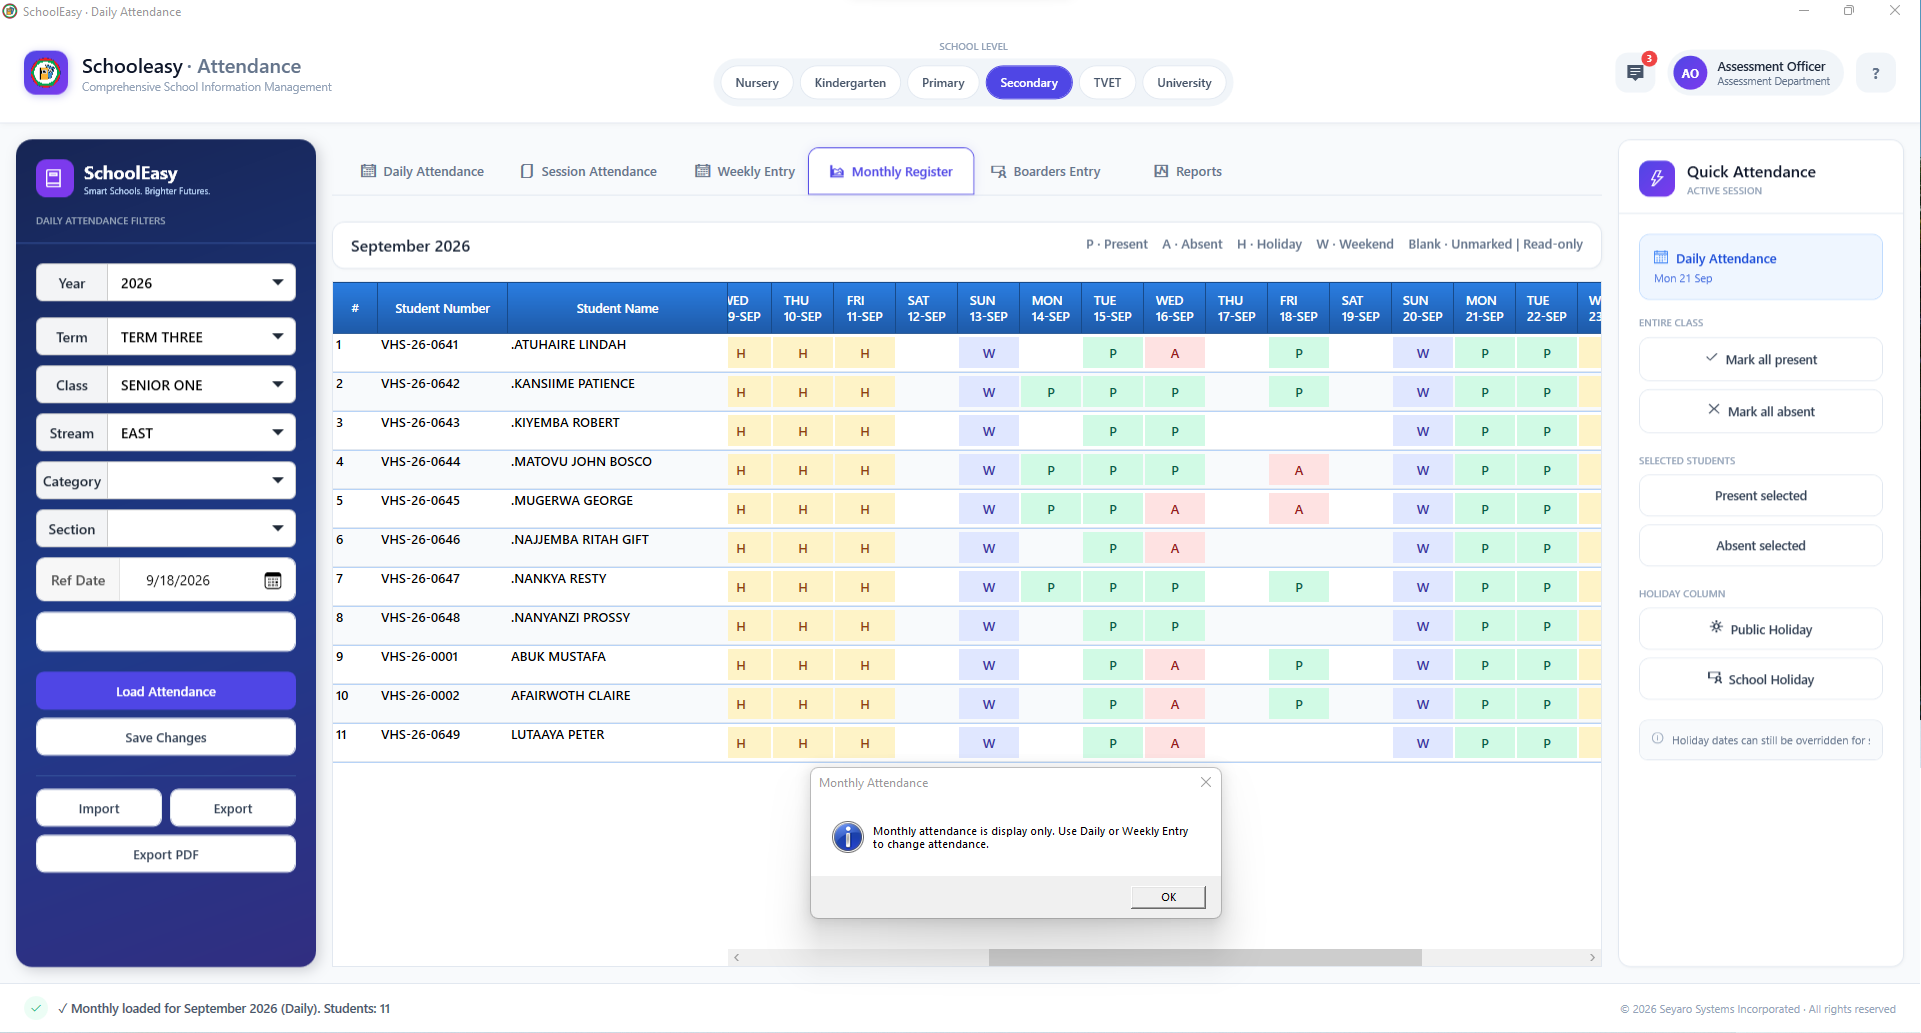
Monthly attendance overview

Read the attendance pattern across a whole month.

SchoolEasy: Monthly attendance overview Click to enlarge
Monthly attendance overview · Desktop application

What this window does

The monthly matrix uses a visible legend for present, absent, holidays, weekends and unmarked days. It is a display-only overview for reviewing patterns across students and dates. Attendance corrections are made in Daily or Weekly Entry, not in this monthly view.

Your workflow

  1. Choose the month and student group.
  2. Read the colored cells using the status legend.
  3. Open Daily or Weekly Entry when a correction is needed.
Back to workflow navigation ↑
WORKFLOW / TIMETABLE

Timetables & teaching

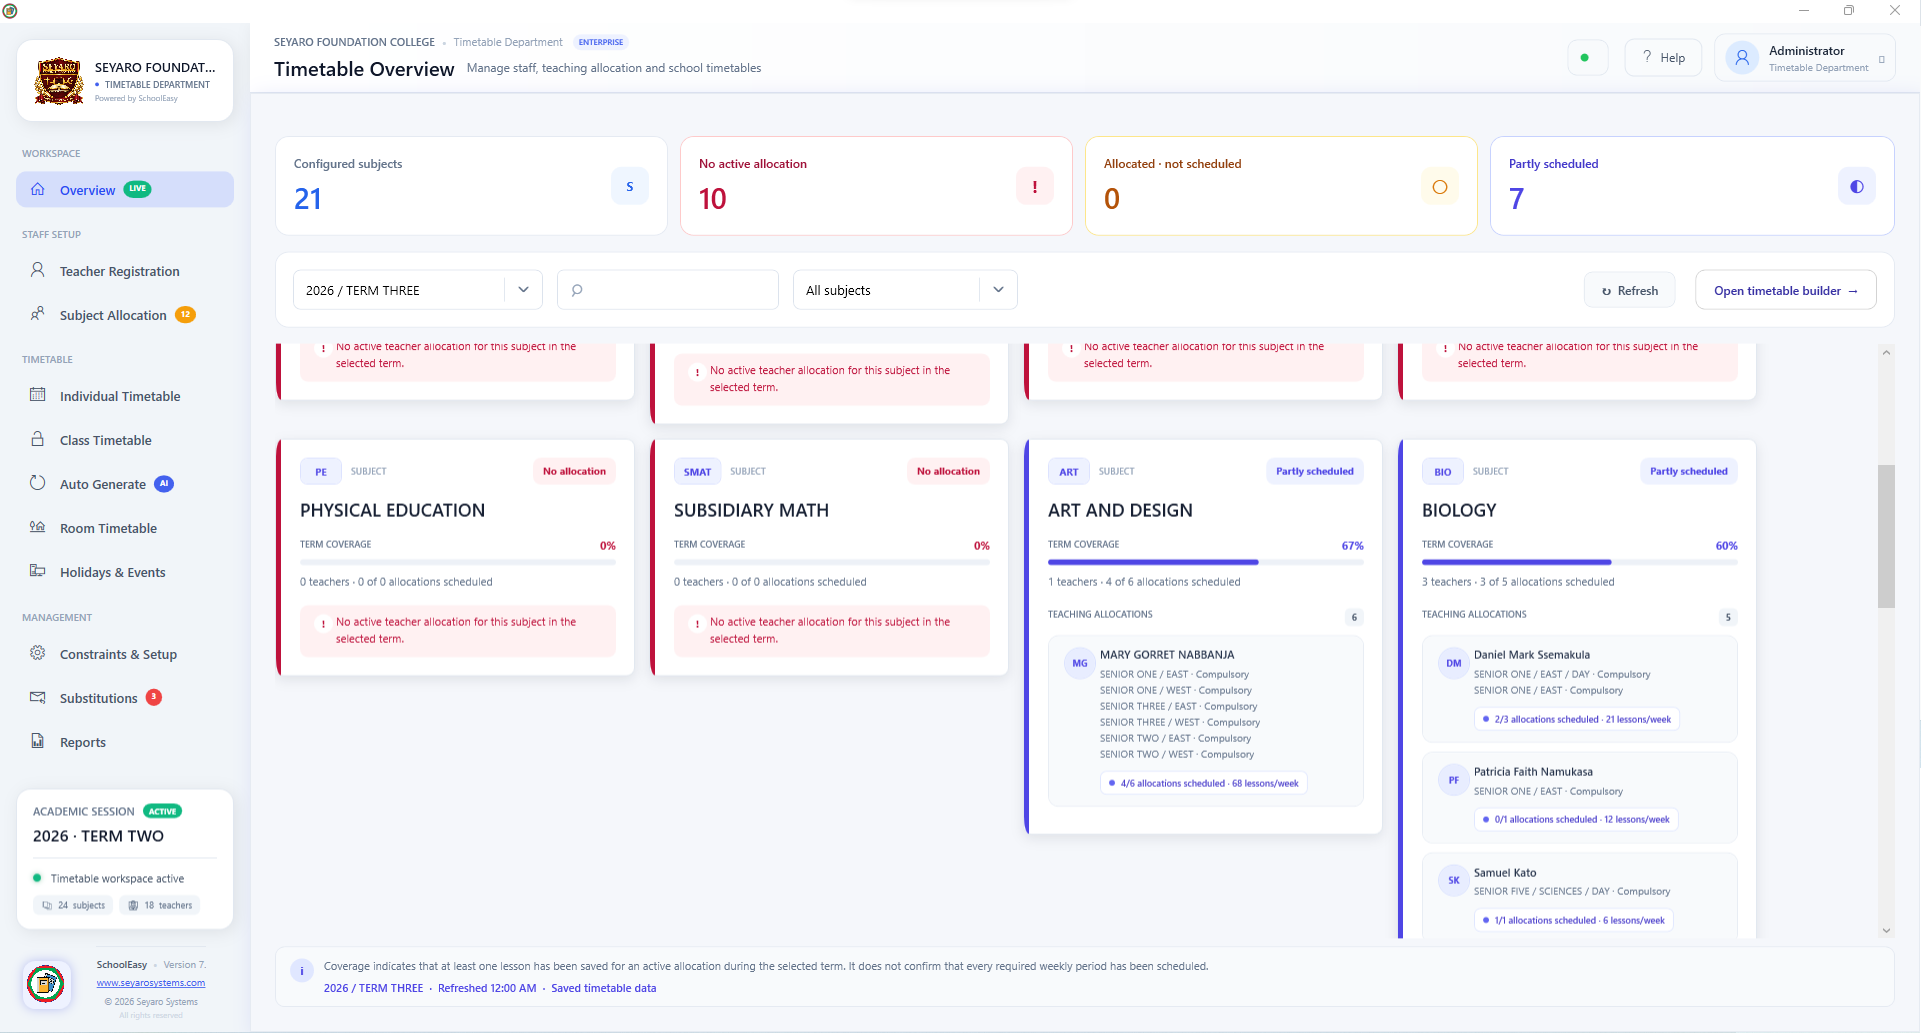
Timetable coverage overview

Find subjects without allocations or complete schedules.

SchoolEasy: Timetable coverage overview Click to enlarge
Timetable coverage overview · Desktop application

What this window does

The overview organizes subjects by allocation and scheduling progress. Coverage bars and subject cards identify missing teacher allocations and partly scheduled work, while a timetable-builder shortcut takes staff into planning. Allocation coverage and fully scheduled periods are separate checks.

Your workflow

  1. Select the year, term and subject filters.
  2. Review unallocated and partly scheduled subjects.
  3. Open allocations or the timetable builder to resolve the gaps.
Back to workflow navigation ↑

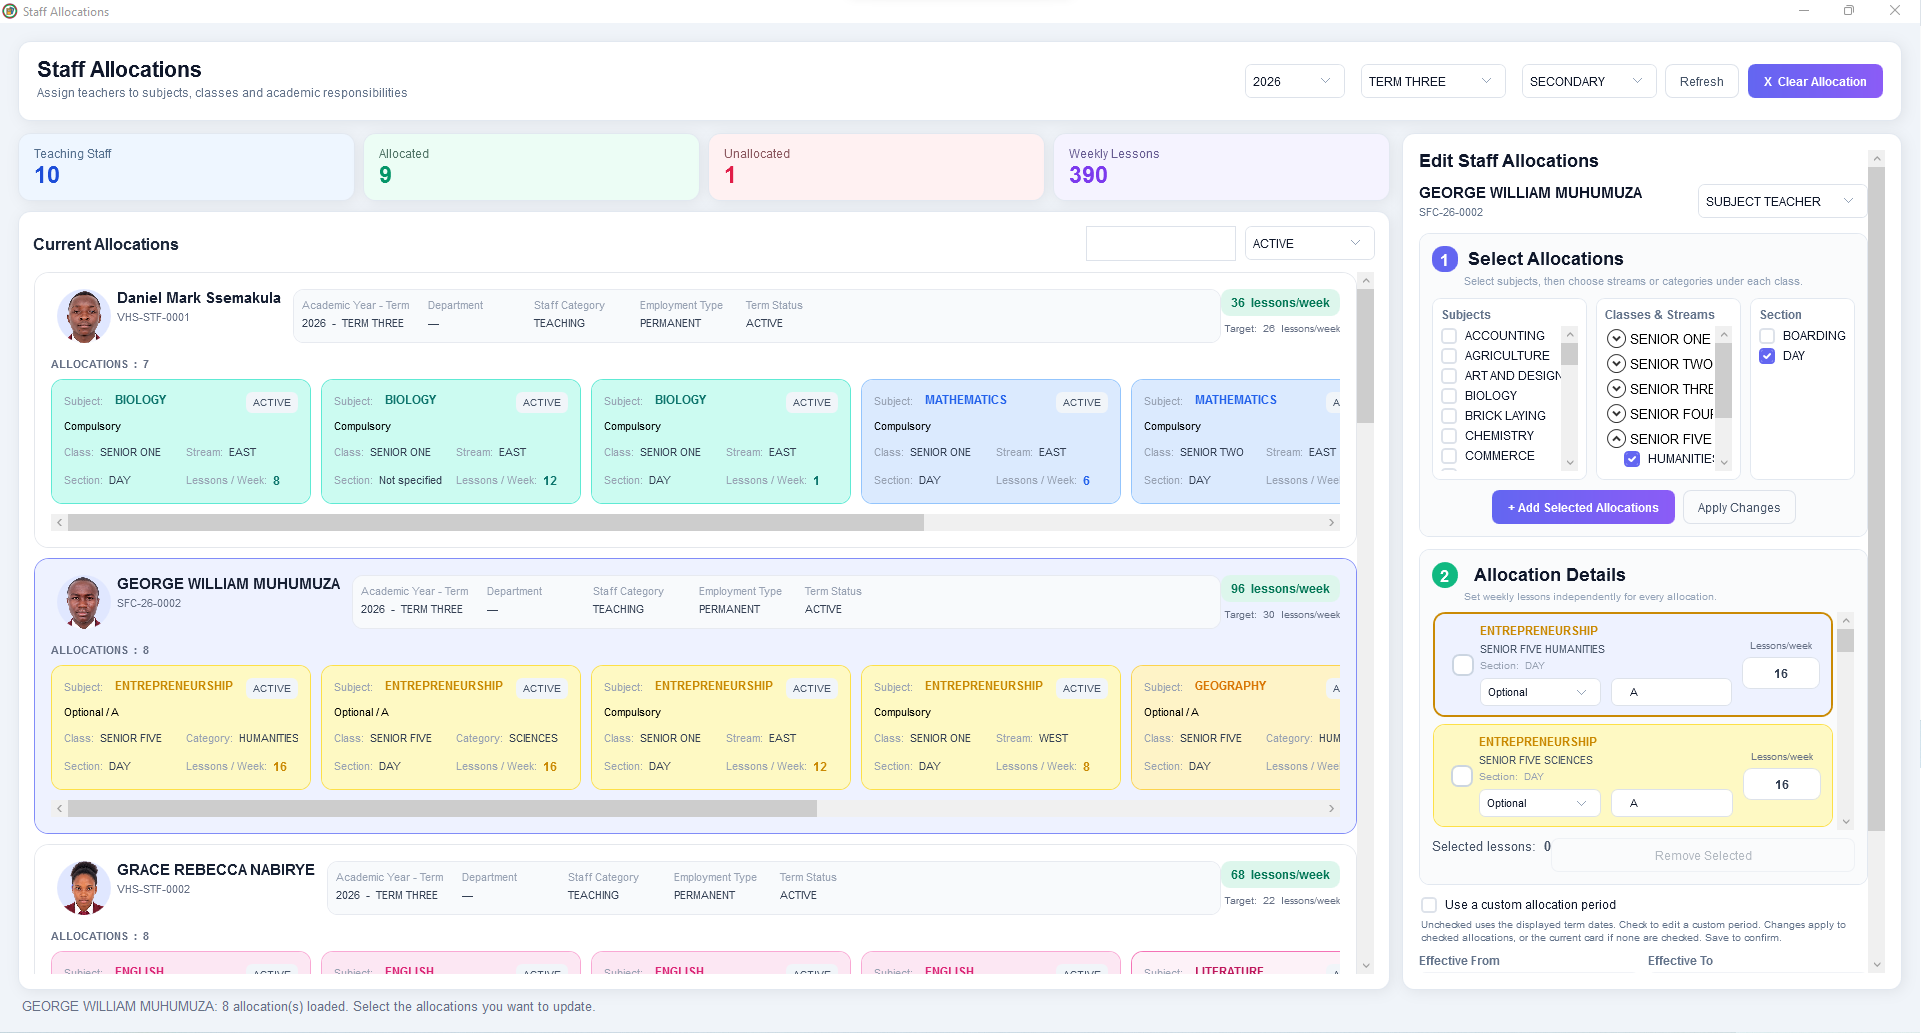
Teacher subject allocations

Assign subjects, classes and weekly lesson requirements.

SchoolEasy: Teacher subject allocations Click to enlarge
Teacher subject allocations · Desktop application

What this window does

Staff allocations connect teachers to subjects, classes, streams and sections. The editor includes lesson counts, optional-subject details and an optional custom allocation period. These assignments establish the teaching responsibilities that the timetable needs to place.

Your workflow

  1. Select a teacher and the appropriate subject and class groups.
  2. Set lesson requirements and any allocation dates.
  3. Apply the changes and check the teacher's total weekly load.
Back to workflow navigation ↑

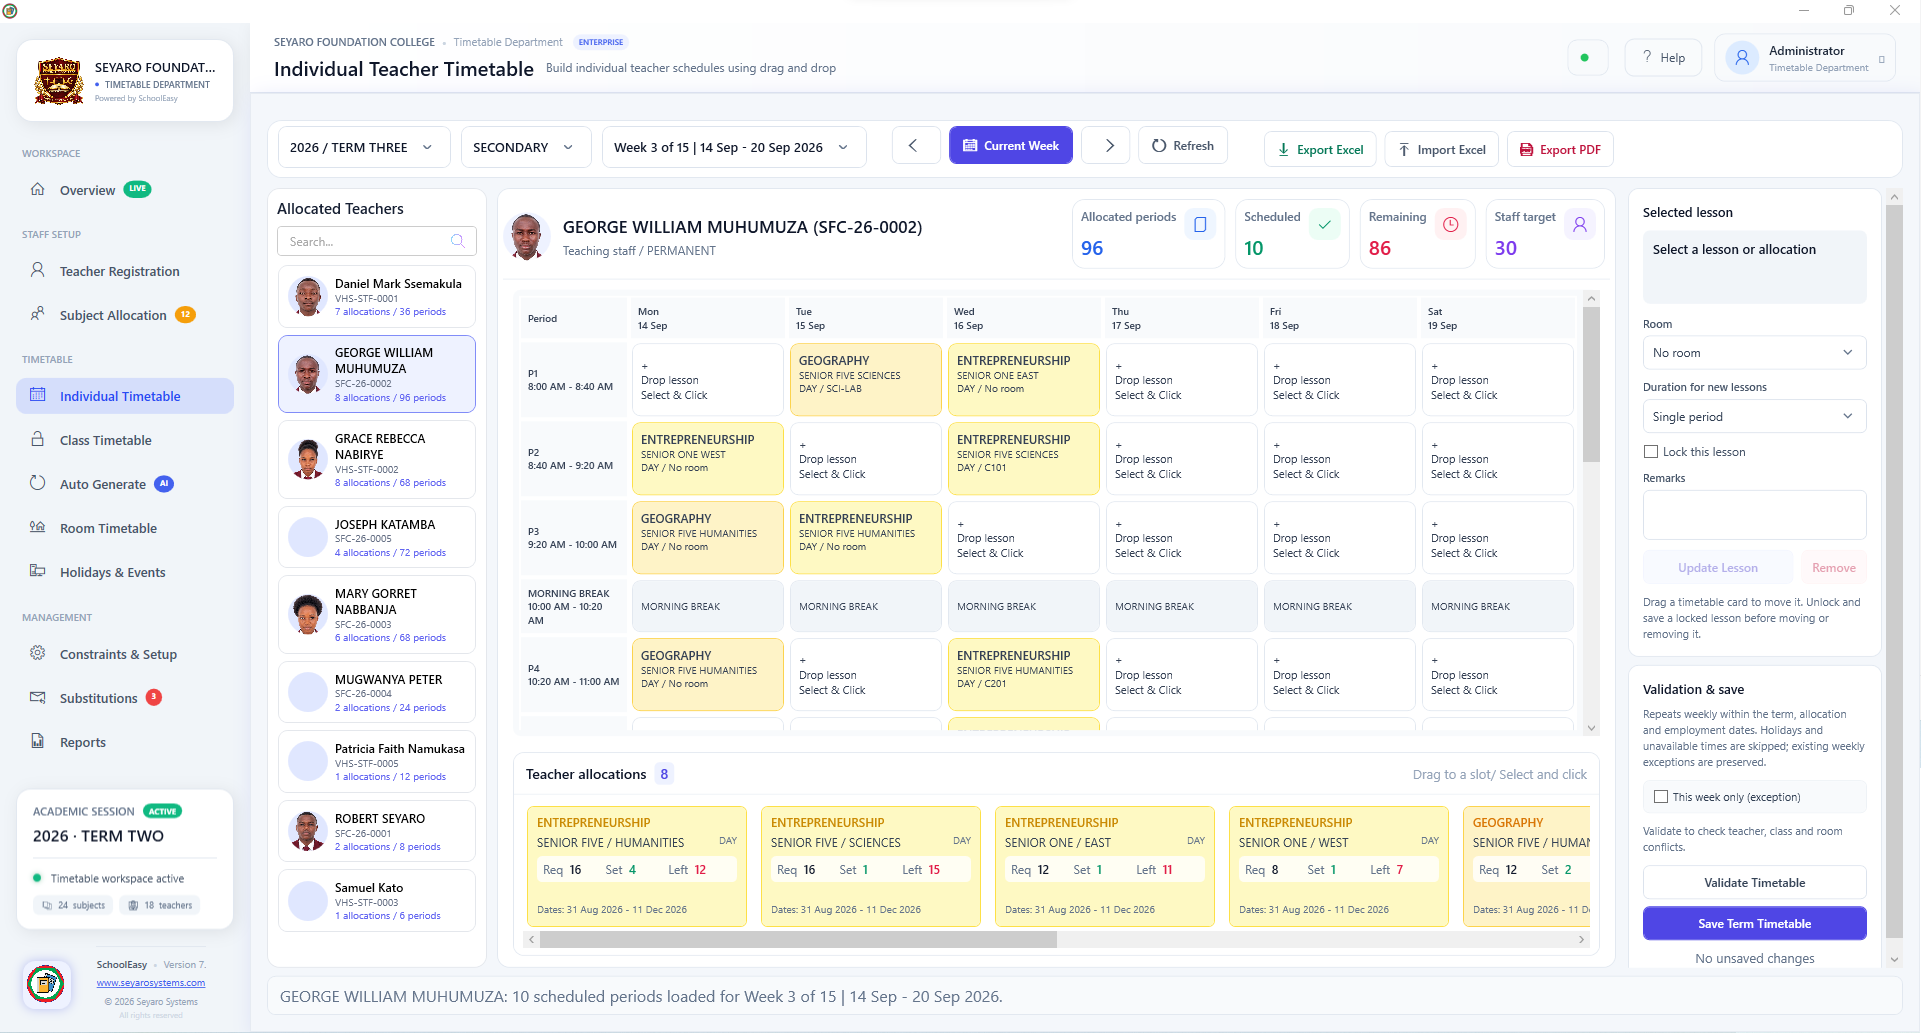
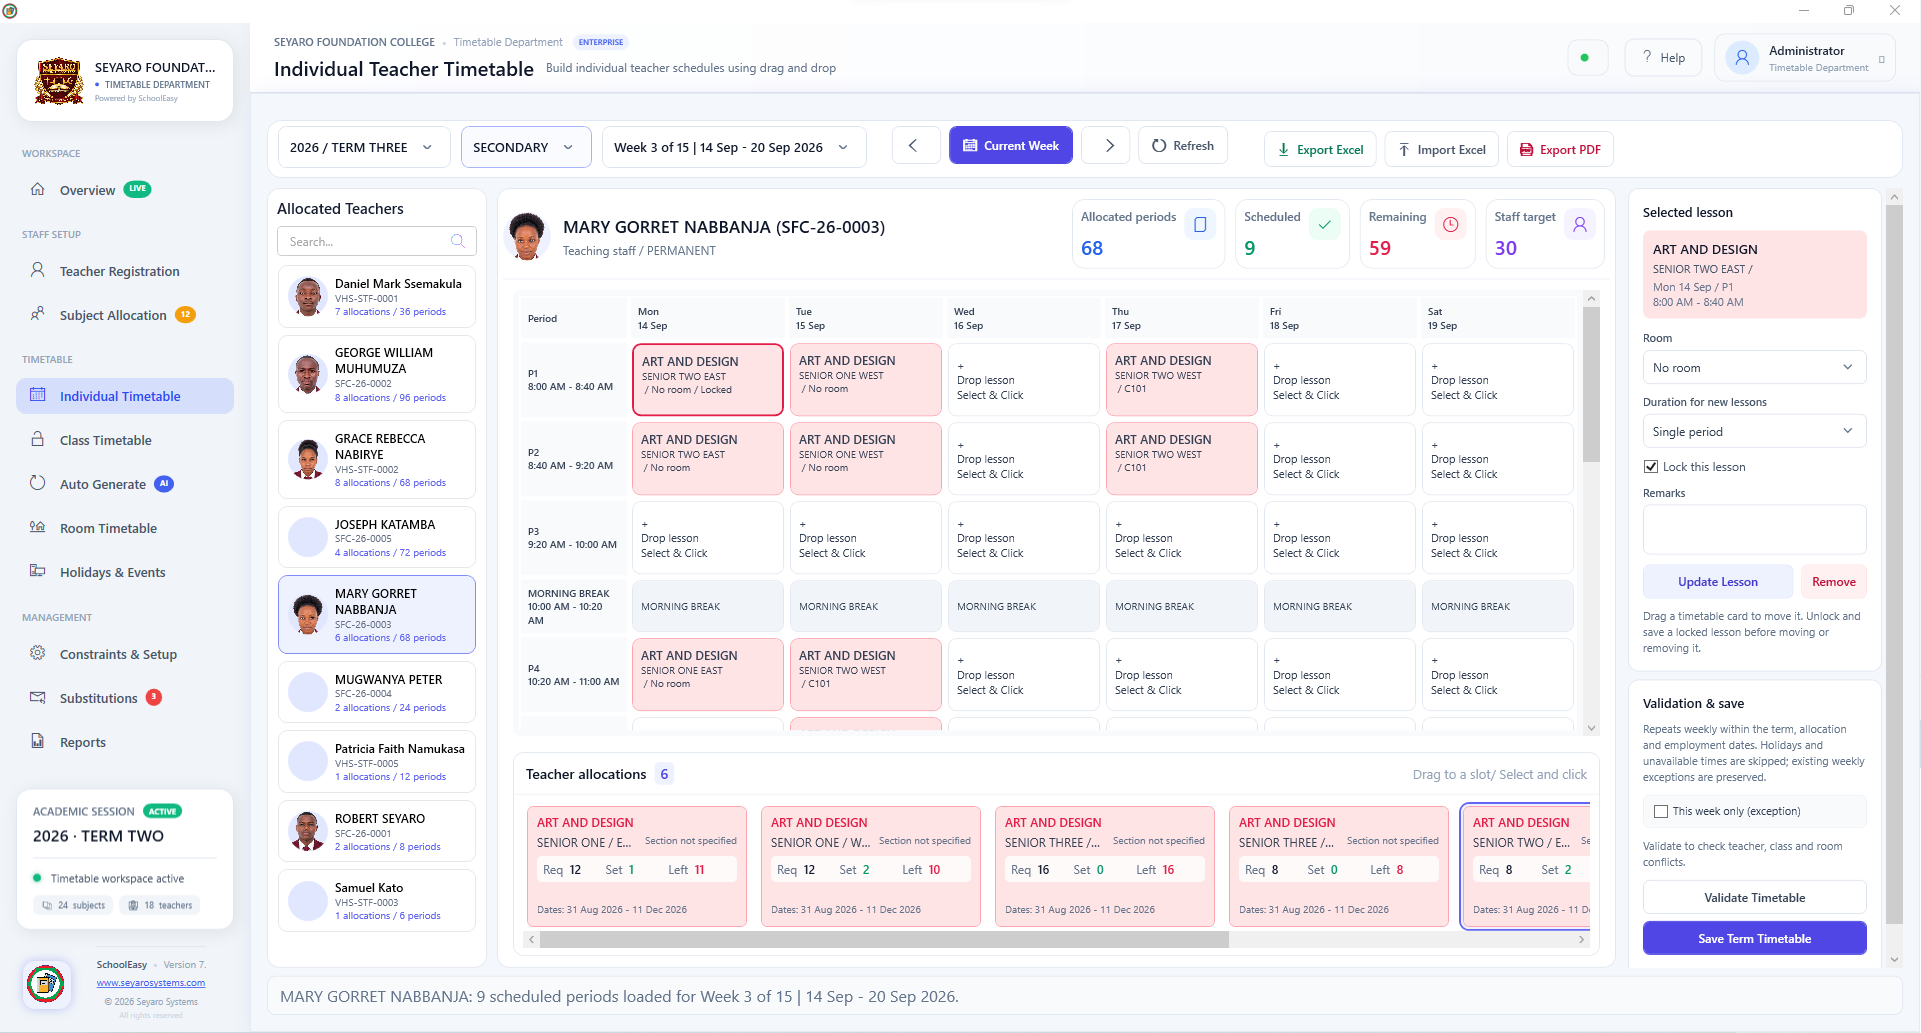
Individual teacher timetable

Arrange a teacher's lessons across the week.

SchoolEasy: Individual teacher timetable Click to enlarge
Individual teacher timetable · Desktop application

What this window does

The teacher timetable combines a weekly grid with allocation cards and workload totals. Staff can drag an allocation into a period and compare scheduled versus remaining periods. Validation and saving are separate steps before the term timetable is finalized.

Your workflow

  1. Choose the academic period, week and teacher.
  2. Place allocations into the weekly lesson grid.
  3. Validate the timetable and save the term schedule.
Back to workflow navigation ↑

Lesson details and timetable validation

Refine a selected lesson before saving.

SchoolEasy: Lesson details and timetable validation Click to enlarge
Lesson details and timetable validation · Desktop application

What this window does

The selected-lesson panel exposes room, lesson duration, lock and remarks settings. Staff can update or remove a lesson and validate conflicts involving teachers, classes and rooms. A week-only exception control supports changes that should not repeat throughout the term.

Your workflow

  1. Select a lesson in the teacher's timetable.
  2. Review its room, duration, lock and exception settings.
  3. Validate the result, then save the intended schedule.
Back to workflow navigation ↑

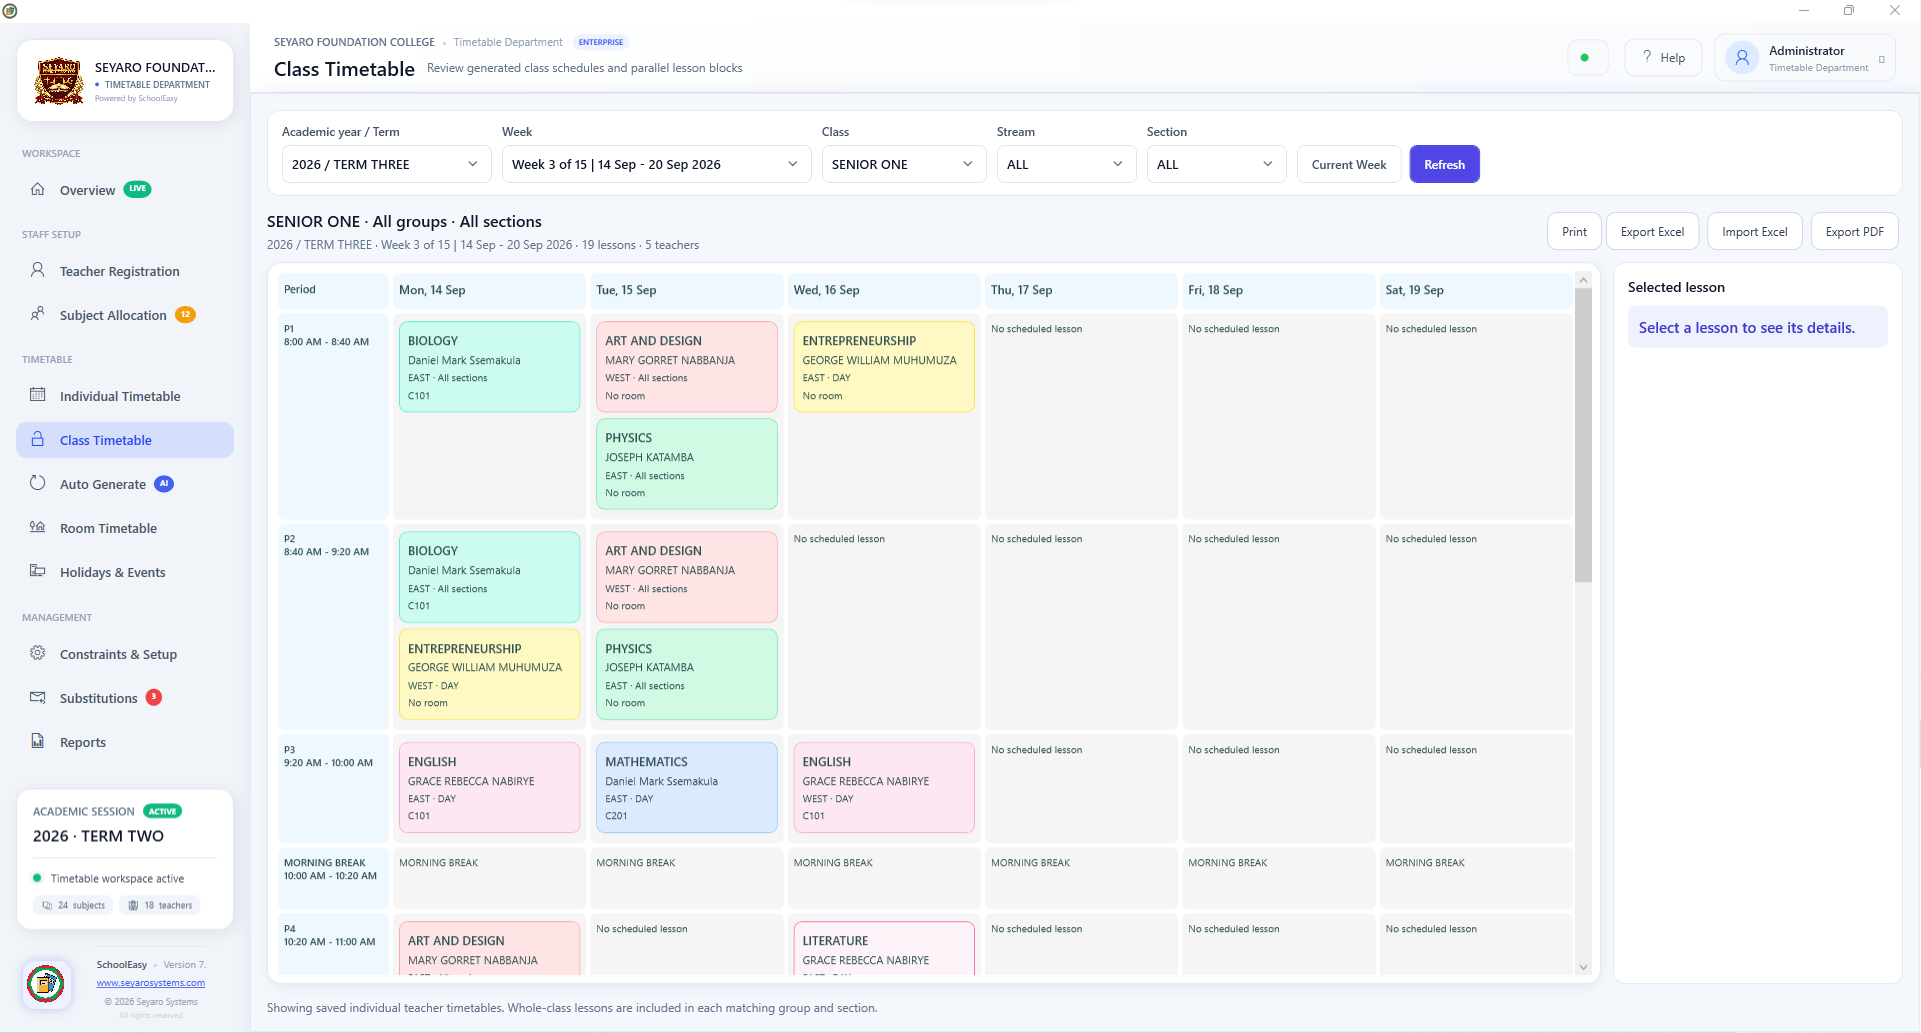
Class timetable

See a class's scheduled subjects and teachers.

SchoolEasy: Class timetable Click to enlarge
Class timetable · Desktop application

What this window does

The class view brings scheduled lessons into a weekly timetable with color-coded subject cards. Year, term, week, class, stream and section filters focus the view. Print and export actions help distribute the resulting schedule.

Your workflow

  1. Choose the class and week to review.
  2. Select a lesson to inspect its details.
  3. Print or export the class timetable when it is ready.
Back to workflow navigation ↑

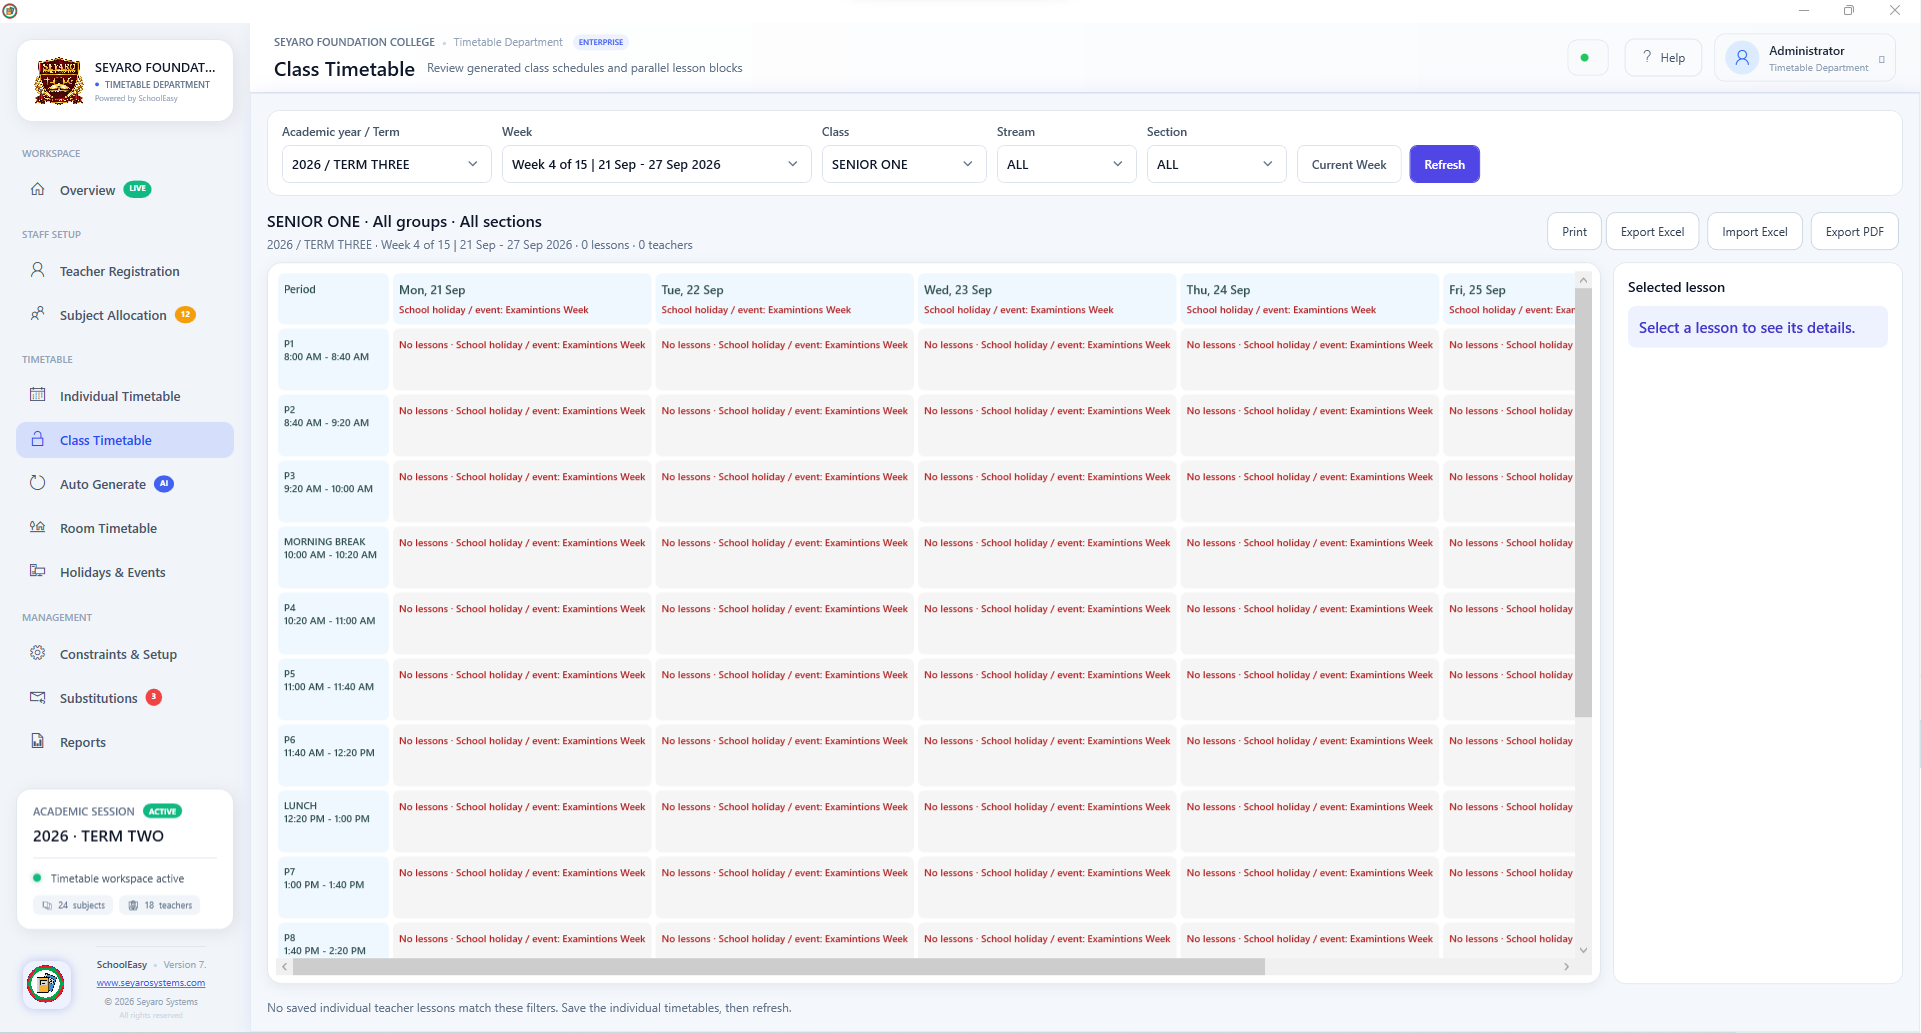
Class timetable during closures

See how school holidays affect lesson availability.

SchoolEasy: Class timetable during closures Click to enlarge
Class timetable during closures · Desktop application

What this window does

This class timetable view shows a week with school holiday or event notices across the lesson periods. It helps staff distinguish a closure from an ordinary empty timetable and review how the academic calendar affects teaching time.

Your workflow

  1. Choose the relevant class and week.
  2. Inspect the holiday or event notices in the lesson grid.
  3. Review the school calendar if the closure dates need adjustment.
Back to workflow navigation ↑
WORKFLOW / ASSESSMENT

Assessment & reporting

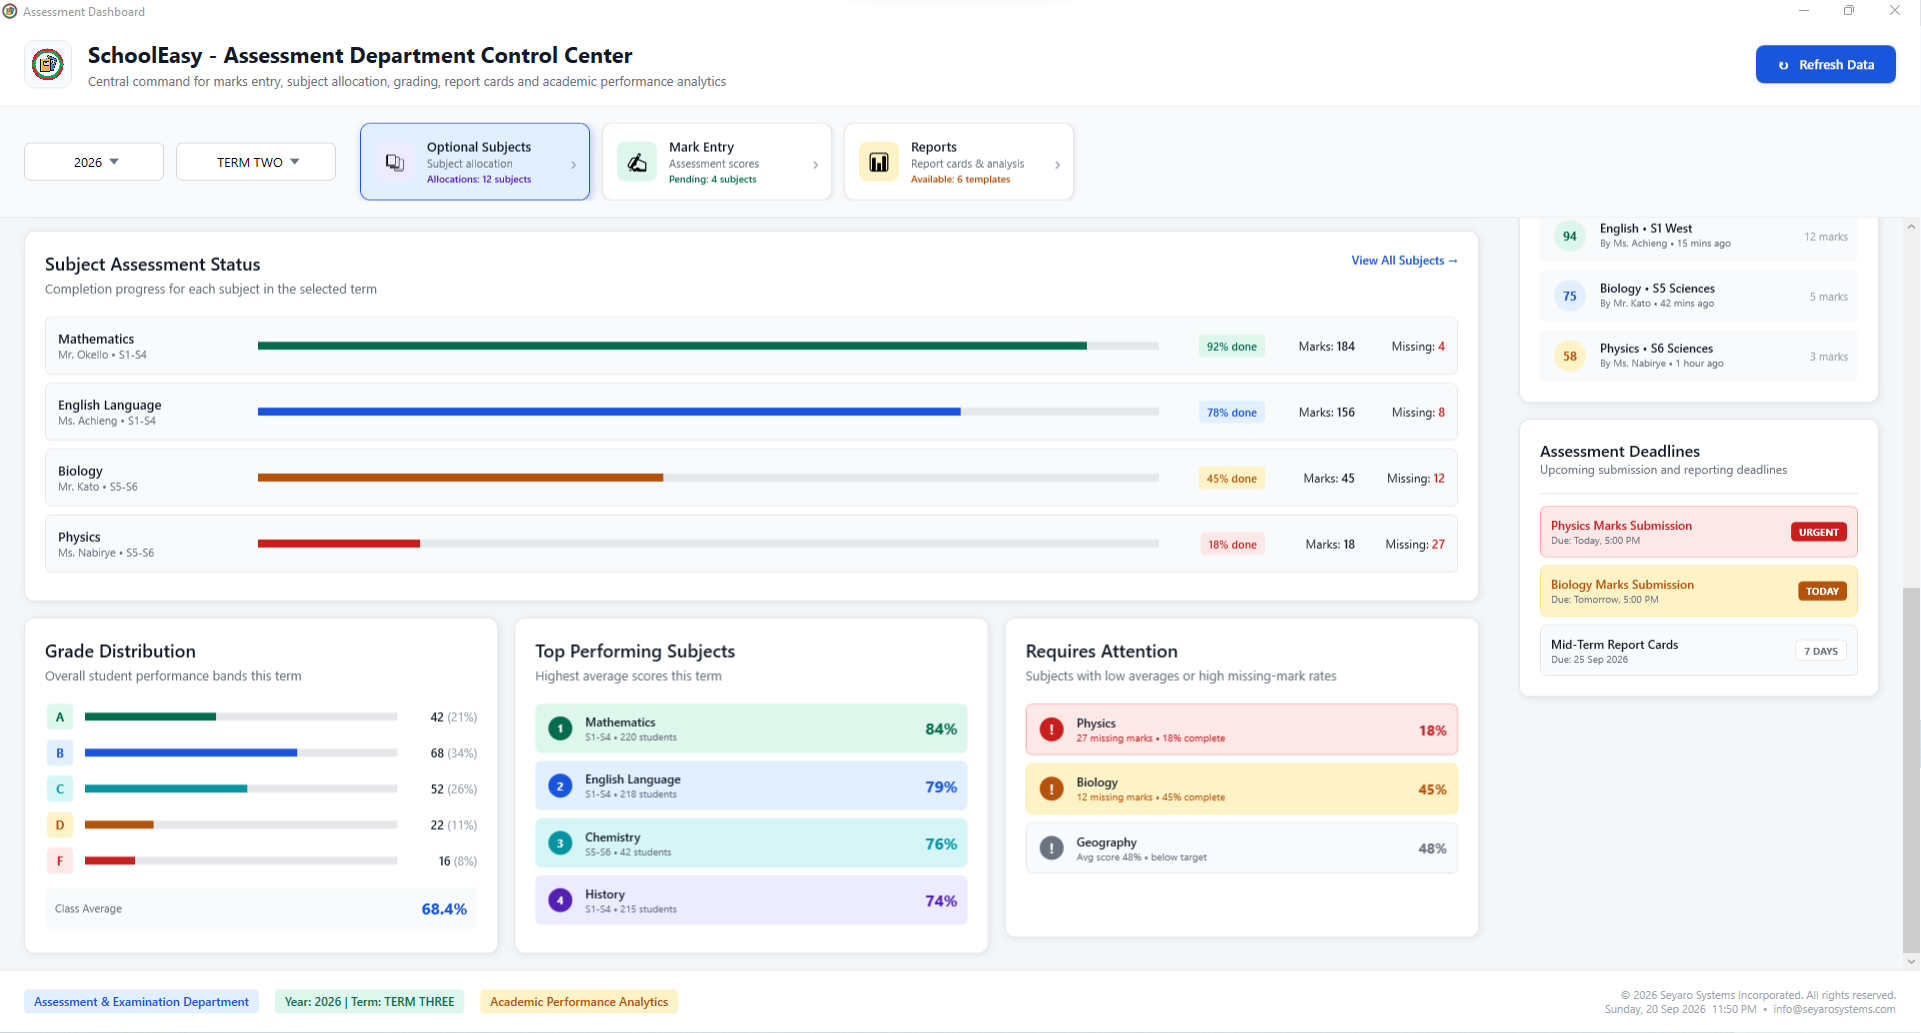
Assessment control center

Keep marks, grading and reporting work in view.

SchoolEasy: Assessment control center Click to enlarge
Assessment control center · Desktop application

What this window does

The assessment dashboard shows progress for marks entry, grading and report preparation alongside the selected term's student distribution. Shortcuts to optional subjects, mark entry and reports allow the assessment team to continue work from the same overview.

Your workflow

  1. Select the assessment year and term.
  2. Review completion summaries and missing-mark indicators.
  3. Open the task that needs attention.
Back to workflow navigation ↑

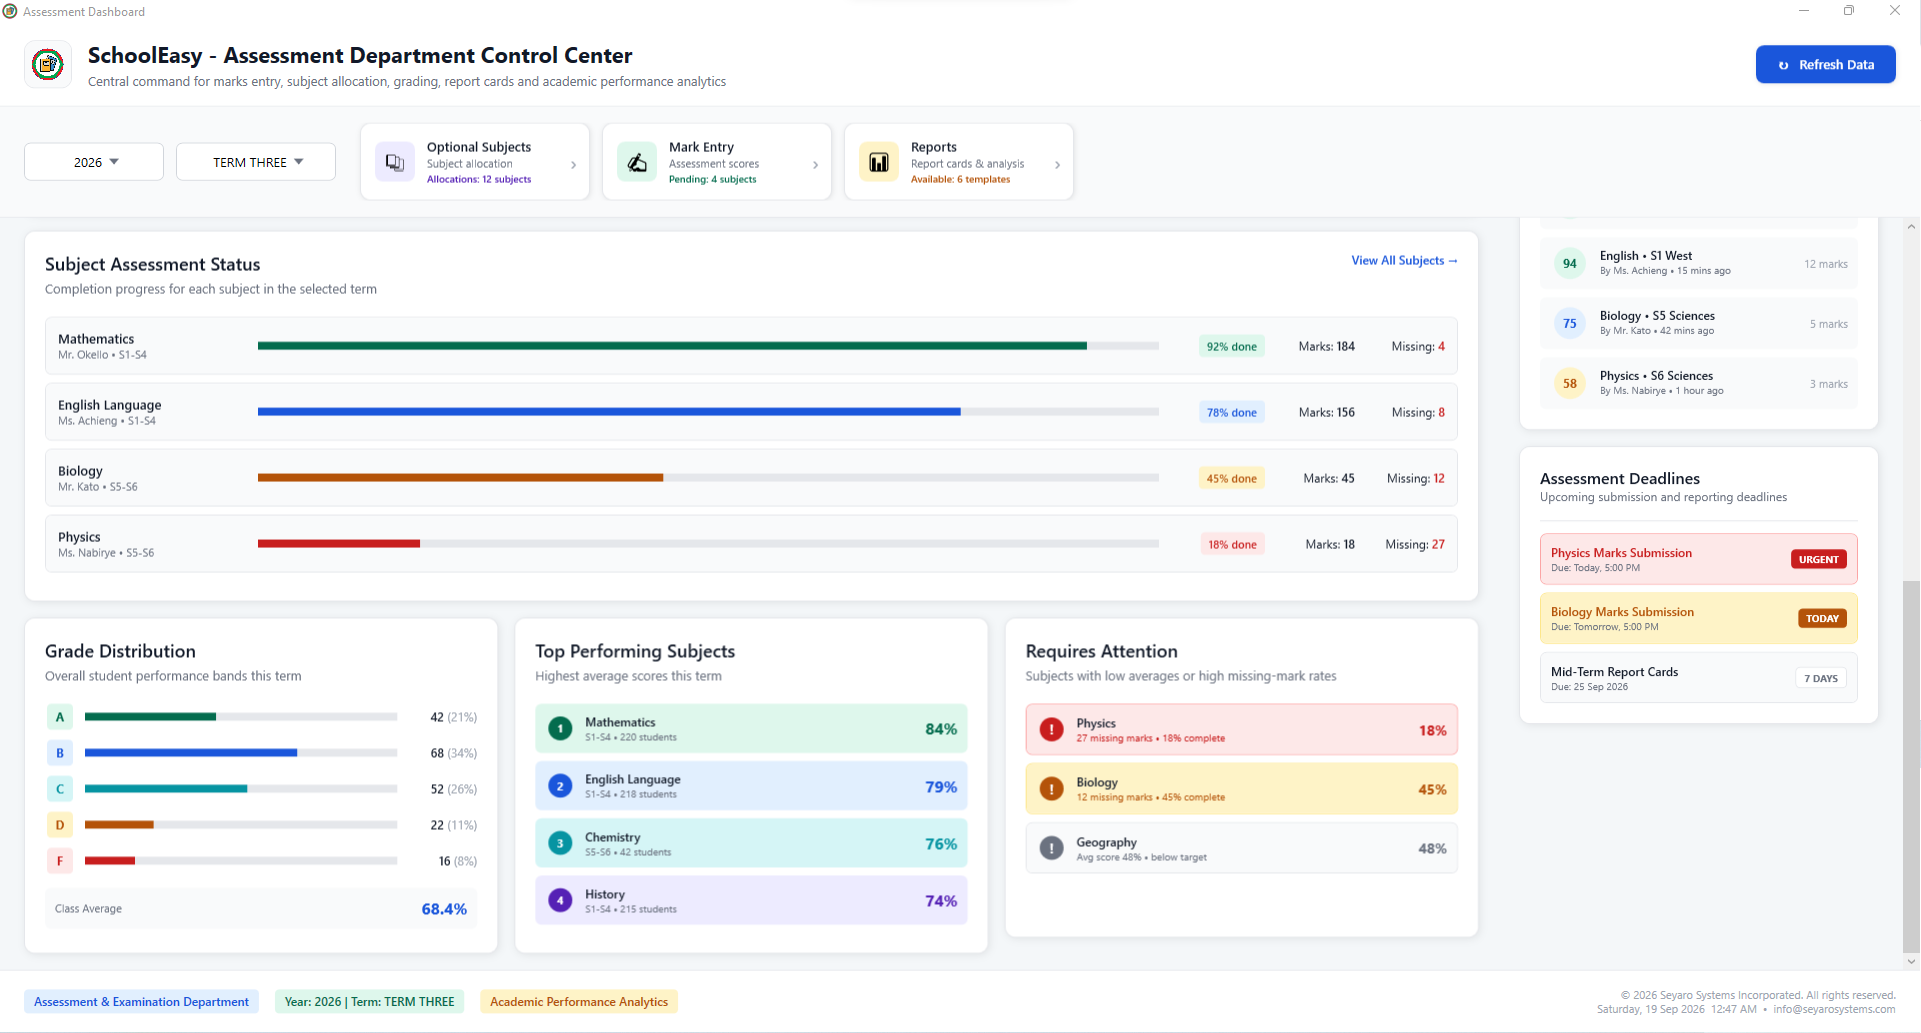
Assessment progress and priorities

Review subject completion and outstanding work.

SchoolEasy: Assessment progress and priorities Click to enlarge
Assessment progress and priorities · Desktop application

What this window does

The lower dashboard view brings subject progress, missing marks, grade distribution and submission deadlines together. It helps assessment staff locate incomplete work before moving to a subject or report workflow; the screenshot illustrates the information layout.

Your workflow

  1. Compare completion across subjects.
  2. Review missing marks and upcoming deadlines.
  3. Follow up the underlying assessment records before reporting.
Back to workflow navigation ↑

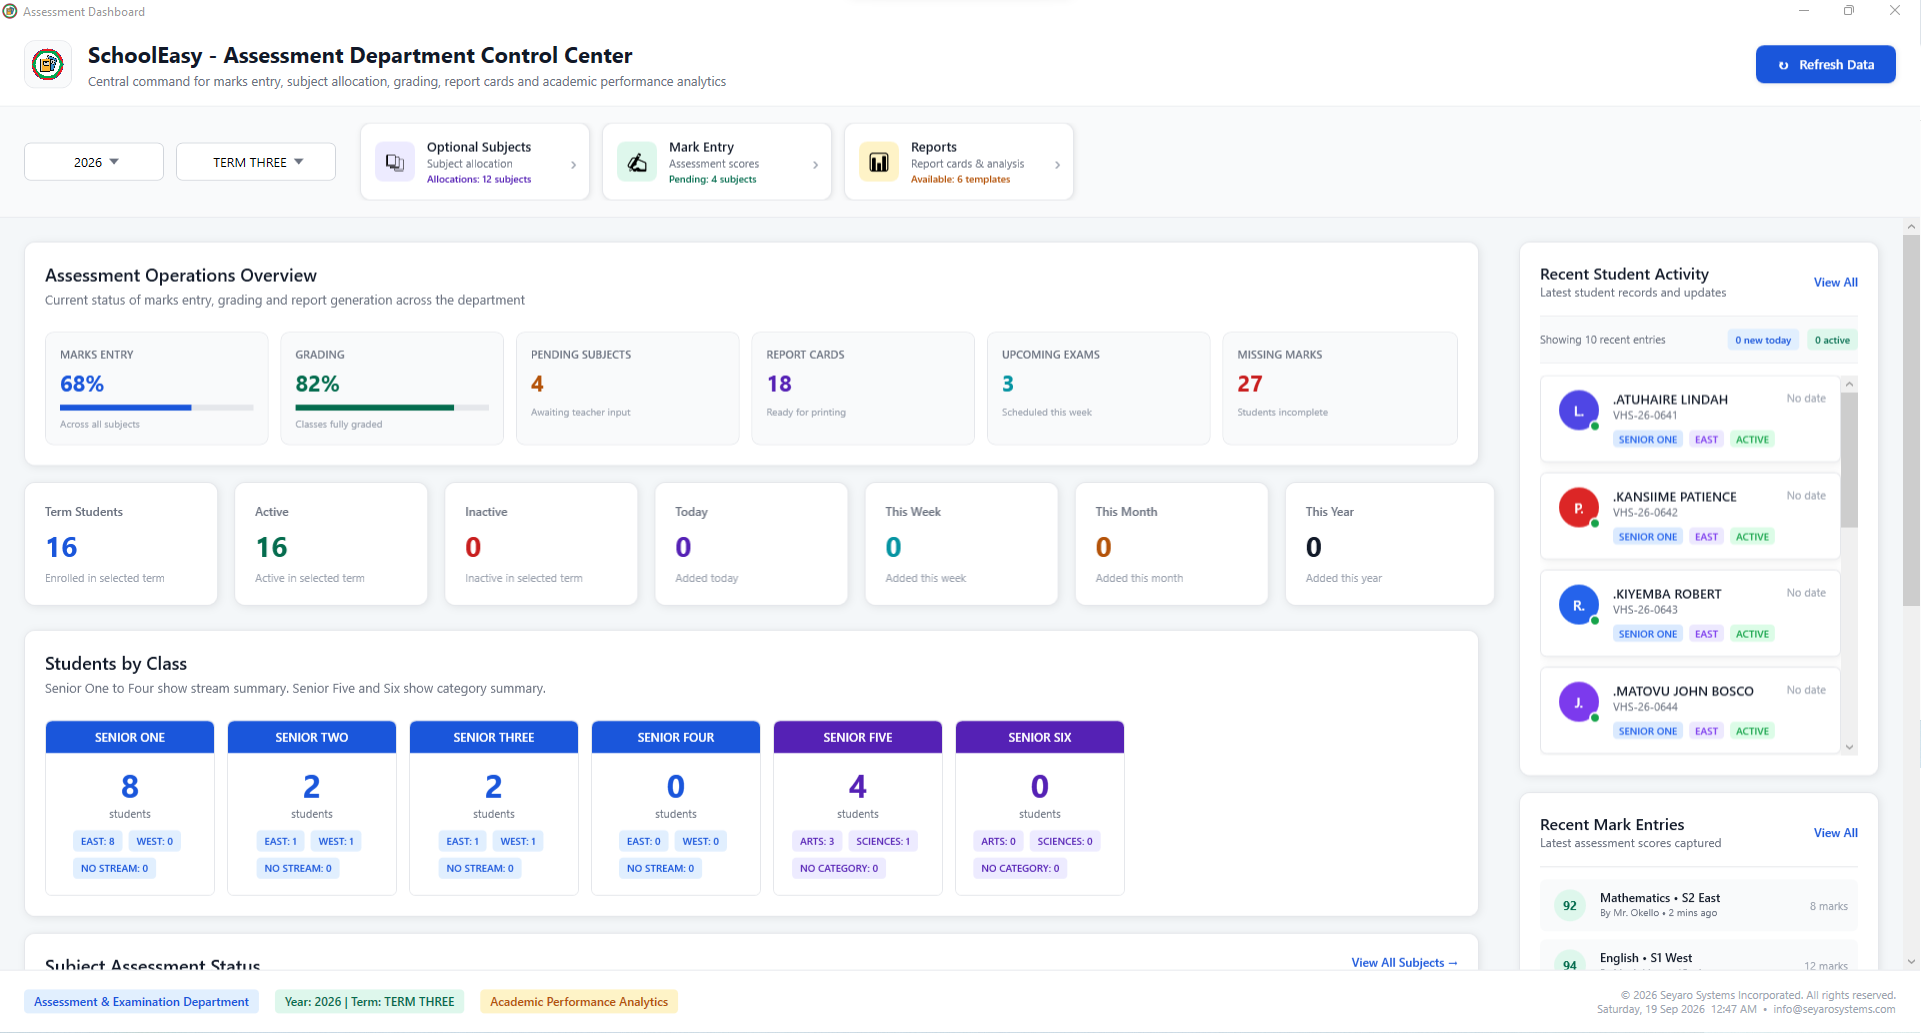
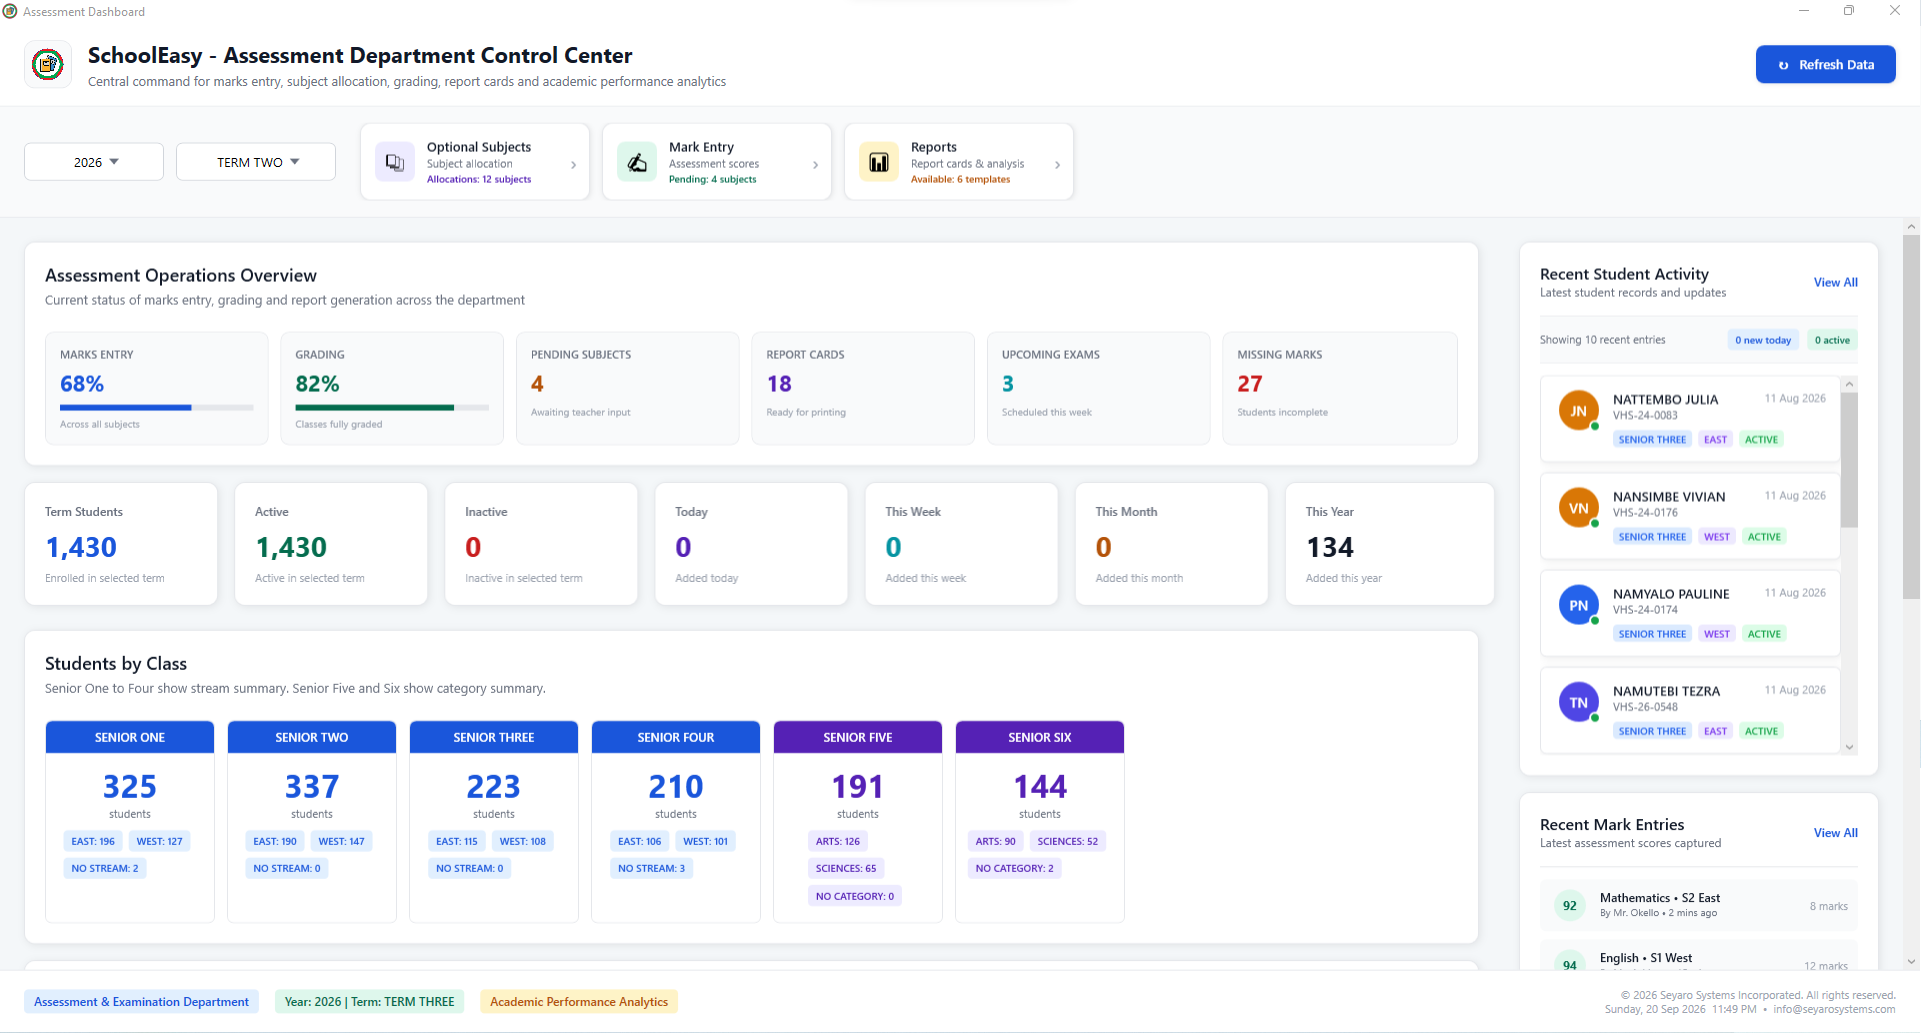
Assessment operations overview

Connect student enrollment with assessment readiness.

SchoolEasy: Assessment operations overview Click to enlarge
Assessment operations overview · Desktop application

What this window does

This alternate dashboard view shows term enrollment by class next to marks, grading and report-card summaries. Recent student activity and mark entries provide operational context, helping staff see which groups are participating in the current assessment cycle.

Your workflow

  1. Check that the selected period is correct.
  2. Review students by class and recent activity.
  3. Continue to optional subjects, marks or reports.
Back to workflow navigation ↑

Subject performance overview

Compare progress, grade distribution and attention areas.

SchoolEasy: Subject performance overview Click to enlarge
Subject performance overview · Desktop application

What this window does

Subject assessment bars sit alongside grade distribution, stronger-performing subjects and subjects requiring attention. Submission deadlines remain visible beside the analysis so staff can consider both completeness and results when planning follow-up.

Your workflow

  1. Inspect completion and missing marks by subject.
  2. Read grade distribution and attention indicators.
  3. Review incomplete records before drawing conclusions from the results.
Back to workflow navigation ↑

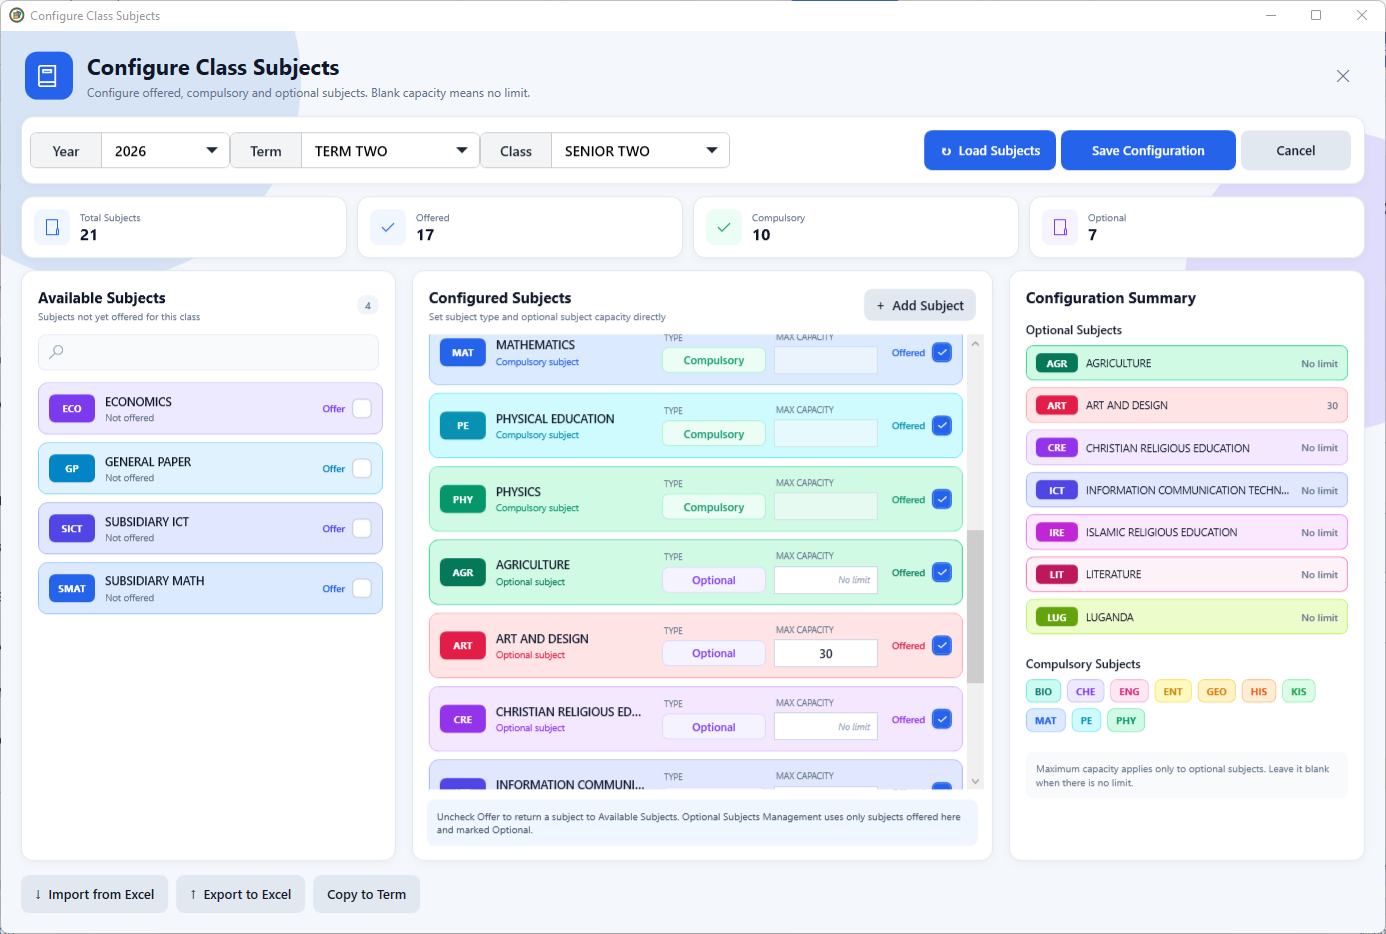
Configure class subjects

Define offered, compulsory and optional subjects.

SchoolEasy: Configure class subjects Click to enlarge
Configure class subjects · Desktop application

What this window does

The configuration window separates available subjects from those offered to a class. Staff can mark subjects compulsory or optional and set optional-subject capacity; a blank capacity means no limit. The summary shows how the selected class's curriculum is configured.

Your workflow

  1. Select the academic year, term and class.
  2. Choose offered subjects, their type and any optional capacity.
  3. Save the configuration before managing student choices.
Back to workflow navigation ↑

Student optional subjects

Manage each student's subject choices.

SchoolEasy: Student optional subjects Click to enlarge
Student optional subjects · Desktop application

What this window does

The workspace lists student selections beside class-wide subject enrollment counts and capacity information. The selected-student editor changes optional choices while showing compulsory subjects as a preview. It also highlights students who still have no optional subjects.

Your workflow

  1. Load the relevant class and stream.
  2. Select a student and review available optional subjects.
  3. Save choices and check the remaining students without selections.
Back to workflow navigation ↑

Assessment structure

Organize subjects, papers and assessment components.

SchoolEasy: Assessment structure Click to enlarge
Assessment structure · Desktop application

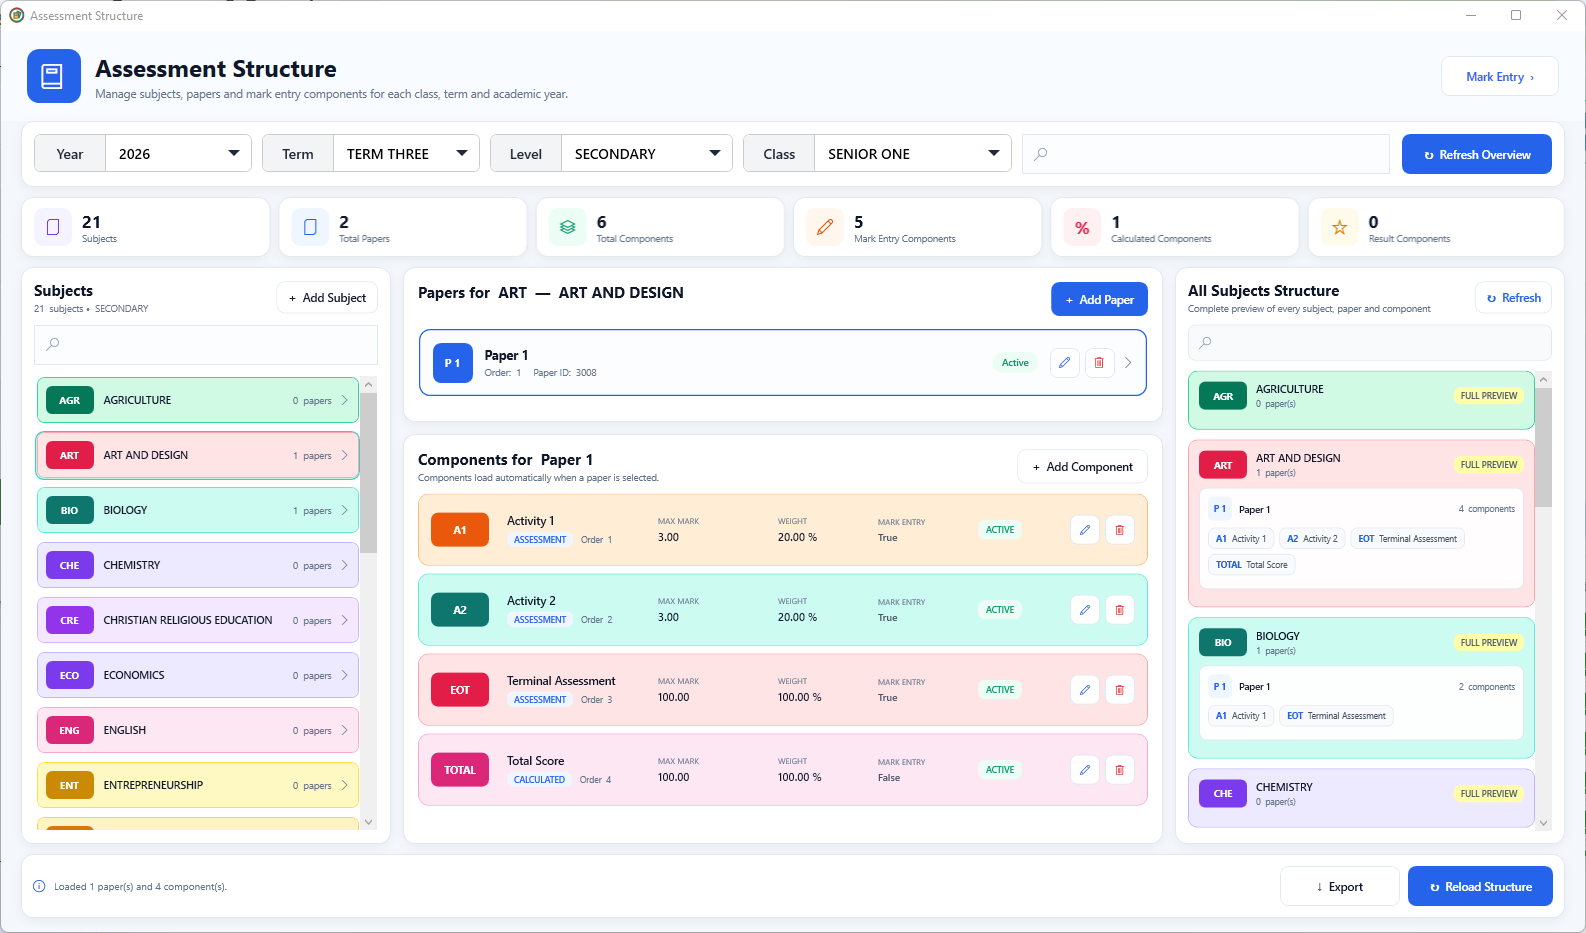
What this window does

A three-part workspace connects the subject list, the selected subject's papers and components, and an overall structure preview. Component cards show marks, weights, order and entry status. This setup determines the assessment structure used by the marks workspace.
Your workflow

  1. Choose the academic context and subject.
  2. Review its papers and component structure.
  3. Update the configuration before entering marks.
Back to workflow navigation ↑

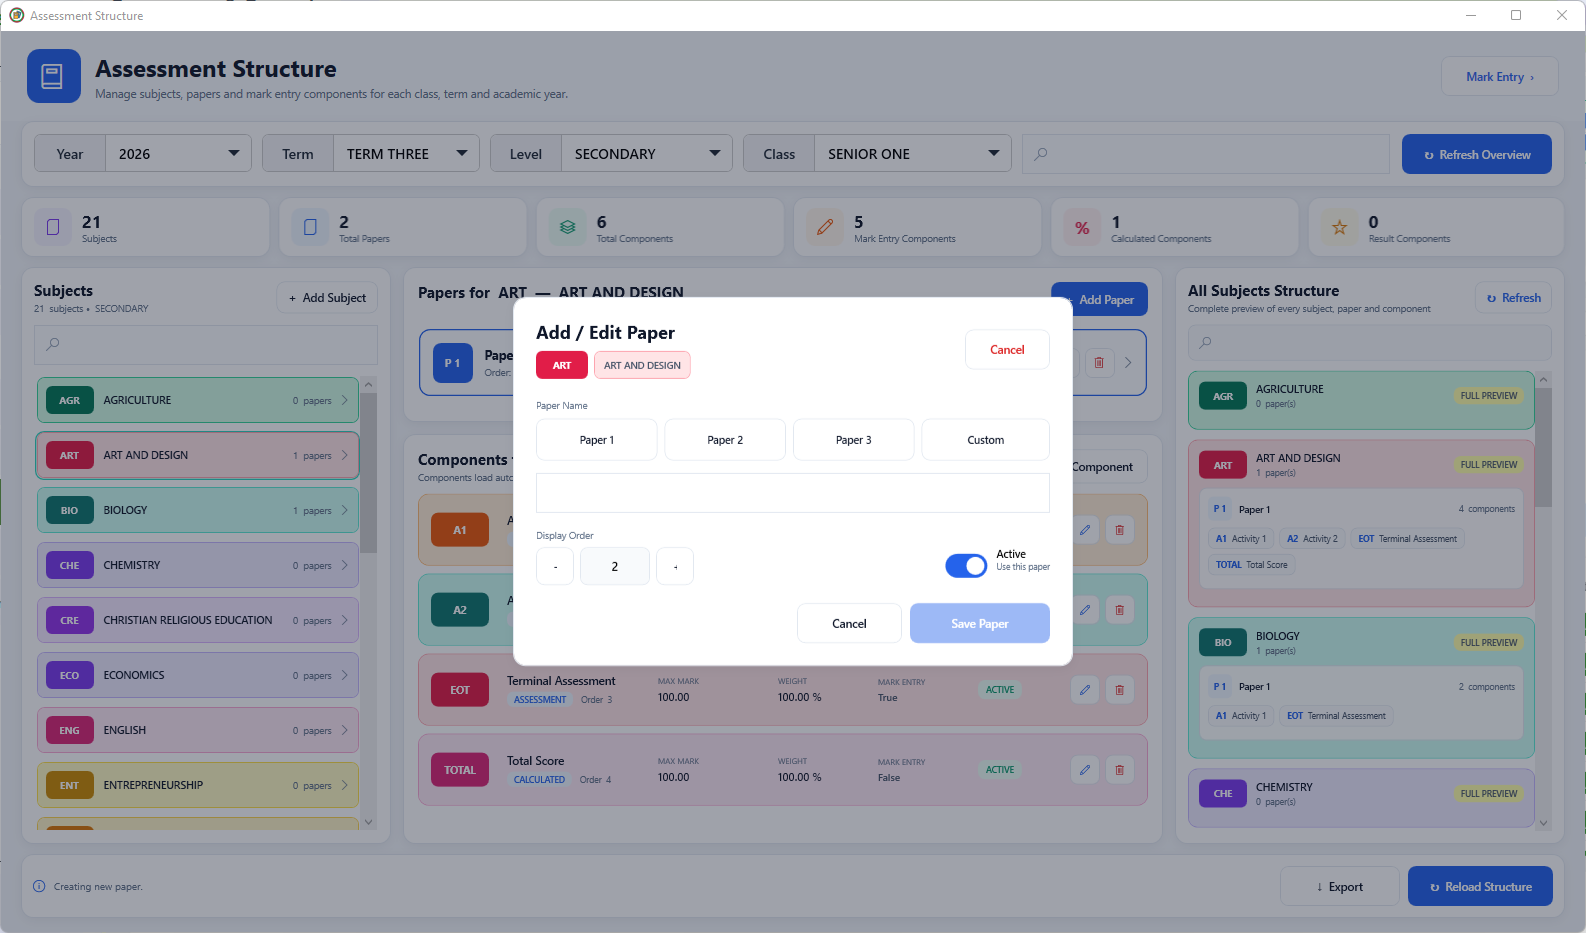
Add or edit an assessment paper

Set a paper's name, order and active status.

SchoolEasy: Add or edit an assessment paper Click to enlarge
Add or edit an assessment paper · Desktop application

What this window does

The paper editor creates or updates a paper under the selected subject. Preset paper names and a custom option support the naming structure, while display order controls placement and the active switch controls whether the paper is in use.

Your workflow

  1. Confirm the parent subject.
  2. Choose a paper name and display order.
  3. Set its active status and save the paper.
Back to workflow navigation ↑

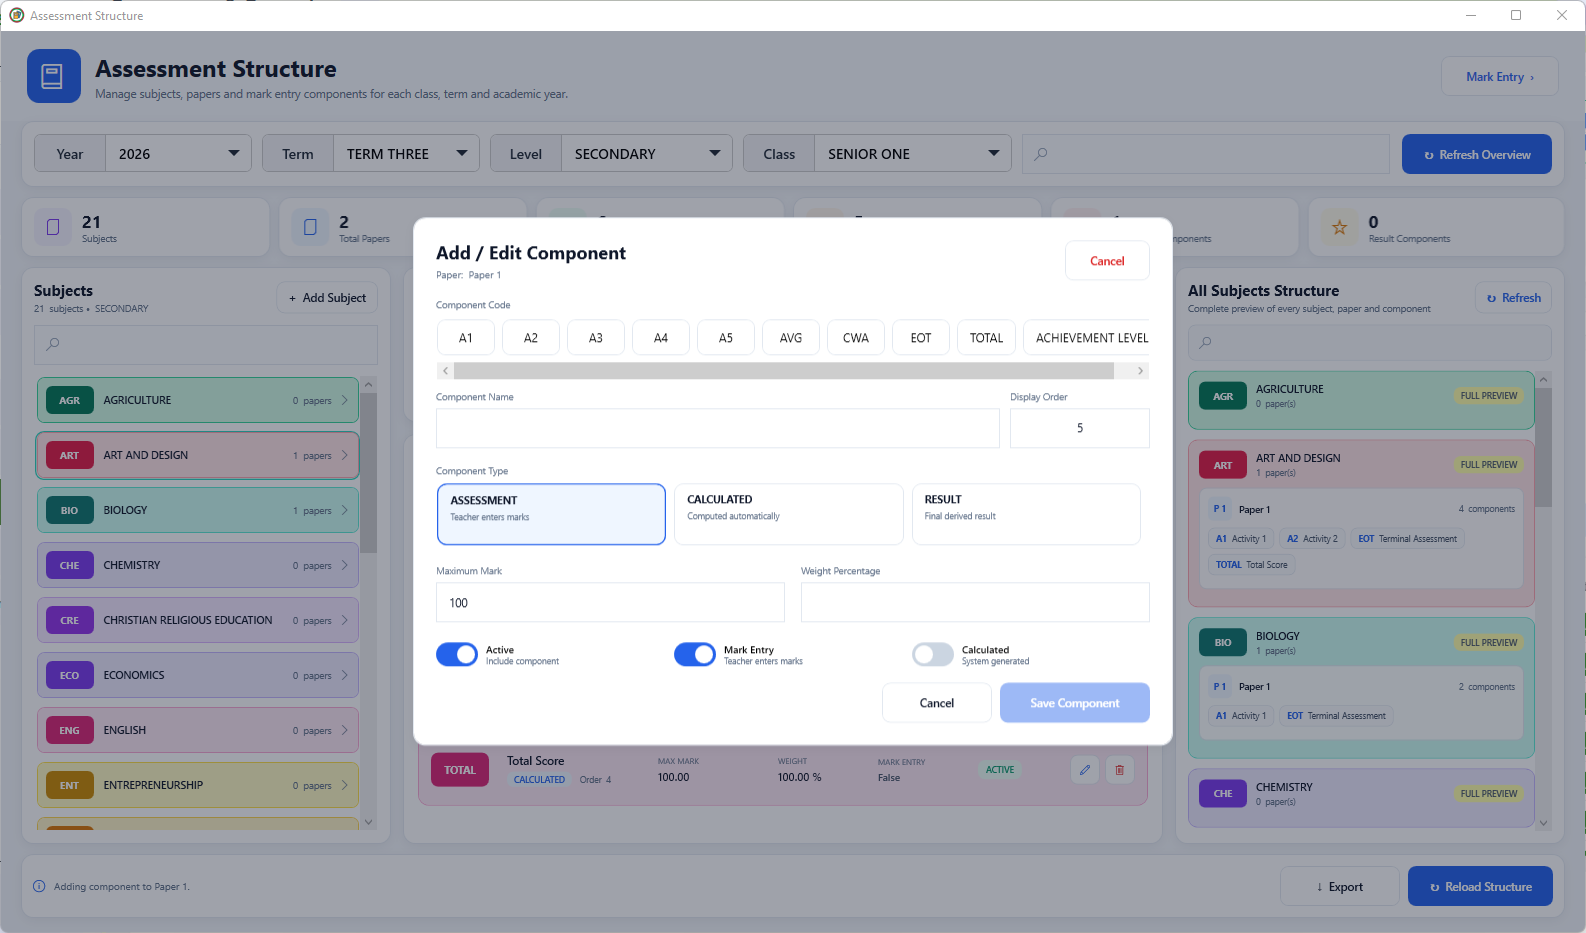
Add or edit an assessment component

Define how each part of an assessment is treated.

SchoolEasy: Add or edit an assessment component Click to enlarge
Add or edit an assessment component · Desktop application

What this window does

The component editor distinguishes entered assessments, calculated values and result components. It includes a code, name, order, maximum mark, percentage weight and entry-related switches. Careful configuration gives the marks workspace a clear structure for each paper.

Your workflow

  1. Choose the component code and type.
  2. Set the maximum mark, weight and entry settings as applicable.
  3. Save and review the component within the paper structure.
Back to workflow navigation ↑

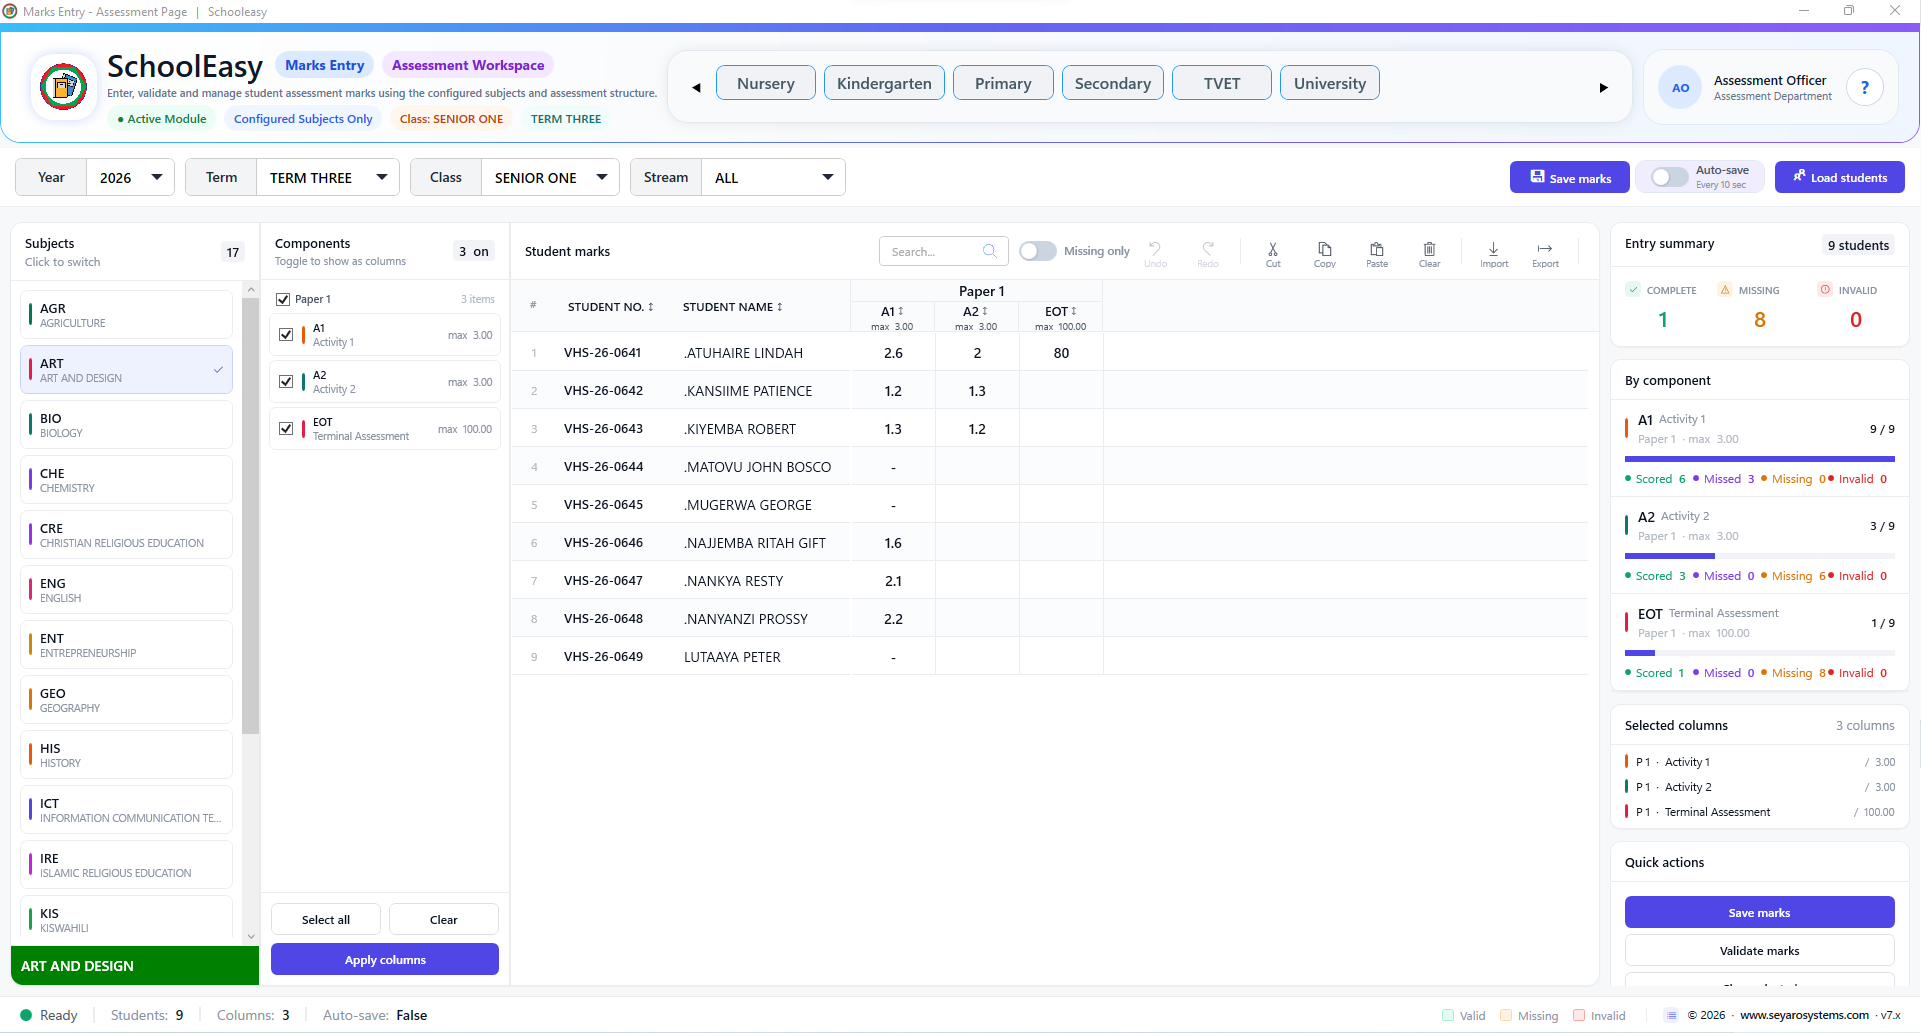
Marks entry workspace

Enter, validate and review assessment marks.

SchoolEasy: Marks entry workspace Click to enlarge
Marks entry workspace · Desktop application

What this window does

The marks grid is built around the selected subject and paper components. Staff load a student group, select the columns to work with and enter marks while completeness and invalid-entry summaries remain visible. Save and validation actions support review before reporting.

Your workflow

  1. Select the year, term, class, stream and subject.
  2. Apply the relevant component columns and enter marks.
  3. Review missing or invalid values, validate and save.
Back to workflow navigation ↑

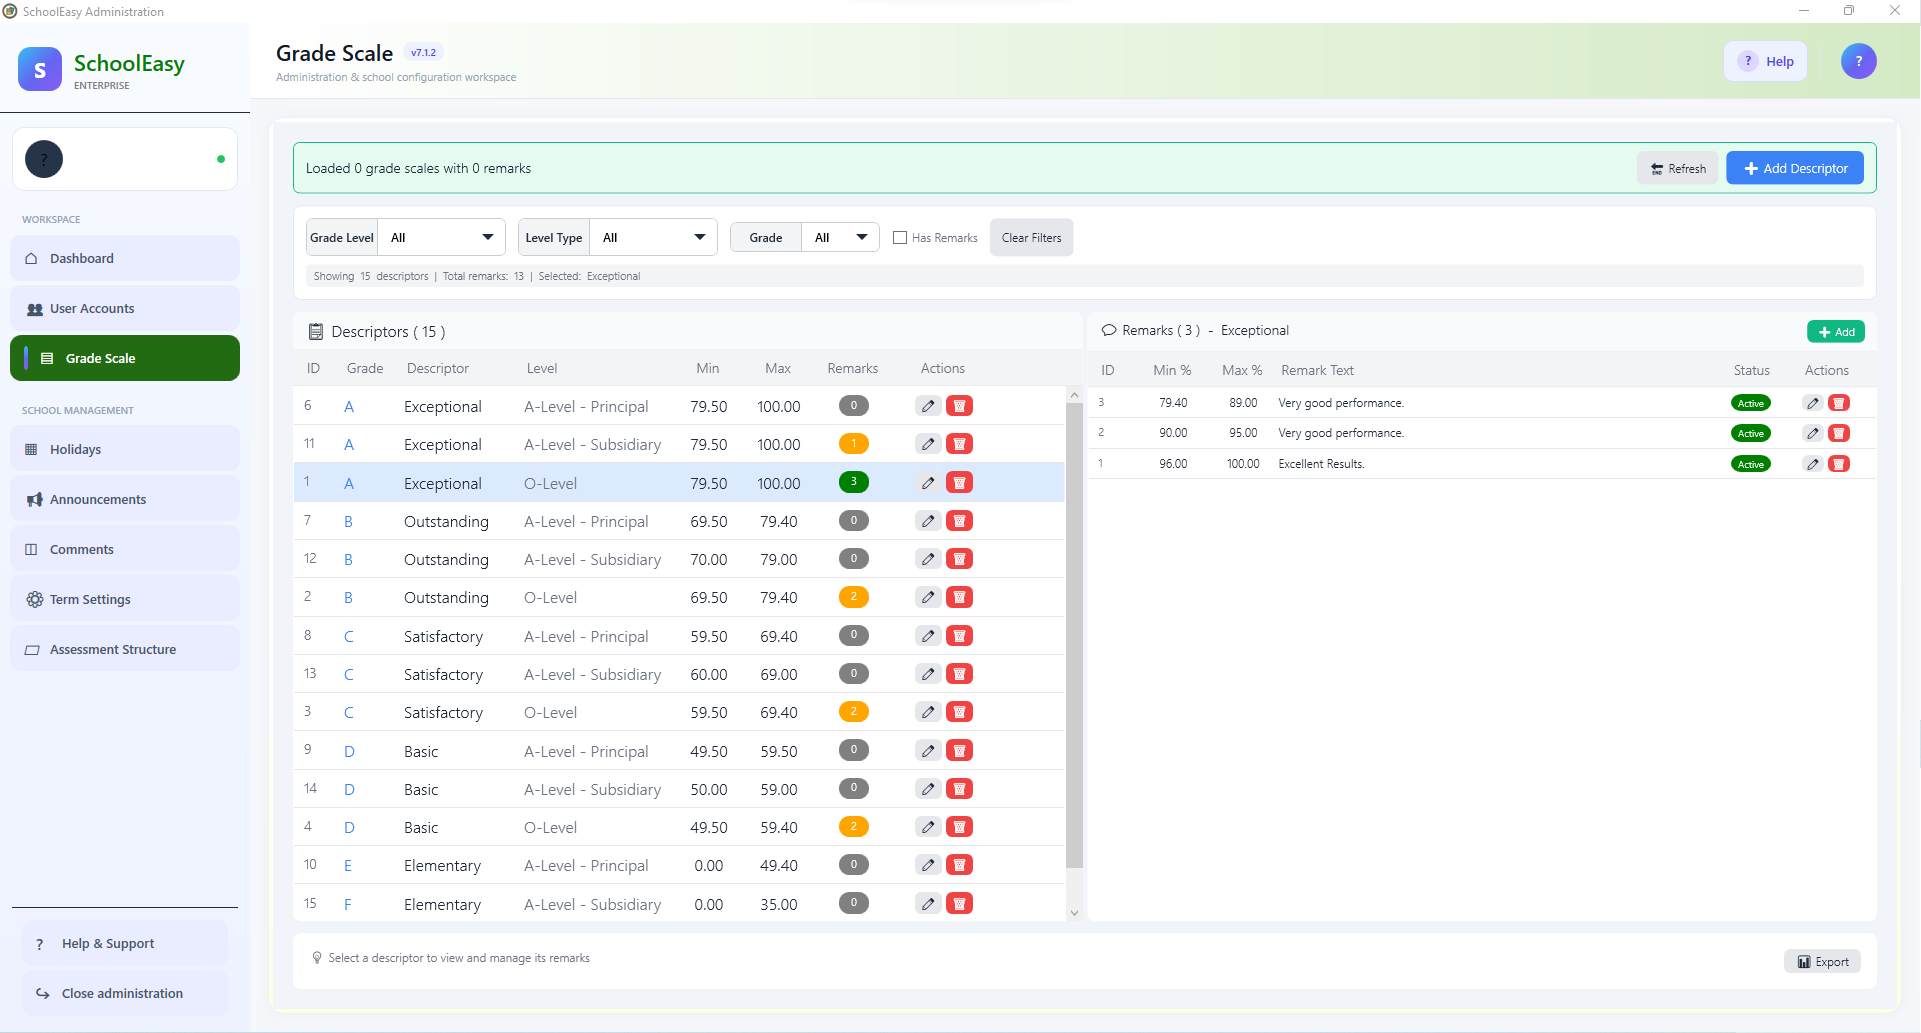
Grade scales and remarks

Maintain grade boundaries and descriptive feedback.

SchoolEasy: Grade scales and remarks Click to enlarge
Grade scales and remarks · Desktop application

What this window does

The grade-scale workspace organizes descriptors by education level, level type and grade. Minimum and maximum marks define the boundaries, while a detail panel holds remarks within a selected descriptor. Filters help administrators focus on the relevant grading scheme.

Your workflow

  1. Filter the level and grading context.
  2. Review descriptor boundaries and associated remarks.
  3. Edit the intended descriptor and verify the resulting ranges.
Back to workflow navigation ↑

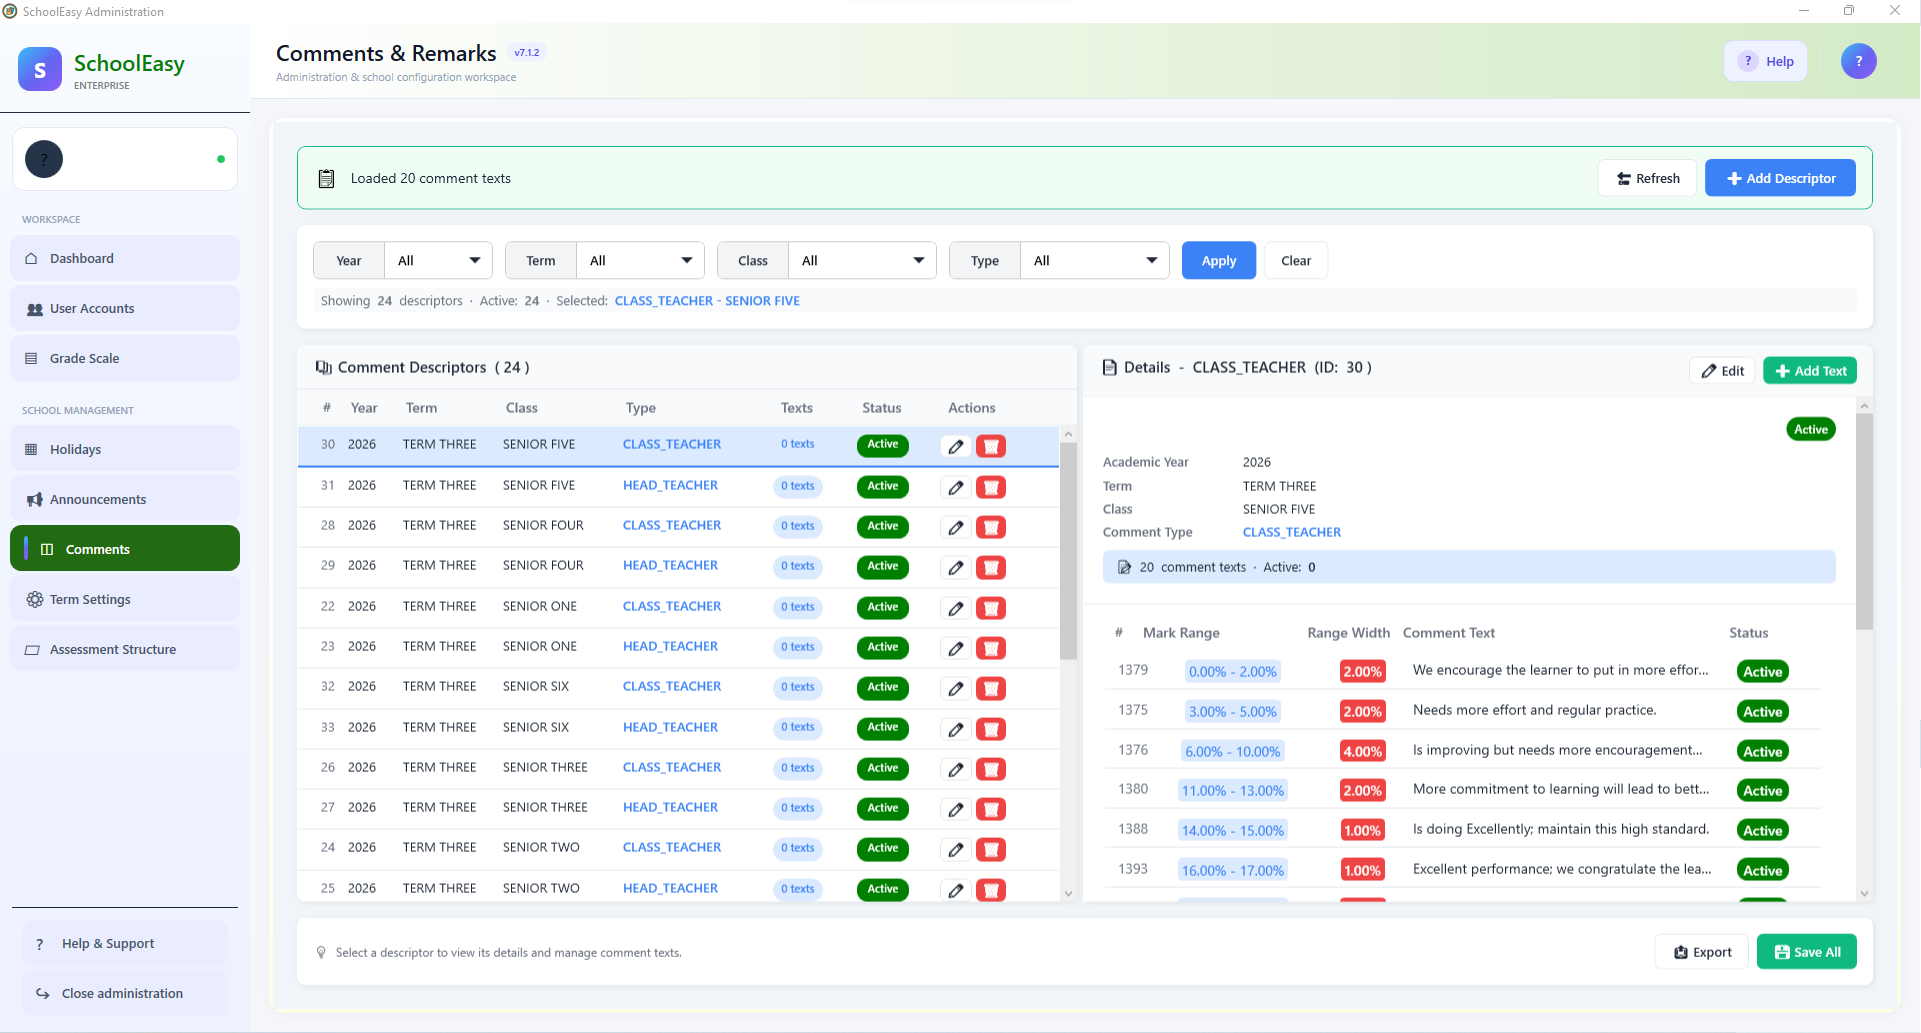
Report comments and remarks

Organize reusable feedback by class and comment type.

SchoolEasy: Report comments and remarks Click to enlarge
Report comments and remarks · Desktop application

What this window does

Comment descriptors are scoped by year, term, class and type, including class-teacher and head-teacher feedback. The detail panel lists comment text with mark ranges and active status, allowing school teams to maintain structured report feedback.

Your workflow

  1. Filter the academic context and comment type.
  2. Select a descriptor and review its comment texts and ranges.
  3. Update the intended feedback and save the changes.
Back to workflow navigation ↑

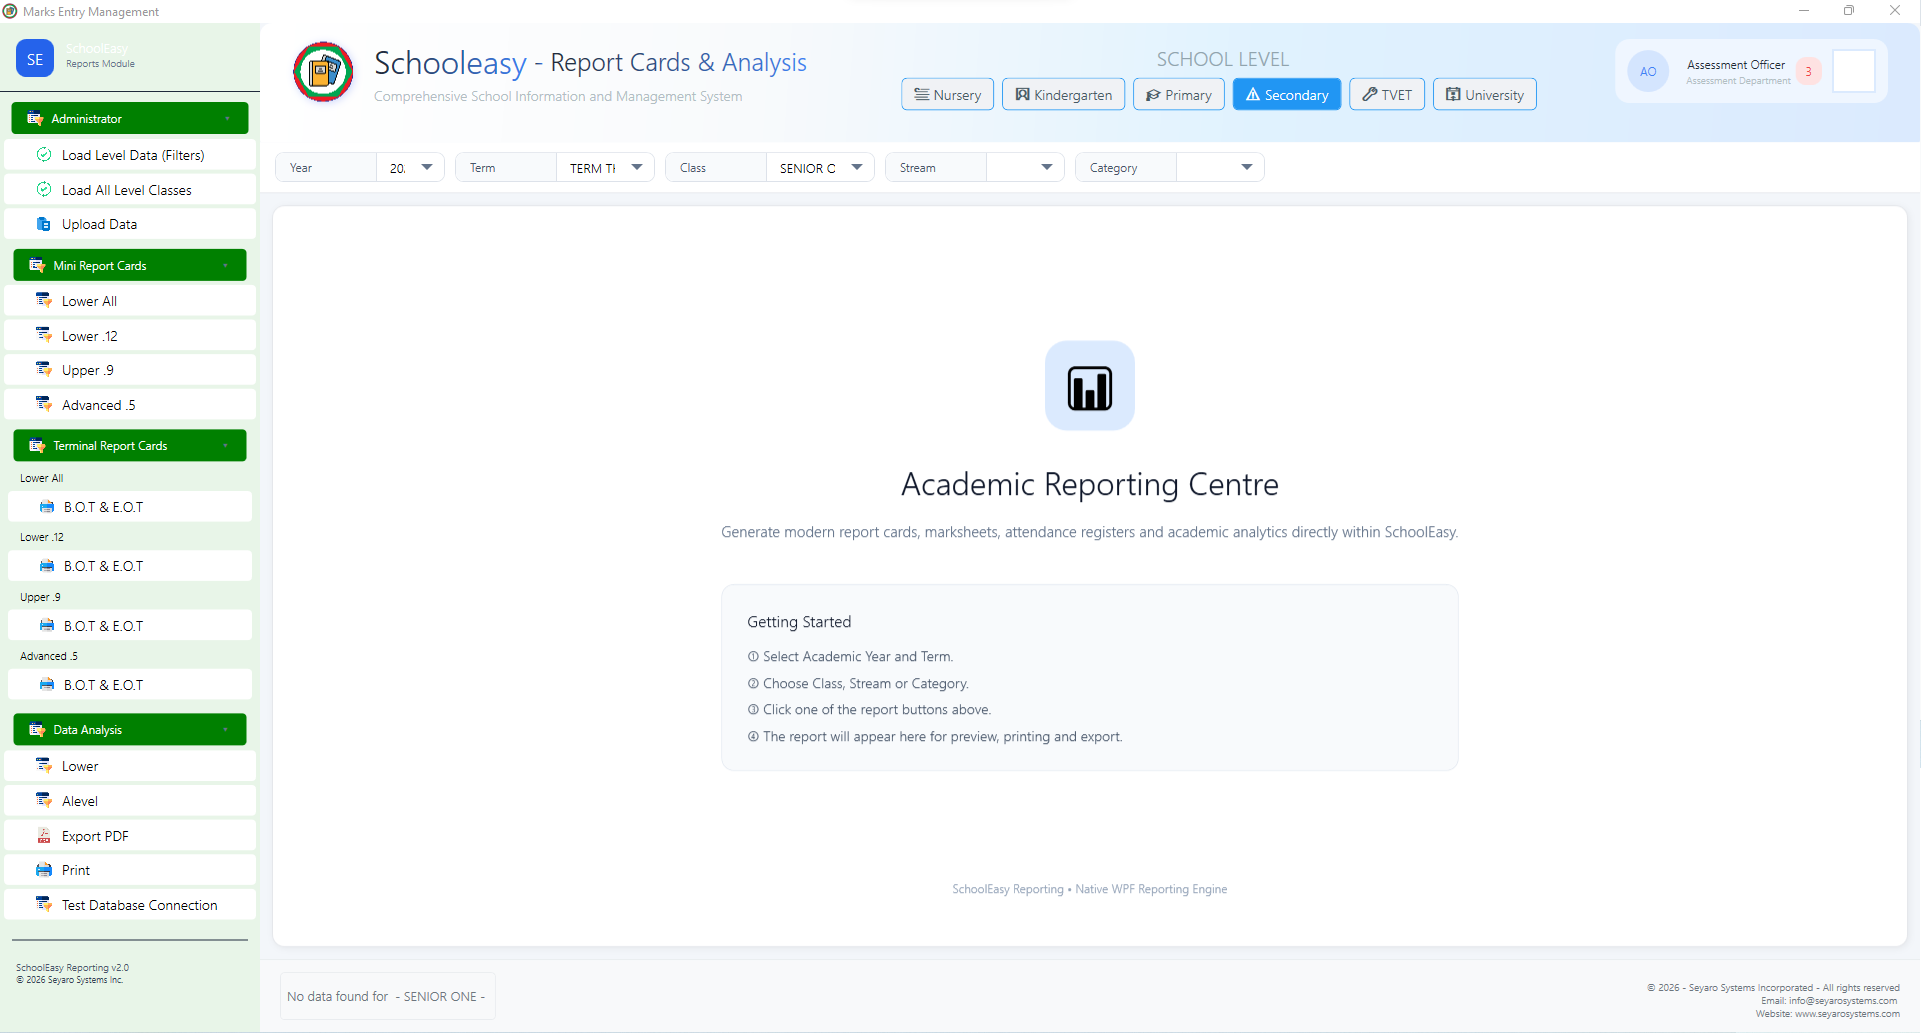
Academic reporting center

Prepare report cards and academic analysis.

SchoolEasy: Academic reporting center Click to enlarge
Academic reporting center · Desktop application

What this window does

The reporting center provides report options for different school levels, including mid-term and terminal reports. Year, term, class, stream and category filters define the reporting group. The workspace supports previewing the selected output and provides print and PDF export actions.

Your workflow

  1. Select the school level and academic filters.
  2. Load the data and choose a report from the navigation.
  3. Review the preview before printing or exporting.
Back to workflow navigation ↑
WORKFLOW / ADMINISTRATION

School administration

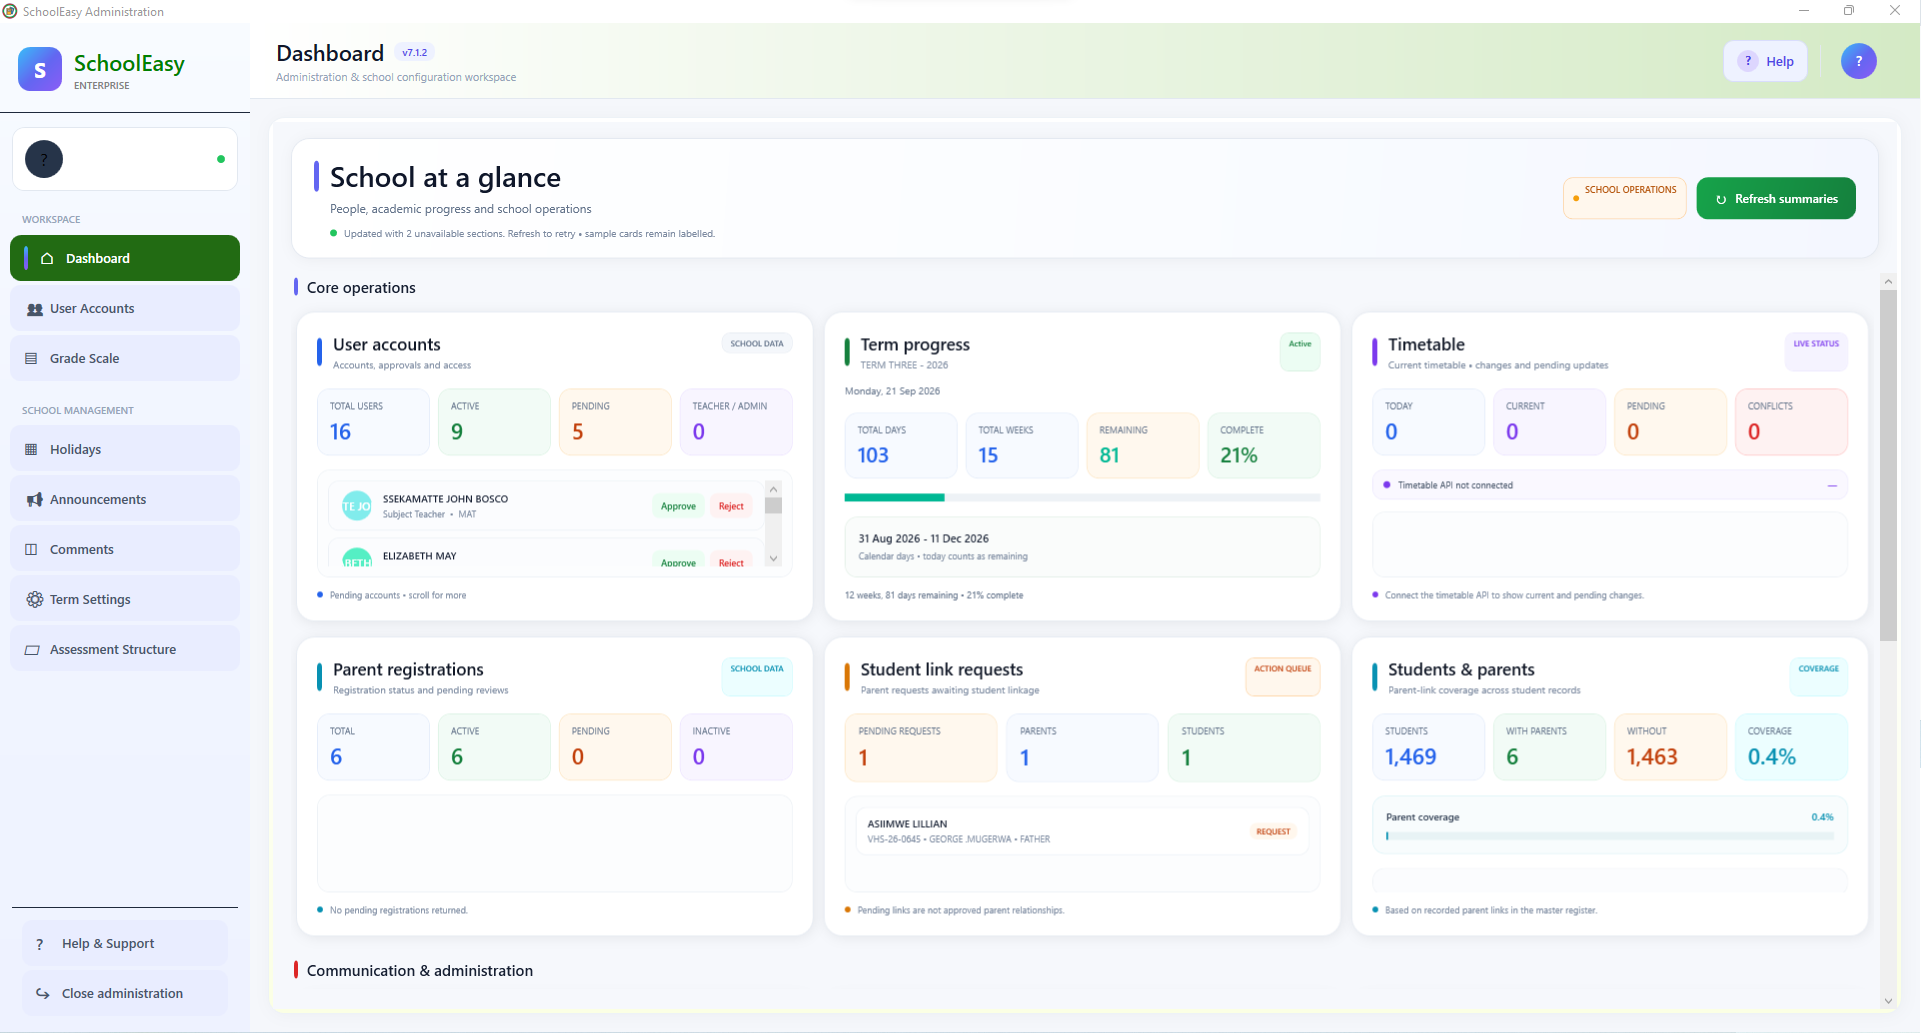
School administration overview

Review access requests, term progress and parent links.

SchoolEasy: School administration overview Click to enlarge
School administration overview · Desktop application

What this window does

The administration dashboard brings user accounts, term progress, timetable status, parent registrations and student-link requests together. It is a school-configuration overview that helps administrators identify pending work and open the relevant management area.

Your workflow

  1. Review pending access and relationship requests.
  2. Check term progress and operational summaries.
  3. Open the relevant administration screen for follow-up.
Back to workflow navigation ↑

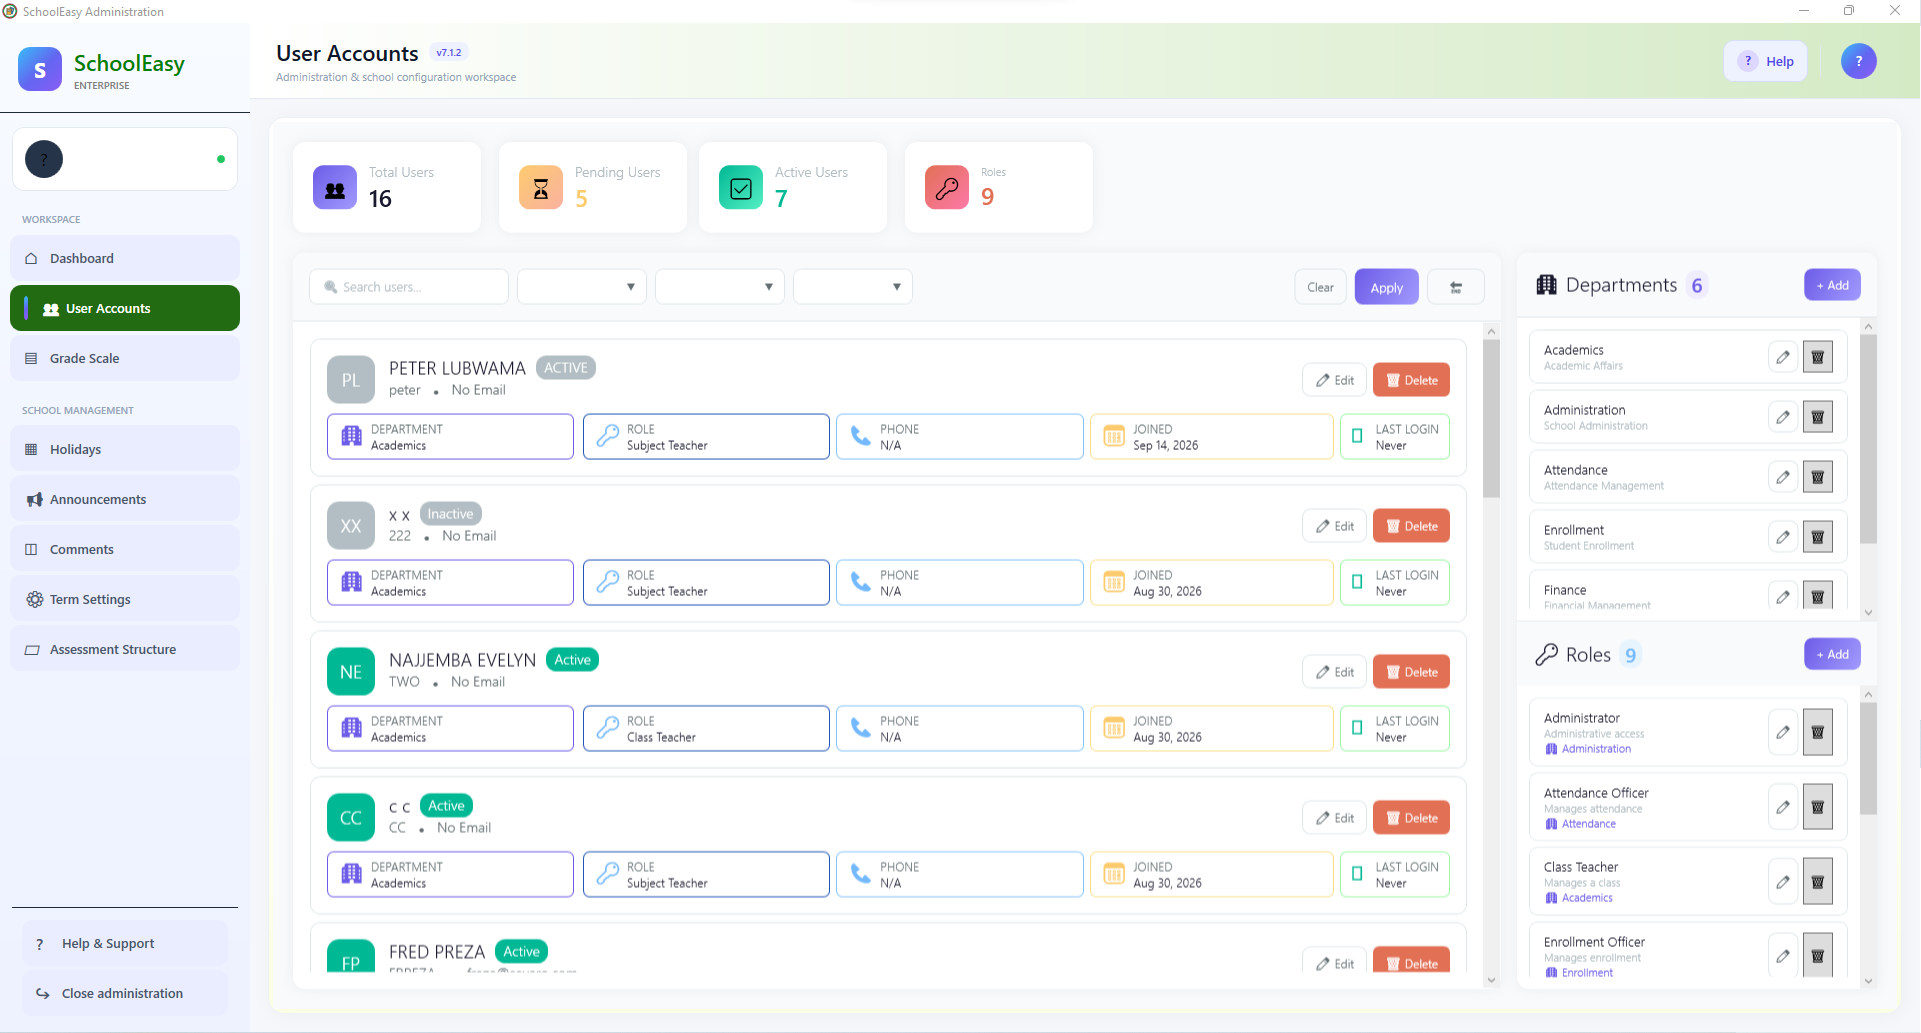
User accounts, departments and roles

Manage who belongs to each school workspace.
SchoolEasy: User accounts, departments and roles Click to enlarge
User accounts, departments and roles · Desktop application

What this window does

The accounts screen shows user status, department, role, contact information and login details. Separate department and role lists sit alongside the user directory. Search and filters help administrators locate an account before editing its assigned access information.

Your workflow

  1. Search or filter the user directory.
  2. Review the selected user's status, department and role.
  3. Use the account editor to apply the intended changes.
Back to workflow navigation ↑

Holidays and school events

Maintain the dates that affect school availability.

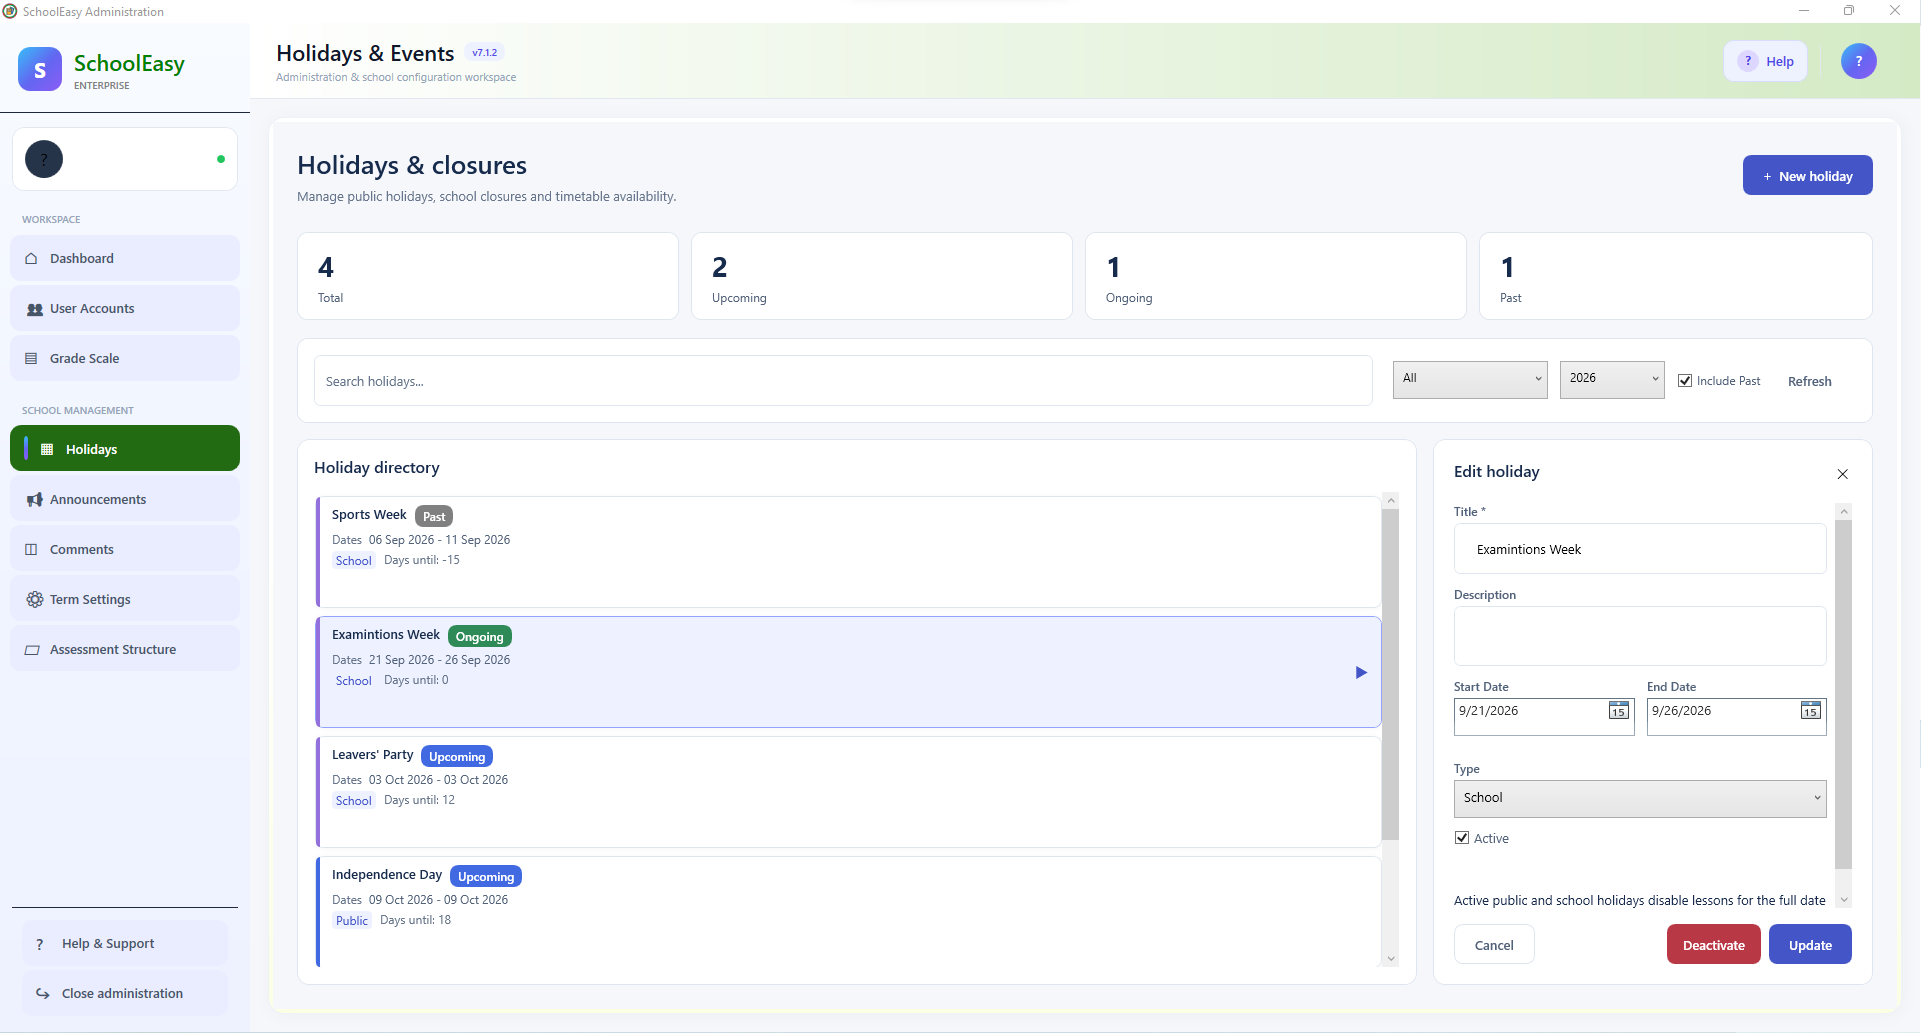
SchoolEasy: Holidays and school events Click to enlarge
Holidays and school events · Desktop application

What this window does

The holiday directory lists upcoming, ongoing and past events. Its editor captures title, description, date range, type and active status. Active public and school holidays affect lesson availability across their dates, connecting calendar management with timetable planning.

Your workflow

  1. Find an event or create a new holiday.
  2. Set the correct date range, type and active status.
  3. Save the event and review the affected timetable dates.
Back to workflow navigation ↑

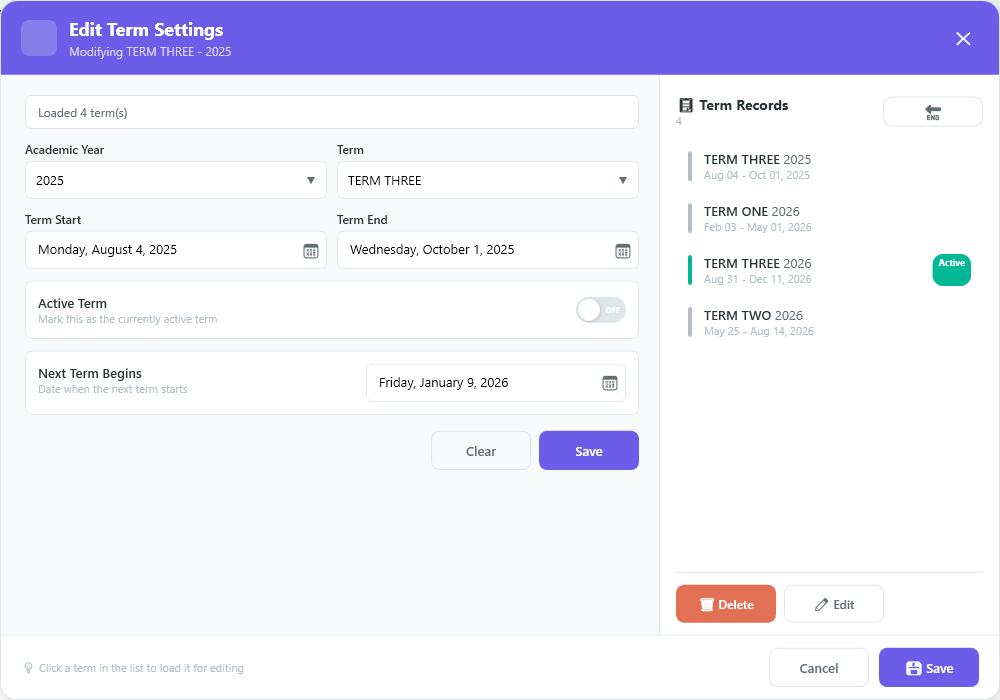
Academic term settings

Define term dates and the active academic period.

SchoolEasy: Academic term settings Click to enlarge
Academic term settings · Desktop application

What this window does

The term editor stores the academic year, term, start and end dates, active-term flag and next-term start date. A records list makes existing periods visible while editing, helping staff establish the calendar context used throughout the application.

Your workflow

  1. Select or create the appropriate term record.
  2. Check the academic year and all term dates.
  3. Set the intended active period and save.
Back to workflow navigation ↑
WORKFLOW / IDENTITY

Student identity

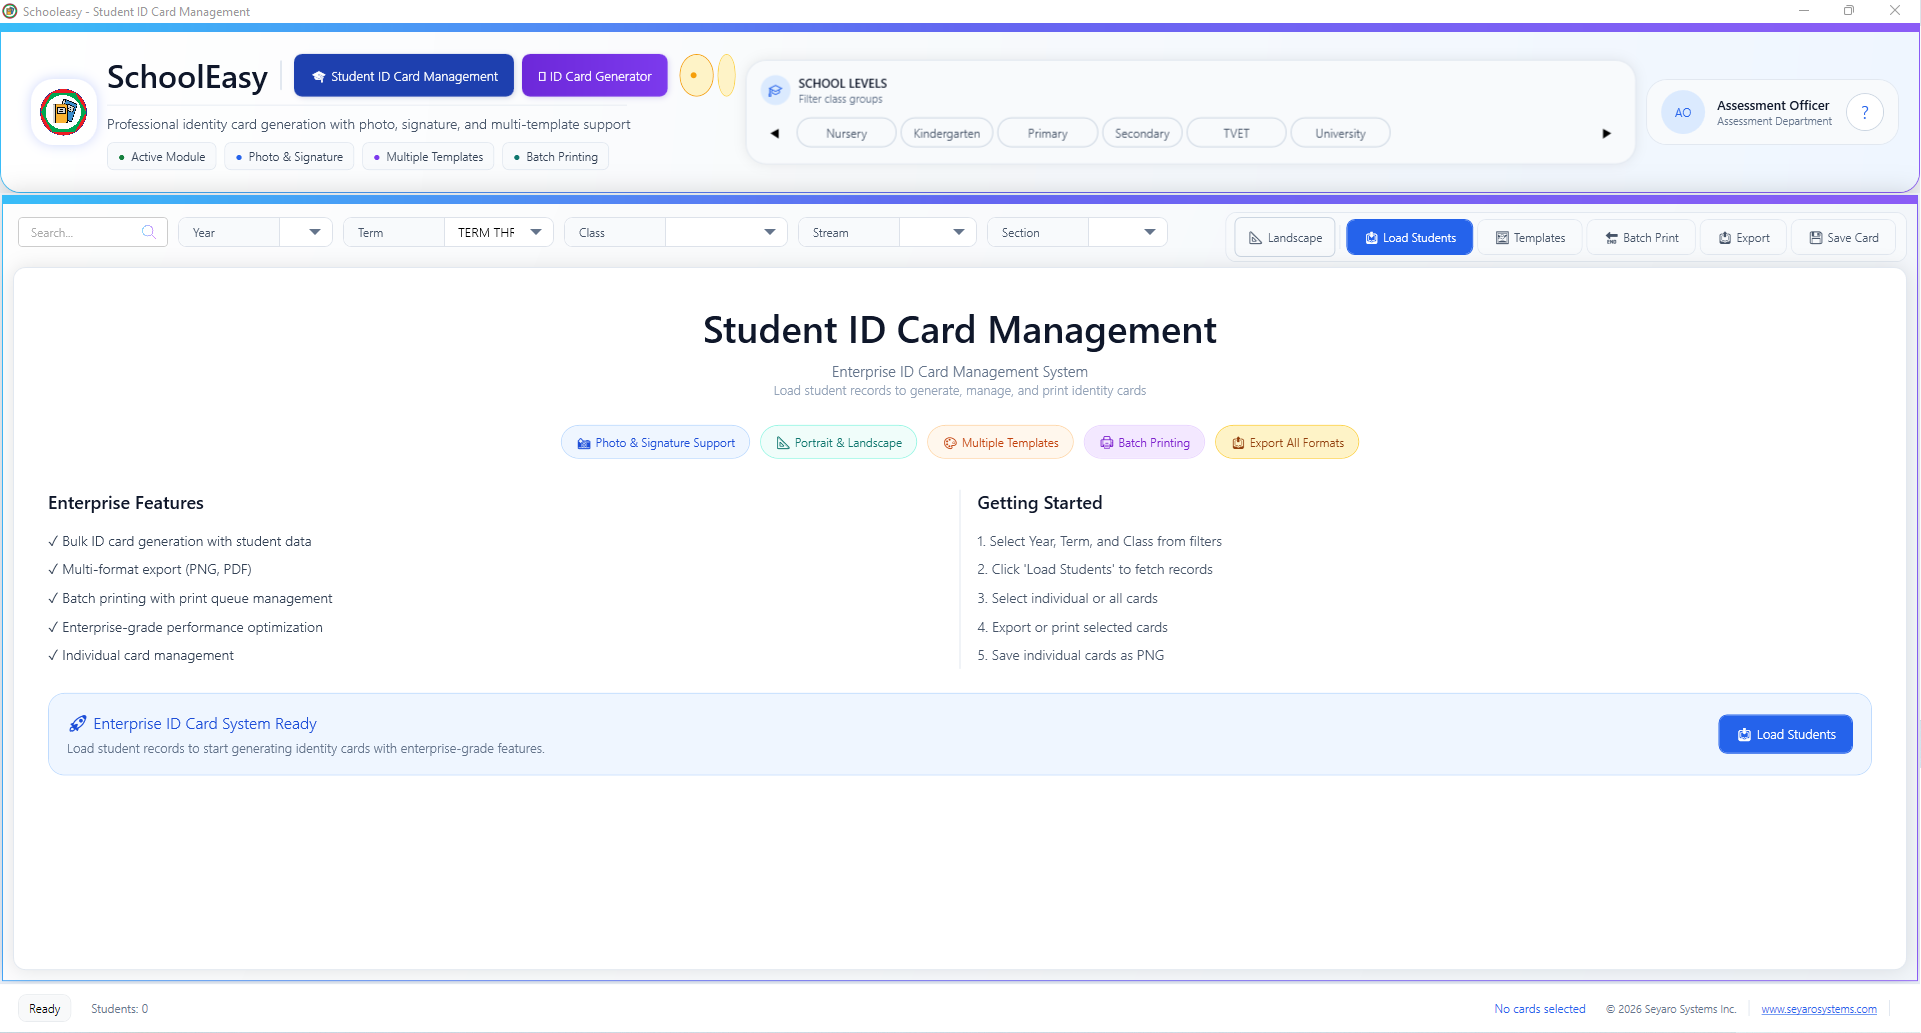
Student ID card workspace

Prepare student records for identity card production.

SchoolEasy: Student ID card workspace Click to enlarge
Student ID card workspace · Desktop application

What this window does

The starting screen explains the ID workflow and provides filters for year, term, class, stream and section. The module presents photo and signature support, portrait and landscape layouts, templates, batch printing and export actions.

Your workflow

  1. Set the filters and load the required students.
  2. Choose the template and card orientation.
  3. Select the cards to preview, print or export.
Back to workflow navigation ↑

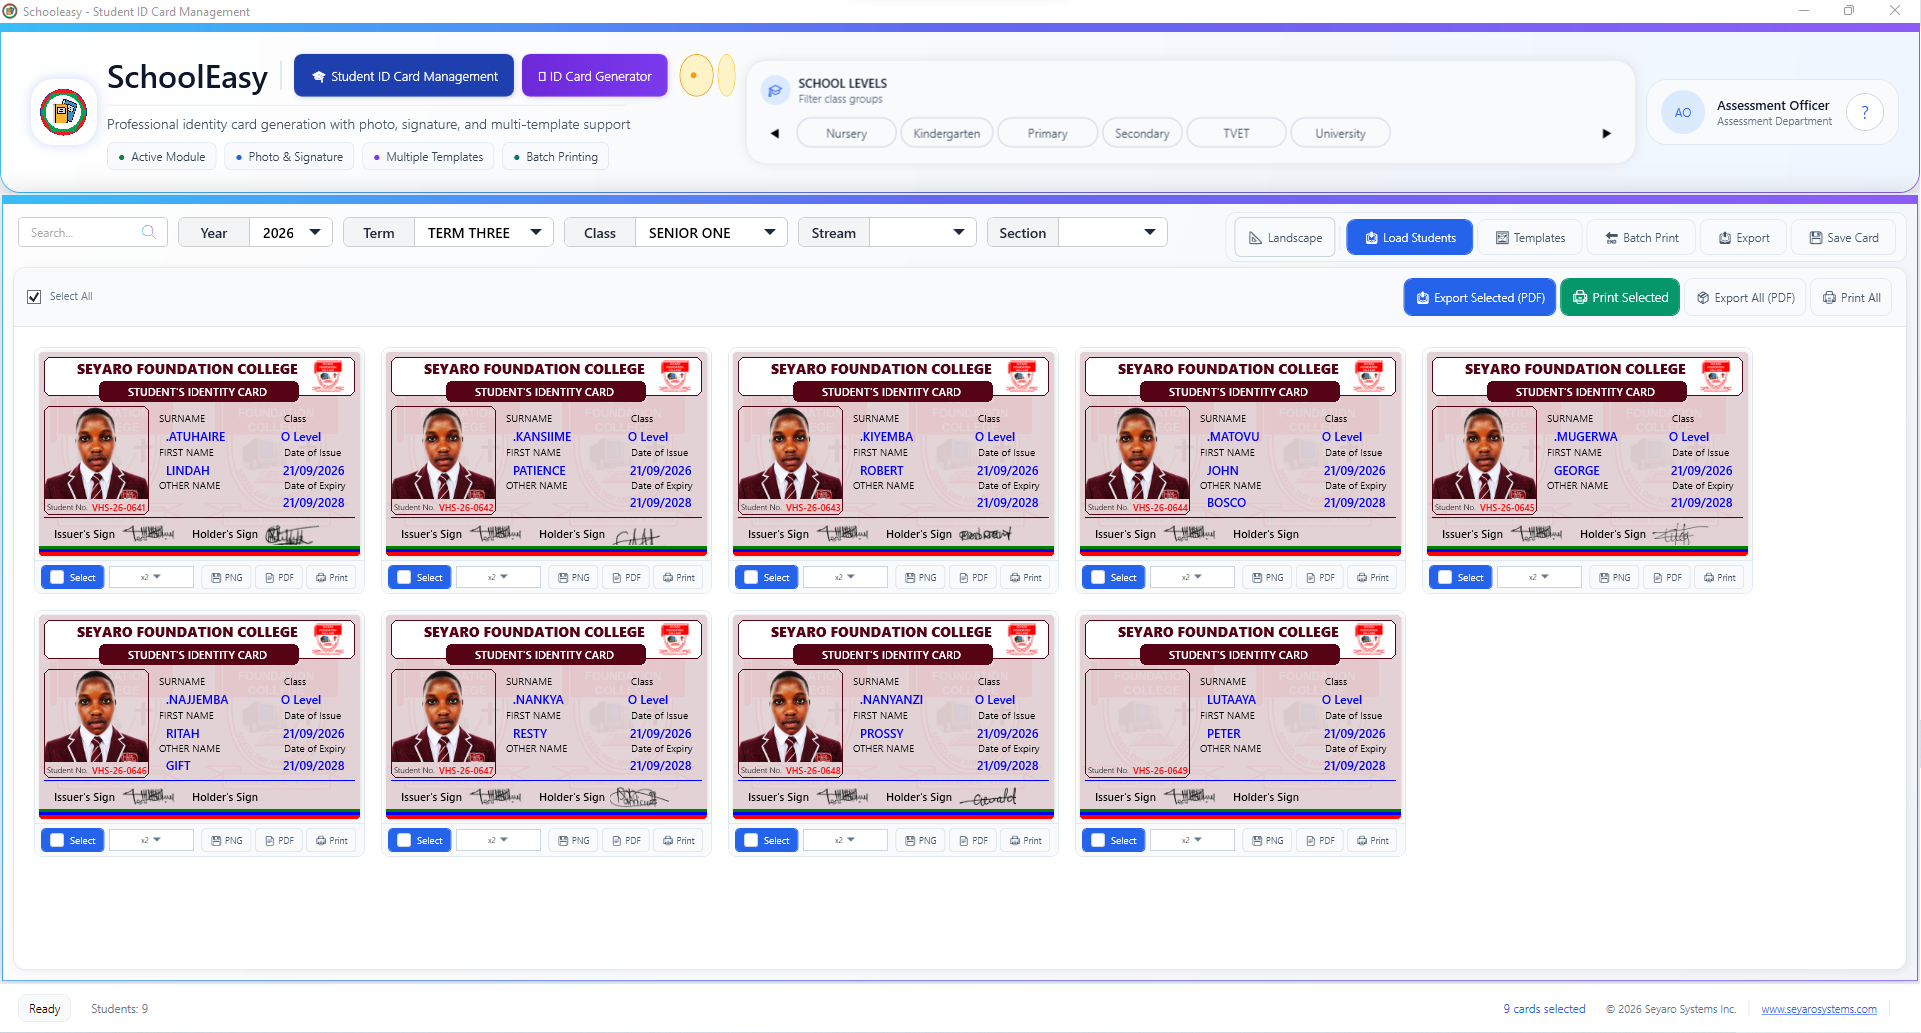
Landscape ID card preview and batch output

Review student cards before printing or exporting.

SchoolEasy: Landscape ID card preview and batch output Click to enlarge
Landscape ID card preview and batch output · Desktop application

What this window does

The loaded gallery shows landscape identity cards with student photographs and identification details. Individual selection and batch actions let staff choose which cards to produce. PDF export and print controls support selected cards or the full loaded set.

Your workflow

  1. Inspect the loaded cards for correct details and photos.
  2. Select individual cards or the complete group.
  3. Print or export the reviewed selection.
Back to workflow navigation ↑
YOUR SCHOOL. YOUR CONNECTION.

Start locally. Connect across campuses.

Choose the setup that fits your team today, with room for your next stage of growth.

01 / LOCALHOST

One computer

Run the application with a local database for a standalone school workspace.
02 / LAN

One school network

Connect desktop and Android users over your local network without internet.

03 / CLOUD & WAN

Remote, with continuity

Use a remote database, with automatic switching to localhost during network loss and synchronization when the connection returns.

04 / ENTERPRISE

Multiple branches

Plan centralized operations for institutions with multiple campuses or tens of thousands of records, including primary and secondary operations.

Start with the free version. The complete application is free for unlimited use with a maximum of 100 records. Try Cloud/WAN with unlimited users for 30 days. Paid versions and costs are detailed on the pricing page.
Compare plans
YOUR NEXT STEP

Put SchoolEasy to work.
Explore available installers and release history, or speak with us about the right deployment for your school.